UART
The phyCORE-AM65x is configured by default to use UART1 (ttyS3) for console input and output over the Carrier Board’s X16 connector using an on board FTDI device. This FTDI device also provides access to UART2 (ttyS4) through the same connector.
The connector X14 allows for the use of a General Purpose (GP) UART (ttyS1) which is translated to RS-232 levels. This guide will show you how to send serial data over this General Purpose UART.
UART devices
The four UART interfaces will show up in Linux as the corresponding devices:
Hardware Interface |
Sysfs Path |
|---|---|
WKUP_UART0 |
/dev/ttyS0 |
MCU_UART0 (aka GP UART) |
/dev/ttyS1 |
UART0 |
/dev/ttyS2 |
UART1 |
/dev/ttyS3 |
UART2 |
/dev/ttyS4 |
Requirements
RS-232 to USB adapter cable
D-sub 9 ribbon cable (included in the phyCORE-AM65x development kit)
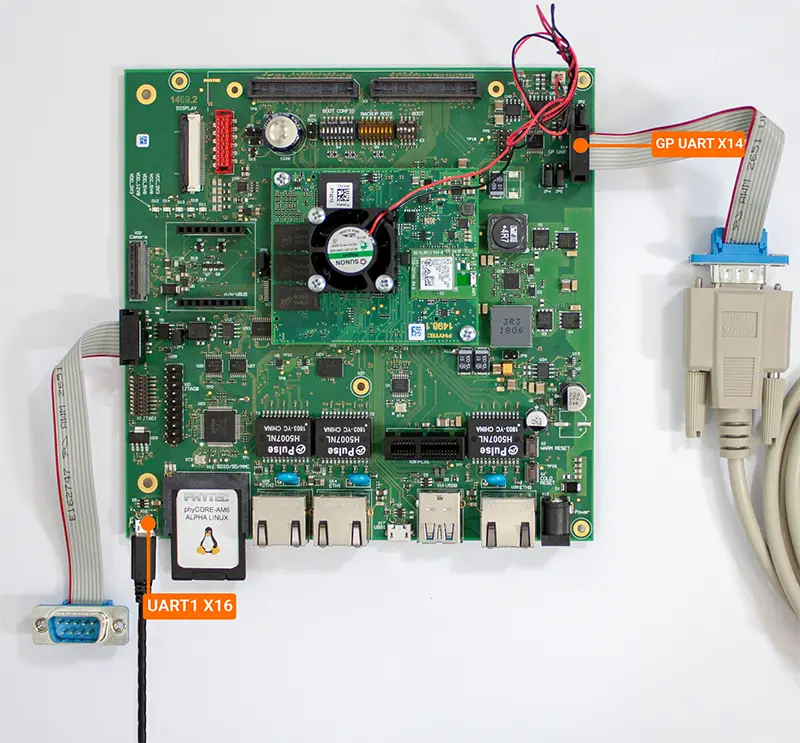
UART1
Connect the D-sub 9 ribbon cable at the X14 connector. (Red line indicates Pin 1)
To send console data over GP UART, connect the RS-232-USB adapter cable between the Host PC and the D-sub 9 ribbon cable on the kit.
Power on the phyCORE-AM65x development kit. Your console emulator will have access to a new serial port.
Open a new console configured for this port
Baud rate of 115200; Data 8 bit; parity none; Stop 1 bit: Flow none
Using the console connected to the default UART1 interface (the original terminal session between the Host PC and development kit via the micro-USB connector X16) enter the following:
Target (UART1 Linux Console)stty -F /dev/ttyS1 115200 echo 'Testing GP UART!' > /dev/ttyS1
You should see ‘Testing GP UART!’ output to the GP UART serial console that was just opened. If not, check the USB serial port settings on the host computer and ensure that it is configured for 115200 baud rate and assigned to the correct serial port.
Now to receive messages in the reverse direction (from the GP UART console) enter the following:
Target (UART1 Linux Console)cat /dev/ttyS1
Now type something into the GP UART console and hit enter. It should output to the UART1 console.
UART2
You may have noticed 2 COM ports becoming available when first connecting your phyCORE-AM65x development kit to your Host Machine. This is because the FTDI device takes in 2 UART signals from the SOM and makes them both available over this single USB connection. This part of the guide will demonstrate basic functionality of UART2 (ttyS4).
Without connecting any additional cables to the AM65x development kit, open a new serial terminal.
The COM port for this second connection will be 1 greater than the one used for your default Linux console. ie, if your UART1 Linux console (the one you used to login as root) is COM port 19, this second port should be configured to use COM port 20.
Using the console connected to the default UART1 interface (the original terminal session between the Host PC and development kit via the micro-USB connector X16) enter the following:
Target (UART1 Linux Console)stty -F /dev/ttyS4 115200 echo 'Testing UART2!' > /dev/ttyS4
You should see ‘Testing UART2!’ output to the UART2 serial console that was just opened. If not, check the USB serial port settings on the host computer and ensure that it is configured for 115200 baud rate and assigned to the correct serial port.
Now to receive messages in the reverse direction (from the UART2 console) enter the following:
Target (UART1 Linux Console)cat /dev/ttyS4
Now type something into the UART2 console and hit enter. It should output to the UART1 console.
Enable UART2 as a Serial Console
To enable UART2 as an additional console in Linux, run the following commands. Note that this setting will persist between boots but will not affect the default console in U-Boot and Linux.
Target (UART1 Linux Console)systemctl enable serial-getty@ttyS4.service systemctl start serial-getty@ttyS4.service
Next, enter the following command to enter a Vi Text Editor session. We will need to modify a security file that determines which UART interfaces allow root access.
Target (UART1 Linux Console)vi /etc/securetty
Edit the contents of the file by adding ttyS4 to the list of Standard serial ports:
Tip
The vi text editor begins in “Command Mode” and you must first hit the ‘i’ key in order to enter “Insert Mode”. Using the arrow keys to navigate, make the necessary changes and then hit ESC to go back to “Command mode”. Now enter “:wq” to write the file and quit.
  ...

  # Standard serial ports
  ttyS0
  ttyS1
  ttyS2
  ttyS3
  ttyS4

  ...