Quickstart
If you have just purchased your phyCORE-AM65x development kit and want to know how to get started, this guide will help you.This guide is specifically written to boot PHYTEC’s Embedded Linux Board Support Package (BSP) on the hardware. The Linux BSP utilizes Yocto and OpenEmbedded as well as TI’s Linux Processor SDK. Follow the guide below to learn how to set up your host machine, connect to the device, and get started with your development.
Basic Evaluation Requirements
This Quickstart guide walks through booting the phyCORE-AM65x development kit into Linux and how to establish a console session with it using a Windows Host Machine. Host system requirements are minimal for basic serial communication, and for the purposes of this Quickstart, any modern computer could be used. PHYTEC recommends using a native Windows environment to establish serial communication with the development kit and leaving the bulk of development tasks for a dedicated Ubuntu 18.04 build server or Virtual Machine.
Tip
Host system requirements for the more process-intense development tasks are detailed in the BSP Development guide, but you won’t need those Host system requirements to follow this Quickstart or to follow the Interface Guides.
Requirements
All PHYTEC development kits ship with the necessary cables to get started. For this kit you should have received:
12V 2A Power Supply
SD Card with phyCORE-AM65x-ALPHA4 Linux bootable image
Standard CAT5e or CAT6 Ethernet Cable
USB A-Male to Micro-B Micro USB Cable
2x5 header to DB-sub 9
You will also need a host/development machine to communicate with the hardware. The requirements for your machine depend on your use case, a couple recommendations are provided below.
For Basic Evaluation
If you simply want to turn the kit on, communicate over a serial shell, and run basic commands on the device, your host system can vary. In this environment it’s understood that you are not compiling code on your host machine to run on the target, therefore requirements are minimal.
Windows |
Linux |
macOS |
|
|---|---|---|---|
Tested Operating System Version |
Windows 10 |
Ubuntu 16.04 |
Mojave |
Machine RAM |
>4GB |
>4GB |
>4GB |
Machine CPU |
>2 cores |
>2 cores |
>2 cores |
Free Disk Space |
>5GB |
>5GB |
>5GB |
For BSP or Application Development
If you are designing a custom carrier board and need to make boot-loader and kernel level changes, the host machine must meet the criteria below. In this environment you will be able to build the software BSP and develop custom Yocto meta layers.
Linux |
|
|---|---|
Tested Operating System Version |
Ubuntu 16.04 64-bit |
Machine RAM |
>4GB |
Machine CPU |
>4 cores |
Free Disk Space |
>100GB |
Note
Virtual machine platforms such as Virtual BOX, VMWare, and Docker can be used to host your development environment. Certain SD-card readers, USB serial adapters, and other peripherals have proven to be unstable when working with Virtual Machines. Please keep this in mind or contact PHYTEC Support for a recommendation.
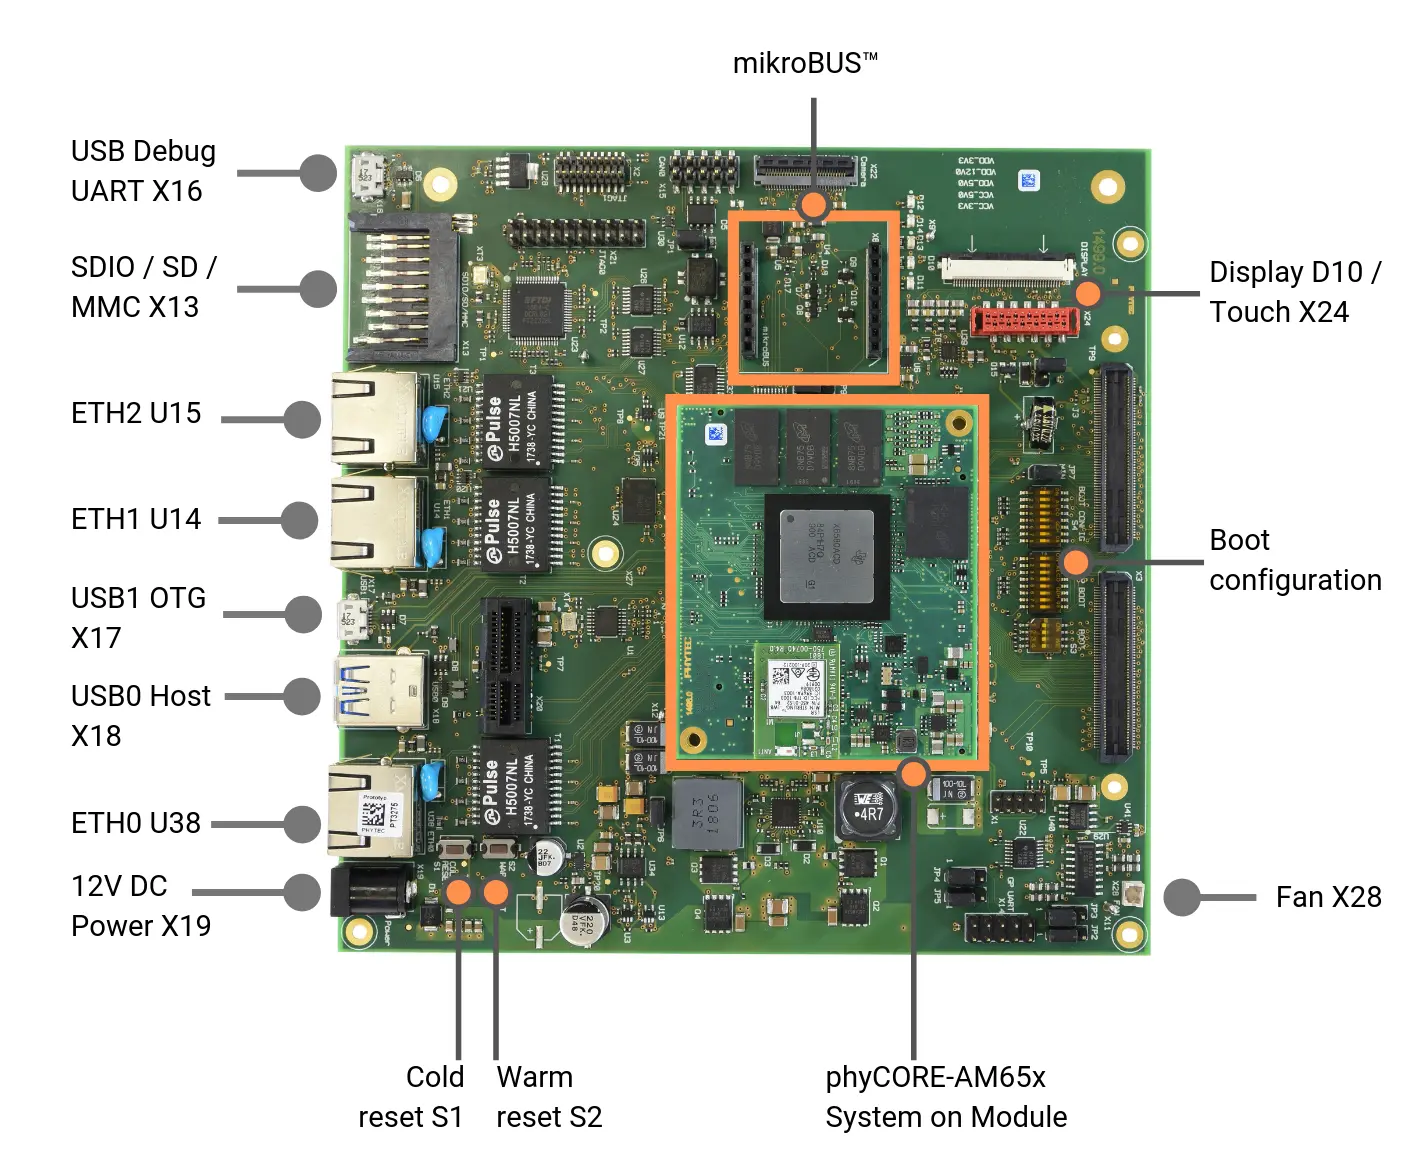
Prepare the Hardware
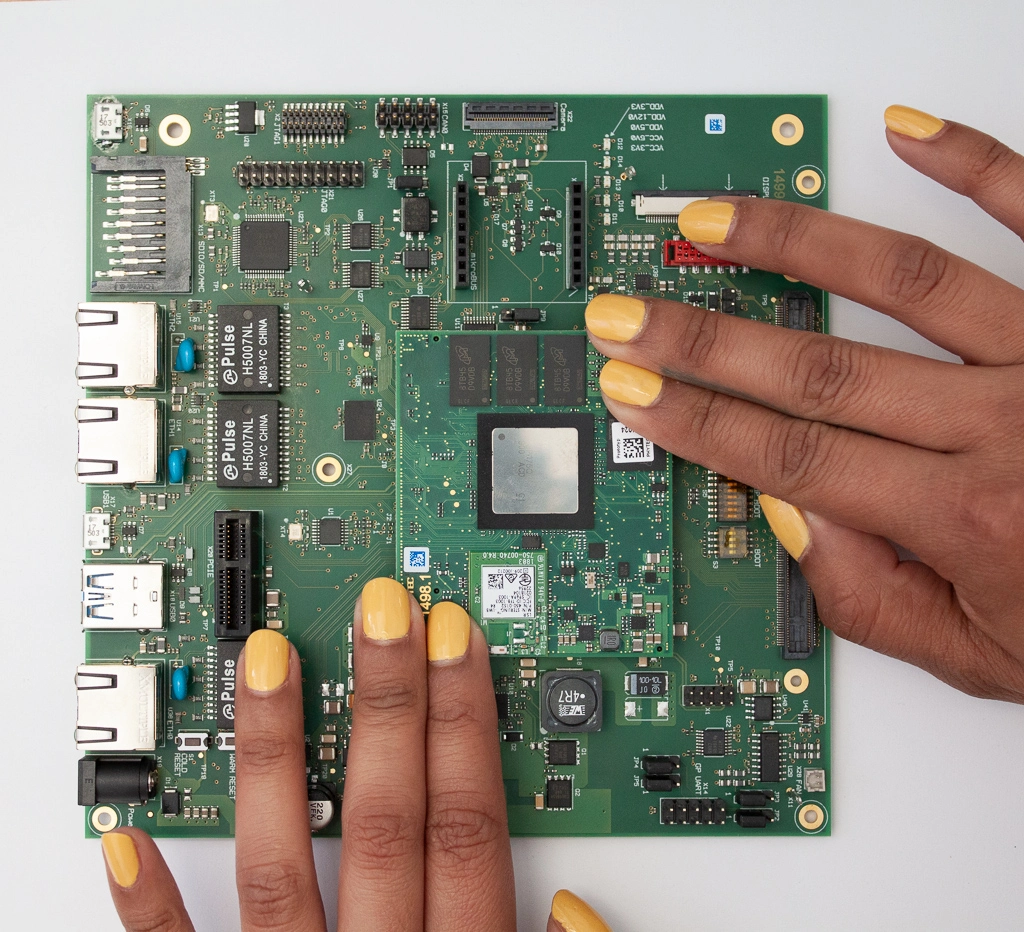
Before turning on the hardware, ensure the phyCORE-AM65x SOM is properly mounted to the Carrier Board.
Press firmly down on the SOM with equal pressure on both sides
Insert the SD card (phyCORE-AM65x Linux BSP) included with your kit.
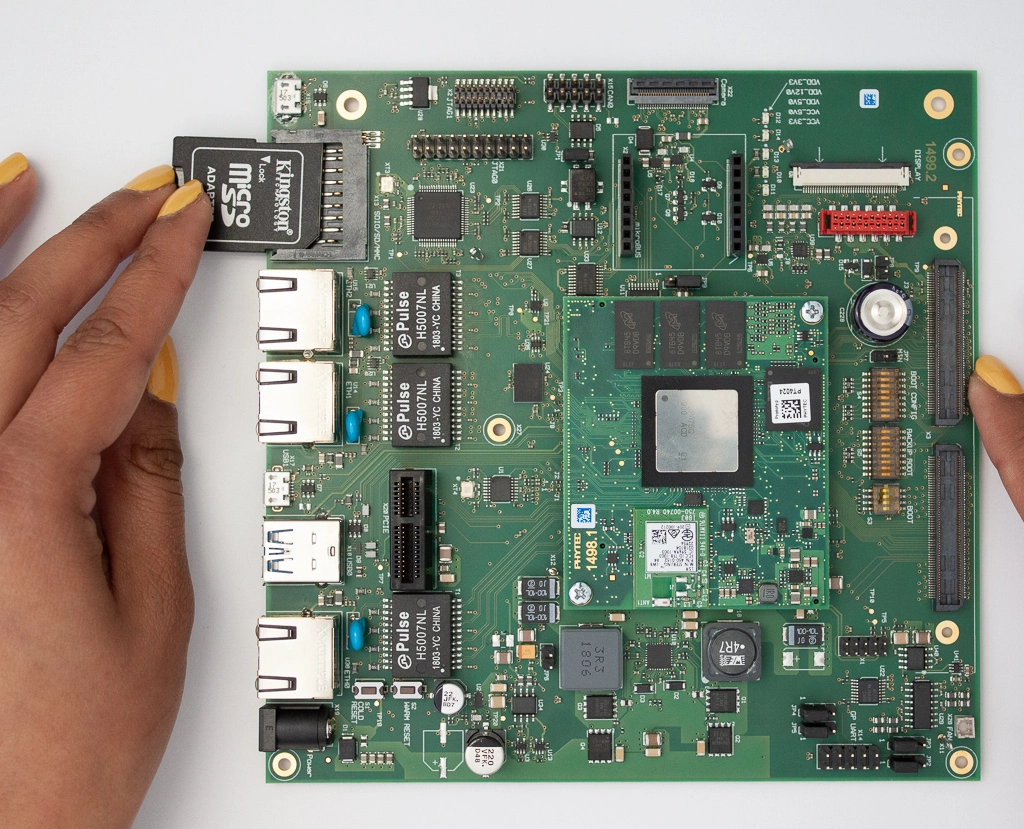
Note
Your development kit comes with this SD card. If your kit does not have an SD card or your existing card has been corrupted you can follow the instructions for how to make a new SD card here: Create a bootable SD Card .
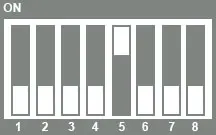
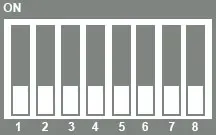
Development kits are by default set to boot from SD Card. Locate the boot switches on the Carrier Board and verify the switches are set as follows:


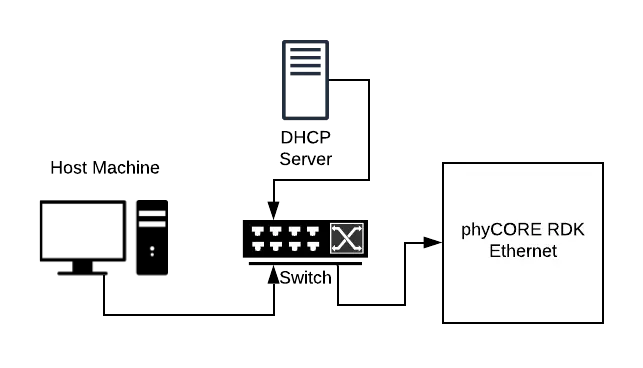
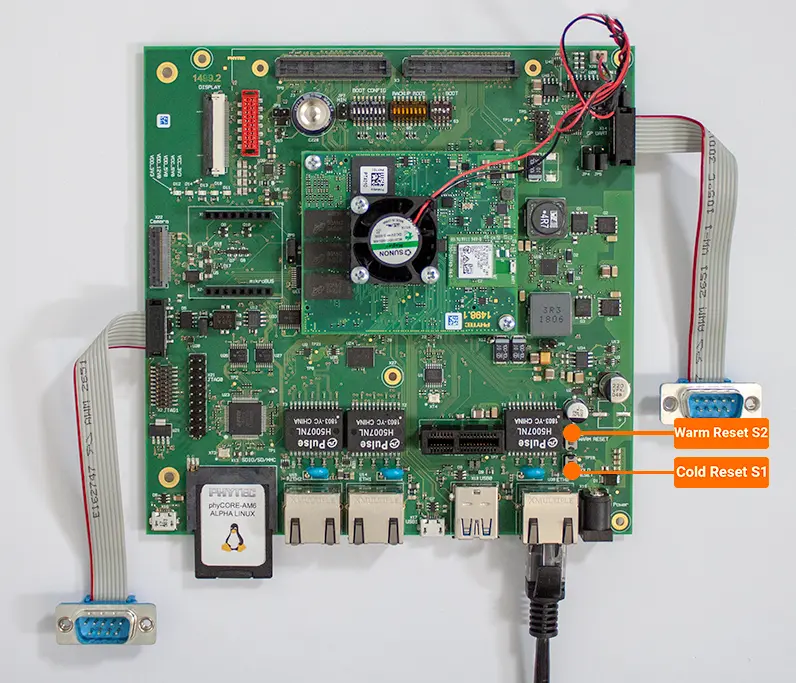
Connect the Peripherals
You only need to make a few connections to get up and running with your development kit. First you will make all the connections between the development kit and your computer, then in following steps, we will guide you on how to set up your serial terminal and establish a console session with the phyCORE-AM65x SOM.
Cable |
Development Kit |
Connect To |
|---|---|---|
Ethernet Cable |
Connect to X29 ETH0 |
An Ethernet switch that is connected to the same network as your host/development machine. Ensure your network has DHCP enabled. See the diagram to the right. |
USB |
Connect to X19 |
Your host/development machine’s USB A port |
Power Adapter |
Connect to X16 |
Wall power outlet |
Set Up a Serial Terminal
If you don’t already have a terminal application set up on your host machine, we have provided a few different methods below depending on your host operating system.
Windows 10
Determine the COM port associated with the development kit:
Open Device Manager
Expand Ports (COM & LPT)
You should see two “USB Serial Port” devices that correspond to UART1 and UART2 on the development kit.
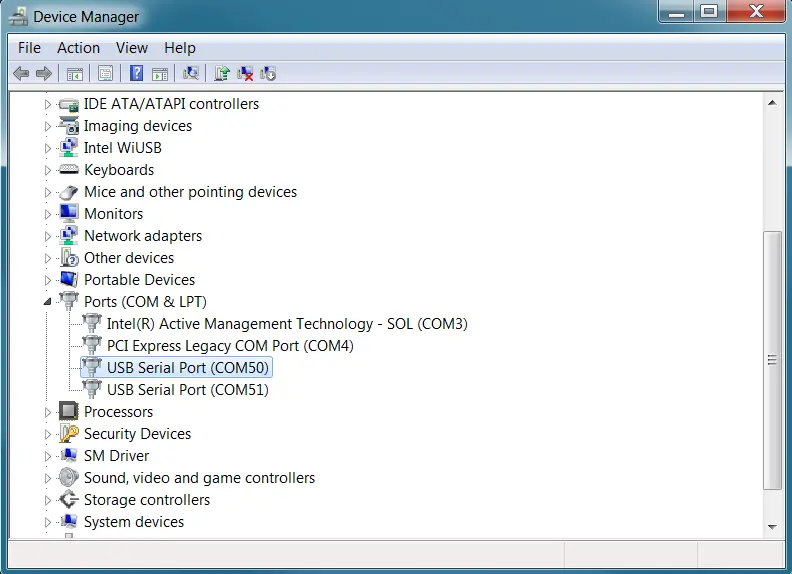
The lowest number COM, of the two associated with your development kit, is the correct choice when setting up your terminal session in the steps below. Remember this port number.
If you are having trouble determining which COM port to use:
Unplug/re-plug the USB cable from your computer and see what disappears/reappears in Device Manager.
Check Other Devices
Configure your Terminal Session:
Download or open the terminal emulator of your preference. There are many options such as PuTTY and TeraTerm.
Configuration of your terminal will vary slightly depending on the terminal emulator software you are using.
Specify that you will connect using “Serial” to the COM port (found in previous step)
Other parameters include: 115200 Baud, 8 bit data, no parity bits, 1 stop bit and no flow control.
Note
You might not see anything in your serial terminal once it opens. That is OK, if the board was powered on for more than a minute while setting up the terminal session, then it has already booted. Simply press ‘enter’ in the terminal to get a new line OR press the “Cold Reset” button (S1). Otherwise, make sure your hardware is plugged in and powered on and the correct COM port has been selected.
MacOS MoJave
On your host machine open up a Terminal and type the following command to list all of the USB serial devices
ls -ltl /dev/cu.usb*
Verify the output is similar to:

Start a serial terminal session using screen. From the list choose the USB device that ends in ‘A’. In this case, that will be /dev/cu.usbserial-00002014A .
Now type the following command:
screen /dev/cu.usbserial-00002014A 115200
The ‘115200’ is the default baud rate.
Note
You might not see anything in your serial terminal once it opens. That is OK, if the board was powered on for more than a minute while setting up the terminal session, then it has already booted. Simply press ‘enter’ in the terminal to get a new line OR press the “Cold Reset” button (S1). Otherwise, make sure your hardware is plugged in and powered on and the correct COM port has been selected.
Boot the Board
If you have not already powered on the development kit, you can do this now.
The board will begin booting and the output will look similar to the one below:
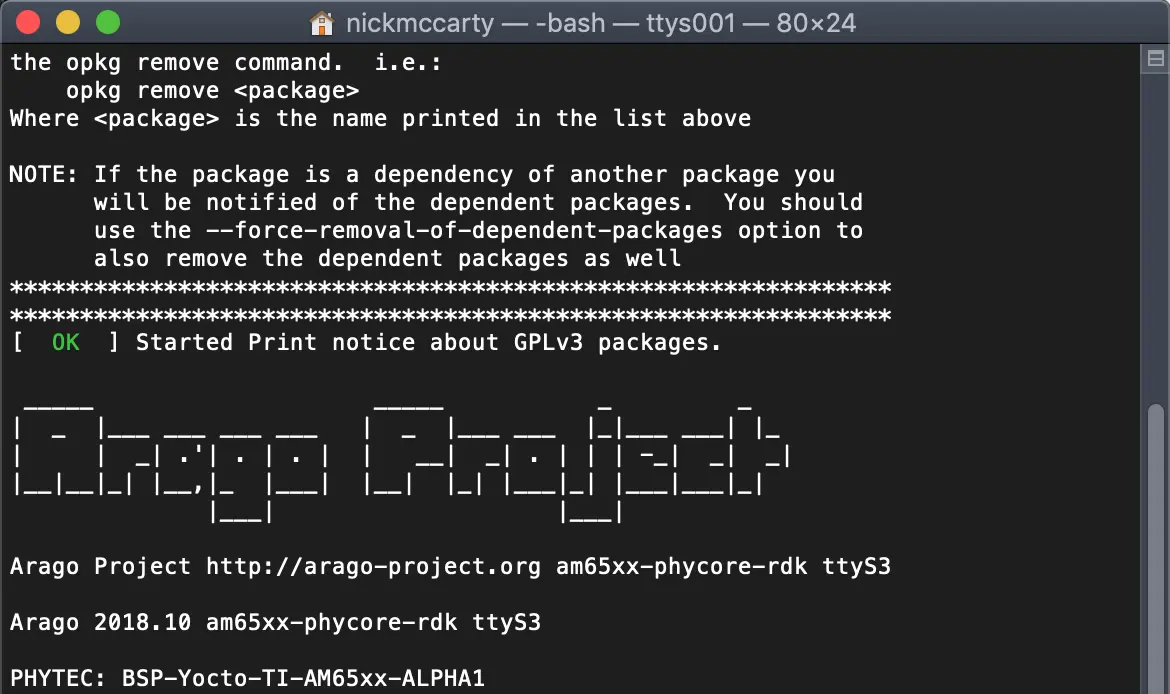
If you are not getting any output and have already plugged in power, you might need to reset the board. You can press the “Cold Reset” button (S1) to reset the board:
On your serial console you should reach a login prompt.
Expected OutputPHYTEC: BSP-Yocto-TI-AM65xx-ALPHA4 am65xx-phycore-rdk login:
Login using root (no password is required).
That is it, now you are at a Linux prompt and can start working with the development kit. Check out Interface Guides articles for ideas of what to do next.
Tip
You may find that commands and text wrap over themselves if they extend too far on a single line in your Terminal Window. To improve usability and to prevent text from wrapping over itself use the following command:
shopt -s checkwinsize && resize
Turn Off the Device
Before removing power from the development kit, you must make sure that the operating system has safely shutdown.
To initiate a shutdown run the following command:
Target (Linux)poweroff
Once you have seen Reached target Shutdown it is safe to remove the power from the development kit:
Expected OutputReached target Shutdown.
Completely remove power from the board by unplugging the power cable
Warning
The command “poweroff” suspends all software running on the processor (including fan termination) but inadvertently causes a kernel panic. This kernel panic causes the Power Management IC to not properly shut down and keeps the SOM and Carrier Board powered if the power supply is left connected. This can cause the processor to overheat and potentially damage the board.
What’s Next?
Find the Hardware Manual on the phyCORE-AM65x product page
Warning
Known Issue
A kernel panic inadvertently happens after the “poweroff” command. This is planned to be fixed in the next TI SDK BSP release.