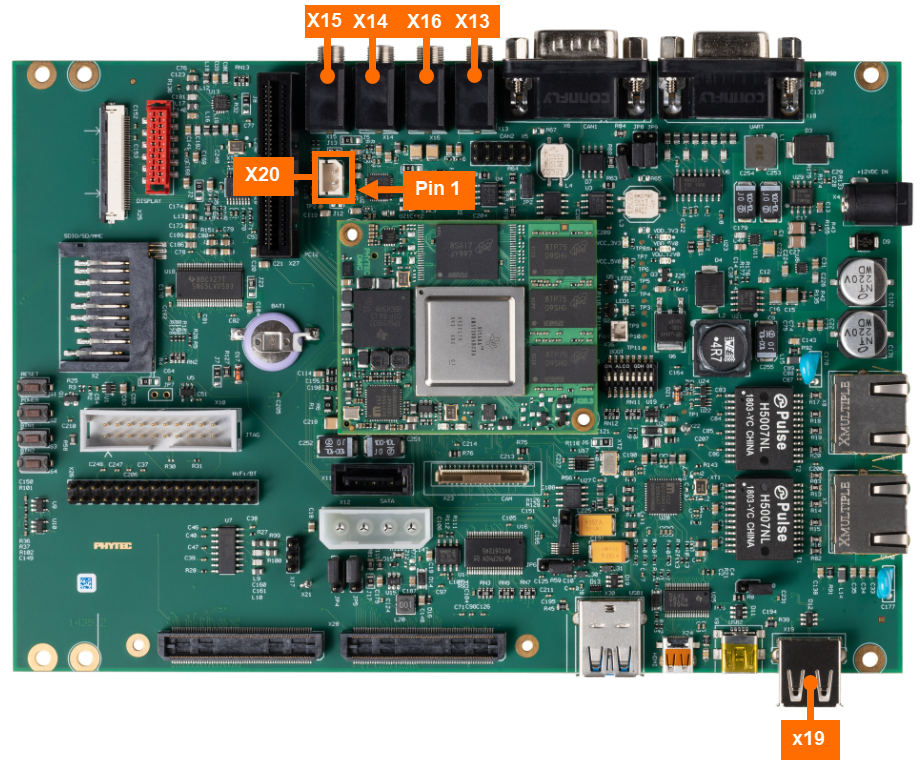
Audio
The phyCORE-AM57x offers three different headers to access the audio interface: 3.5 mm audio jacks, a 2-pin header, and USB. This guide will demonstrate how to play and record audio using the phyCORE-AM57x development kit via USB. For additional information about the phyCORE-AM57x Audio, please section 29 in the Hardware Manual.
Location |
Description |
Header Type |
|---|---|---|
X13 |
Headset Output |
3.5mm Jack |
X14 |
Line In |
3.5mm Jack |
X15 |
Line Out |
3.5mm Jack |
X16 |
Microphone In |
3.5mm Jack |
X20 |
Speaker Out |
2-pin Header |
X19 |
USB2.0 |
USB |
Requirements
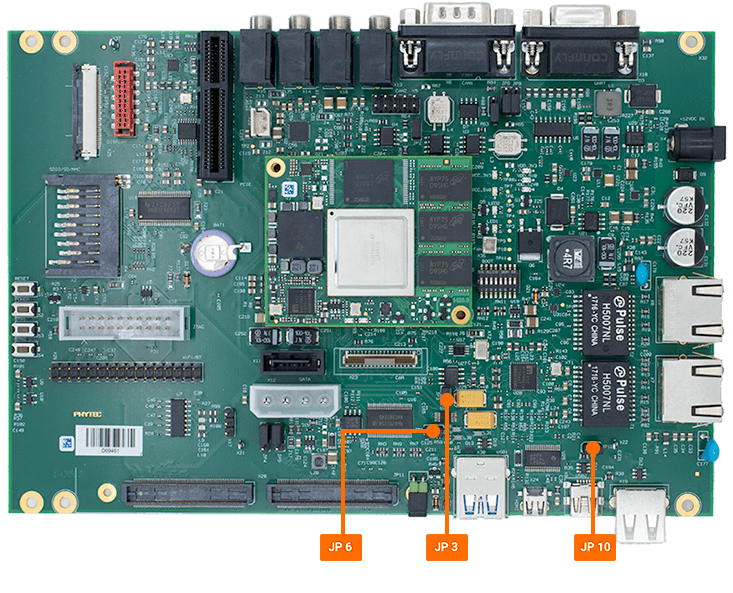
Hardware Setup
With the kit powered off, make sure the jumpers JP3, JP6 and JP10 are closed.
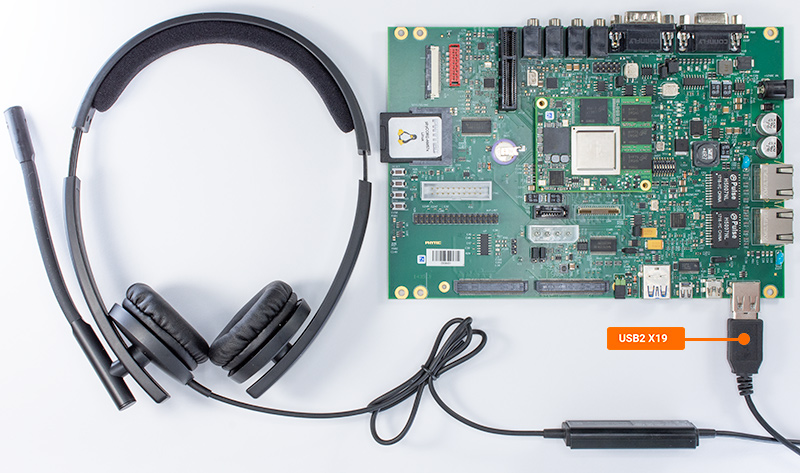
Power the kit back on and plug the headset into the USB2.0 (X19) connector.
After the device is connected, the Linux console will present a similar message as seen below:
Expected Output[ 218.177573] usb 3-1: new full-speed USB device number 3 using xhci-hcd [ 218.640926] usb 3-1: Warning! Unlikely big volume range (=4125), cval->res is probably wrong. [ 218.649521] usb 3-1: [11] FU [Sidetone Playback Volume] ch = 1, val = 0/4125/1 [ 218.745587] input: Logitech Inc Logitech H570e Stereo as /devices/platform/44000000.ocp/488c0000.omap_dwc3_2/488d0000.usb/xhci-hcd.2.auto/usb3/3-1/3-1:1.3/0003:046D:0A56.0002/input/input2 [ 218.827835] hid-generic 0003:046D:0A56.0002: input: USB HID v1.11 Device [Logitech Inc Logitech H570e Stereo] on usb-xhci-hcd.2.auto-1/input3
Verify Device Connection
Verify that the USB device was recognized by the kit.
Target (Linux)lsusb
You will see the logitech headset in the output:
Example Outputroot@am57xx-phycore-kit:~# lsusb Bus 004 Device 001: ID 1d6b:0003 Bus 003 Device 003: ID 046d:0a56 Logitech, Inc. Bus 003 Device 001: ID 1d6b:0002 Bus 002 Device 001: ID 1d6b:0003 Bus 001 Device 001: ID 1d6b:0002
Playing Audio
First copy an audio file onto the development kit. This example will use the wget command, which requires a network connection. Discover more mediums that can assist in copying files by following the guide Copying Files to the Device.
Use the following command to download an audio file to the development kit.
Target (Linux)wget https://www2.cs.uic.edu/~i101/SoundFiles/ImperialMarch60.wav
Note
You can find more audio files here.
Play the audio file.
Target (Linux)aplay -Dsysdefault:CARD=Stereo ImperialMarch60.wav
Capturing Sound
Audio Mixer Settings
Control volume and various other audio setting using the ALSA soundcard driver’s ‘amixer’ or ‘alsamixer’ commands.
Changing Settings via GUI
The command ‘alsamixer’ allows the user to adjust, volume, soundcard devices and many other settings with an interactive GUI. This command is recommended for users who are note familiar with ALSA.
Use the following command to access the settings GUI.
Target (Linux)alsamixer
A GUI interface will pop up that can be navigated with the arrow keys.
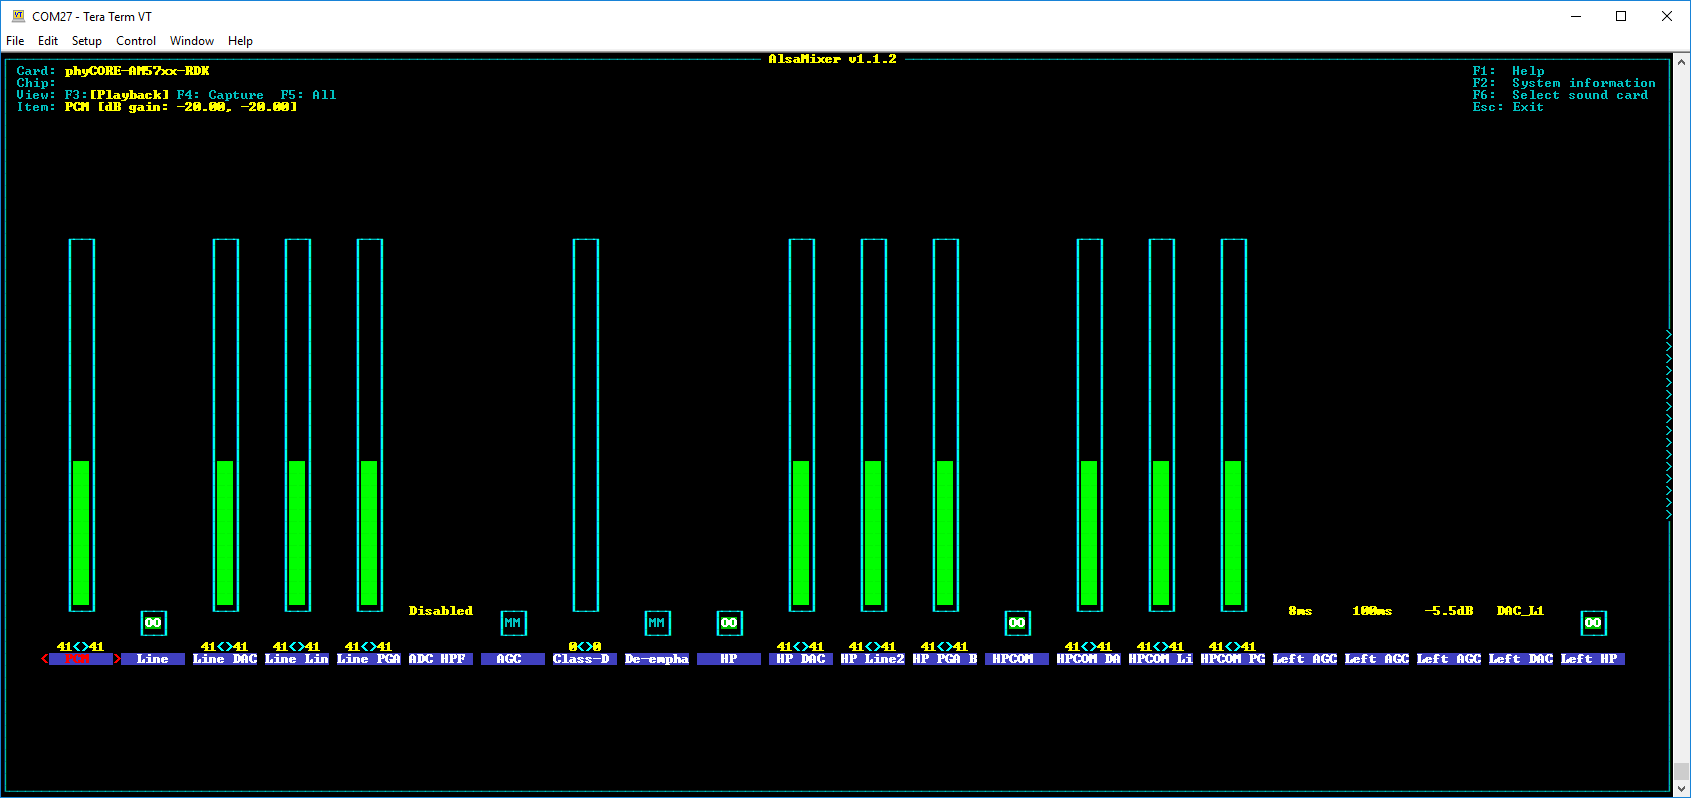
Press “F6” to select the device.
Exit GUI by pressing the “esc”.
It is a good practice to save the mixer settings found to be good and reload them after every boot.
Target (Linux)alsactl -f board.aconf store
When you decide to reboot the development kit, run the following command to restore mixer settings.
Target (Linux)alsactl -f board.aconf restore
Changing Settings via Terminal Commands
The command ‘amixer’ allows the user to adjust, volume, soundcard devices and many other settings with terminal commands. This command is recommended for users who are familiar with ALSA.
For example, the following command sets the soundcard’s left line input volume to 80% and right line input to 40%, unmute it, and select it as a source for capture (recording).
Targetr (Linux)amixer -c 0 sset Line,0 80%,40% unmute cap
To learn more about this tool use the ‘–help’ command to see the various options available
Target (Linux)amixer --help