Camera (MIPI CSI-2)
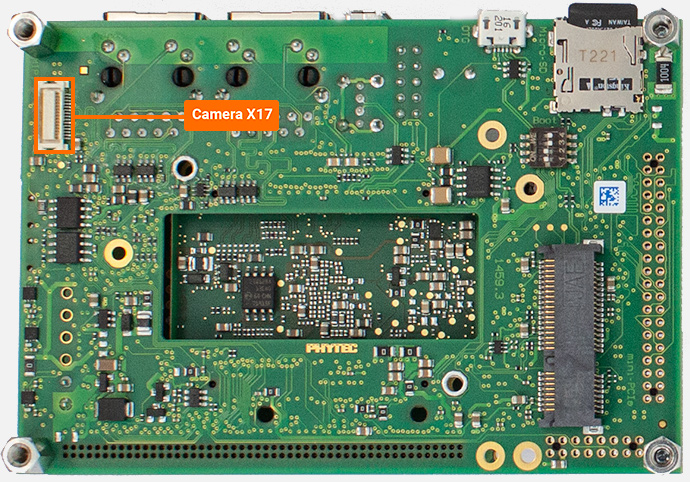
The Camera Serial Interface (CSI) is a specification of the Mobile Industry Processor Interface (MIPI) Alliance. It defines an interface between a camera and a host processor. The phyCORE-i.MX7 development kit has one CSI camera connection at X17. This guide will show you how to connect and take picture with a MIPI CSI-2 camera module.
Requirements
MIPI Camera (LI-OV5640) <https://leopardimaging.com/product/robotics-cameras/cis-2-mipi-modules/mobile-modules/li-ov5640-mipi/li-ov5640-mipi-af/>
MIPI Expansion Module (PEB-AV-06-MIPI)
Contact Sales <https://www.phytec.com/contact/>
CAT5e cable (comes included with the development kit)
See Ethernet guide for setup instructions.
Network switch connected to a DHCP enabled network
Tip
A USB drive could alternatively be used for file transfer to and from the phyCORE-i.MX7
Setting Up the Camera

Power off the kit and remove power.
Connect the MIPI camera to the MIPI expansion module at connector (X2).
Connect the expansion module with the camera attached to the back side of phyBOARD-Zeta at connector X17.
Attach the CAT5e cable to one of the ethernet port.
Power on the development kit and stop in U-boot. Load the device tree overlay required for the parallel camera interface and then boot the board.
Target (U-boot)setenv overlays imx7d-phyboard-zeta-peb-av-06.dtbo boot
Note
For more information about overlays see chapter Configuring the Bootloader.
Taking a Picture
To capture a JPG picture named “smile.jpg”, use the following gstreamer pipeline command.
Target (Linux)gst-launch-1.0 v4l2src num-buffers=1 ! videoscale ! 'video/x-raw,format=(string)YUY2,width=640,height=360' ! jpegenc ! filesink location=smile.jpgTarget (Expected Output)Setting pipeline to PAUSED ... Pipeline is live and does not need PREROLL ... Setting pipeline to PLAYING ... New clock: GstSystemClock Got EOS from element "pipeline0". Execution ended after 0:00:02.443544000 Setting pipeline to NULL ... Freeing pipeline ...
Viewing Picture
This example will use the Secure Copy Protocol (SCP), which requires a network connection. Discover more mediums that can assist in copying files by following the guide Copying Files to the Device.
Use a local network and copy the file from the development kit to your host machine (Ubuntu or Windows).
Connect the development kit to your local network using either ethernet port.
Confirm the development kit’s ethernet IP address (DHCP). For more information on how to change the from a static IP address to a DHCP address, see the Ethernet interface guide.
Target (Linux)ip addr
Transfer the image via Windows Command Prompt or Linux terminal.
Host (Ubuntu or Windows)sudo scp root@<devkit_ip_address>:/root/smile.jpg ./Downloads/
Open your host machine’s Downloads folder. You should see an image named “smile.jpg”.