Copying Files to the Device
There are several ways of transferring files to and from your target device. Please reference the following for some possible methods.
Using Removable Storage Devices
USB
Storage devices formatted with a FAT32 file system, when connected, are automatically mounted to “/run/media/sda1”.
Reformat Flash Drive to FAT32
This process will erase all data on the flash drive. It is highly recommended to back up the contents of your Flash Drive before following these steps.
Connect your Flash Drive to your Windows Host Machine.
Hit the windows key, type “Disk Management” and then hit Enter.
Right click your flash drive and select “Format”

Select FAT32 under File System and then press OK.
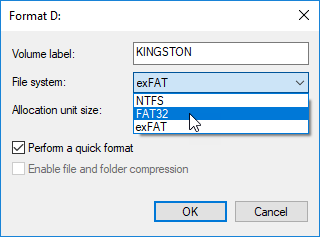
Now right click the device in File Explorer and select Eject to safely disconnect the device from your Host Machine.
USB Host
To verify the mount point of your Flash device using the following command:
Target (Linux)mount
Tip
Pro Tip! Try using this command once before and after connecting the Flash Drive to your hardware. This will make it easy to notice which one is the new one and where it is mounted.
Insert a USB storage device into the USB Type-A connector. The mount point should be sda1 in the directory /run/media/ and this can be confirmed in the printed messages output to the console when the device is registered.
Generate a random 100 MB file to test writing to and from the storage device.
Target (Linux)dd if=/dev/urandom of=test1.file count=100 bs=1M
Copy the file to your storage device:
Target (Linux)cp test1.file /run/media/sda1/ && sync
Copy the file back to the root file system:
Target (Linux)cp /run/media/sda1/test1.file test2.file && sync
To check that the read file is the same as the one that was written, you can use md5sum to compare and verify the data transfer was successful:
Target (Linux)md5sum test1.file && md5sum test2.file
The above command will generate a long and seemingly random string of characters for both files. This long string is called a “hash” and it uniquely identifies the files. If the hash for both files match then you can be confident that both files (down to each bit) are identical.
Expected Outputroot@imx7d-phyboard-zeta-004:~# md5sum test1.file && md5sum test2.file 81ad66df7f773128aef1ec7966180ebf test1.file 81ad66df7f773128aef1ec7966180ebf test2.file
Removing storage devices
Ensure that peripheral devices are unmounted properly before disconnecting to avoid data corruption. Enter the following before disconnecting the storage device.
Target (Linux)umount /dev/sda1
Flashed SD Card (Linux)
In order to copy files to the primary boot media of the phyCORE-i.MX7 development kit you will first have to power it off. Do this in your serial console with the following:
Target (Linux)poweroff
Remove the SD Card and connect it to your Ubuntu Host Machine. You will not be able to place files on the SD Card using Windows because the SD Card is formatted for Linux and Windows doesn’t recognize it.
Drag and drop the file to the rootfs partition of the SD Card using the GUI.
In order to copy files to the SD Card using the Terminal, this can be done with the standard ‘cp’ (copy) command. See the above section utilizing a USB storage device for more information.
The next time you boot your phyCORE-i.MX7 into Linux, using this same SD Card, your file should be present in the filesystem.
Non-flashed SD Card (Storage Device)
When an external SD Card is inserted, it will be mounted automatically and will also be available as /dev/mmcblk0 in Linux when booting from eMMC.
Note
In order to make the microSD connector available you will have to first boot from eMMC.
Write to the SD Card
You can use basic Linux commands to create and write files to the SD card. Below is an example:
echo "Hello World" > ~/test.txt
cp ~/test.txt /run/media/mmcblk0p1
Read from the SD Card
To read what was just written to the SD card in the previous example, use the following command:
cp /run/media/mmcblk0p1/test.txt ~/read.txt
To check that the file read (read.txt) is the same that was written (test.txt) you can use md5sum to compare and verify the data transfer was successful:
md5sum ~/test.txt && md5sum ~/read.txt
The above command will generate a long and seemingly random string of characters for both files. This long string is called a “hash” and it uniquely identifies the files. If the hash for both files match then you can be confident that both files (down to each bit) are identical.
Unmount the SD Card
Before unplugging the device from the development kit, make sure to unmount it. You can do this by running the following command:
umount /run/media/mmcblk0p*
Using a Network
Note
Before being able to transfer files using network protocols, you will first need to establish a network connection and know the ip address of the target device. See the :ref: eth-7 guide for more information.
Secure Copy Protocol (SCP)
SCP is built around a Secure Shell connection (SSH) and offers all the same security features. One advantage of using this method for transferring single files is that it is generally pretty fast but you won’t get interactive functionality when pulling multiple files from a remote server. For example, you won’t be able to list out directory contents and see what other files are available. SCP also has no file size limitations.
SCP - Ubuntu Host Machine
Using the Terminal on your host machine, navigate to the directory containing the file you wish to transfer to the target device.
Host (Ubuntu)cd <insert-path-to-files>
Use the following command to transfer your file:
Host (Ubuntu)sudo scp <insert-name-of-file> root@<insert-IP-address>:~
Your copied file will appear in the root directory on the target device.
To go the other direction and retrieve files from the Target Hardware, just flip the source and destination arguments:
Host (Ubuntu)sudo scp root@<insert-IP-address>:<insert-name-of-file> <insert-path-to-destination>
SCP - Windows Host Machine
In order to use the SCP protocol using your Windows host machine, you will first need the PSCP command-line utility (which is not a standard internal command).
Use this link to download the most recent, stable version of pscp.exe (https://www.chiark.greenend.org.uk/~sgtatham/putty/latest.html).
Move pscp.exe to your Programs Folder and setup a PATH variable for ease of use.
Using the Command Prompt on your host machine, navigate to the directory containing the file you wish to transfer to the target device.
Host (Windows)dir <insert-path-to-files>
Use the following command to transfer your file:
Host (Windows)pscp -scp <insert-name-of-file> root@<insert-IP-address>:~
Your copied file will appear in the root directory on the target device.
To go the other direction and retrieve files from the Target Hardware, just flip the source and destination arguments:
Host (Windows)pscp -scp root@<insert-IP-address>:<insert-name-of-file> <insert-path-to-destination>
Trivial File Transfer Protocol (TFTP)
TFTP can be used for transferring files to and from your Host Machine and Target Hardware very quickly. While it is very fast, it is a NON-SECURE way of transferring files as it doesn’t use any kind of encryption. You should only use this method of transferring files when working on your Local Area Network.
Setup the TFTP Server:
Install TFTP server functionality on your Host PC:
Host (Ubuntu)sudo apt-get update sudo apt-get install tftpd-hpa
Using your favorite text editor (the following command will use vim), open the TFTP configuration file. Here you can specify a folder (this will behave as the file server) where the files will reside on your Host PC by replacing the folder path for ‘’TFTP_DIRECTORY’’ with whatever folder you wish to use as your TFTP file storage location, or leave the folder as the default.
Tip
The vi text editor begins in “Command Mode” and you must first hit the ‘i’ key in order to enter “Insert Mode”. Using the arrow keys to navigate, make the necessary changes, and then hit ESC to go back to “Command mode”. Now enter “:wq” to write the file and quit.
Pro Tip: Use the right-click on your mouse to paste. This will only work if you are in “Insert Mode” first.
sudo vim /etc/default/tftpd-hpa
# /etc/default/tftpd-hpa

TFTP_USERNAME="tftp"
TFTP_DIRECTORY="/var/lib/tftpboot"
TFTP_ADDRESS=":69"
TFTP_OPTIONS="--secure --create"
Remember to save any changes you may have made.
If you made any changes to the settings of the TFTP server, you need to restart it for them to take effect.
Host (Ubuntu)sudo systemctl restart tftpd-hpa
If you would like to grant every user on the system permission to place files in the TFTP directory, use the following command (you will have to specify your storage location if you changed the default location):
Host (Ubuntu)sudo chmod ugo+rwx /var/lib/tftpboot
Configure your firewall to allow TFTP connections (these occur via UDP on port 69 by default):
Host (Ubuntu)firewall-cmd --add-port=69/udp
Warning
If you get an error about firewall-cmd being an unrecognized command then we will have to install it before running the above step. SKIP THIS if you didn’t have trouble running that last step:
Host (Ubuntu)sudo apt-get update sudo apt-get install firewalld
For the sake of testing, lets throw a test file into the server we just setup to practice retrieving it:
Host (Ubuntu)echo "test" > /var/lib/tftpboot/testS.txt
The final step for the TFTP Server setup is simply knowing the server’s IPv4 address. You can find this using this command:
Host (Ubuntu)ifconfig
TFTP Client
With your target hardware connected to the same network as your Host Machine, enter the following command to retrieve the test file we created on the server. You will need to replace the Xs with the IPv4 address of the server we found earlier:
Target (Linux)tftp -gr testS.txt XXX.XXX.XXX.XXX:69
In order to move files in the opposite direction, from the Target Hardware to the Host Machine, we just need to change the “get” option to a “put” and then specify the file we are moving:
Target (Linux)echo "test" > testC.txt tftp -pr testC.txt XXX.XXX.XXX.XXX:69
Network Filesystem Server
A Network Filesystem Server (NFS) gives other systems the ability to mount a filesystem stored on a Host PC which is exported over the network. Aside from the initial setup, this is the easiest way to transfer files back and forth between systems and PHYTEC recommends using the strategy during application development.
Setup the NFS Server
On your Host Machine, create a directory to use as the filesystem on the NFS Server and ensure it is accessible:
Host (Ubuntu)sudo mkdir -p /mnt/testNFS sudo chown nobody:nogroup /mnt/testNFS sudo chmod 777 /mnt/testNFS
Run the following to update/install NFS packages on your Ubuntu host Machine:
Host (Ubuntu)sudo apt-get update sudo apt install nfs-kernel-server
Using your favorite text editor, open the file configuring exported filesystems. Use the following command to do this using the Vim Text Editor:
Host (Ubuntu)sudo vim /etc/exports
Add the following line to the end of the file (replace Xs with your i.MX7’s IP address and network mask in the command using this format, <ip address>/<net mask>):
Host (Ubuntu)/mnt/testNFS XXX.XXX.XXX.XXX/XXX.XXX.XXX.XXX(rw,sync,no_root_squash,no_subtree_check)
Save and close the file.
Export the NFS Server:
Host (Ubuntu)sudo exportfs -va
Modify your firewall to allow your i.MX7 to mount the NFS Server’s filesystem:
Host (Ubuntu)firewall-cmd --add-port=2049/tcp
Restart your NFS Server:
Host (Ubuntu)sudo systemctl restart nfs-kernel-server
NFS Client
Create a directory to mount the NFS Server’s filesystem to:
Target (Linux)mkdir ~/testNFS
Mount the NFS Server (replace <host ip address> with the ip address of your Host Machine you set the NFS server on):
Target (Linux)sudo mount -t nfs <host ip address>:/mnt/testNFS ~/testNFS/
Now check out the contents of the mounted NFS server. The file we placed there previously should already be there:
Target (Linux)ls ~/testNFS/
You should find that when you add a file to this NFS directory (from either the side of the Server of the Client) that it appears automatically wherever the NFS server is mounted.