JTAG
There is one JTAG interface on the phyCORE-i.MX7 SOM, located on the PEB-D-RPI Expansion Board at connector X5. This guide which will show you how to connect to and verify a JTAG debugger via a connection integrity test executed using Ozone J-Link Debugger.
Requirements
Note
Various IDEs and debug probes can be used to debug the phyCORE-i.MX7 development kit.
In order to follow this guide exactly, you will need a J-Link KS and the Ozone J-Link debugger software by SEGGER.
J-Link KS JTAG Probe
Connecting the JTAG Device to the Kit
Warning
Connecting or disconnecting the J-Link probe, while the phyCORE-i.MX7 is powered on, can trigger a reboot of the board.
The style of JTAG connector on the phyCORE-i.MX7 development kit is an ARM 20 pin interface. Pin 1 is indicated on the very edge of the PCB by a white dot.
Using the ribbon cable attached to the probe, align the colored signal line with the dot for pin 1 and connect the ribbon cable to the X5 connector.
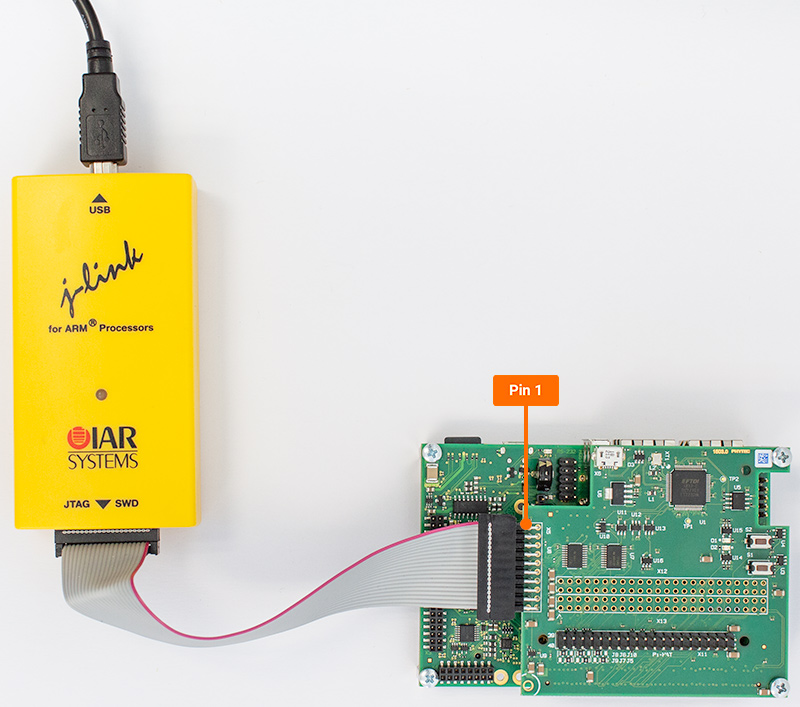
Connect the J-Link Probe to your Host Machine using a USB AB cable.
Power on the phyCORE-i.MX7
Make Sure the JTAG Device is Connected to to the Host Machine
When first connecting the J-Link Debug Probe to your Windows Host Machine it will likely be an unrecognized device.
Navigate to the Device Manager (hit the Windows key, type device manager, and then hit enter)
Locate your unidentified device in the list of devices.
Select the device and have windows automatically search the web for a compatible driver.
Creating a New Project in Ozone
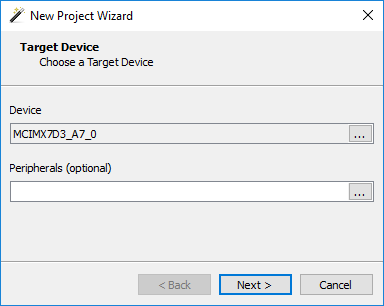
In order to establish a connection, a new project needs to be created in Ozone for the phyCORE-i.MX7.
Upon starting Ozone, you should be prompted with a New Project Wizard, otherwise head to File > New > New Project Wizard…
Under “Device”, locate and select MCIMX7D3_A7_0 in the window that appears and then hit OK.
Leave the “Peripherals” field empty and select Next.
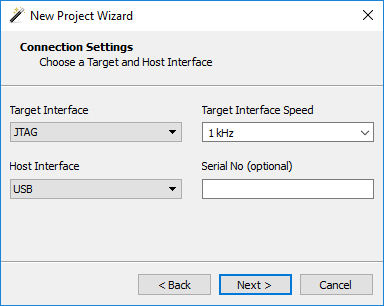
Ensure that JTAG is the “Target Interface”, USB is the “Host Interface”
Any speed is fine (we will set this to detect the speed automatically in the next steps). Hit Next.
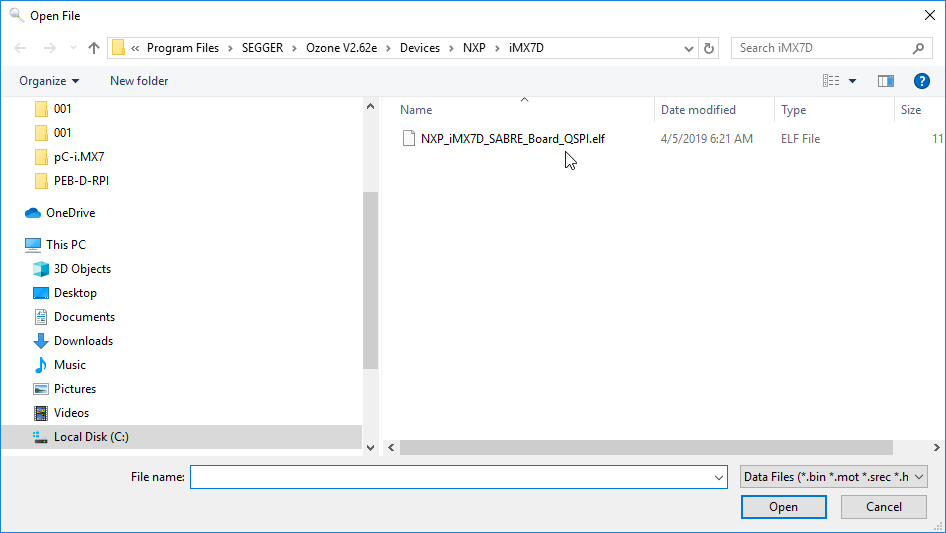
Browse for a Program file. This will be unique to the target device and will be included with your installation of Ozone.
Navigate to <Where you installed Ozone>Ozone V2.62eDevicesNXPiMX7DNXP_iMX7D_SABRE_Board_QSPI.elf and select this .elf file before hitting Open.
Select Finish.
Navigate to Tools > J-Link Settings > Target Interface (via the button with the 3 dots)
Set the Speed to auto and then select Close.
Start Debugging
Navigate to Debug > Start Debugging > Attach to Running Program
