Ethernet
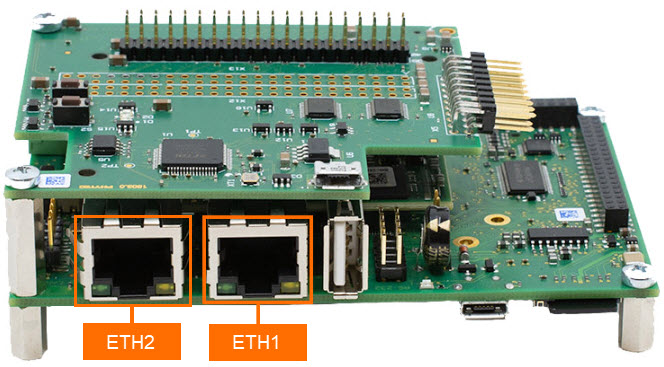
Gigabit Ethernet links are provided via ETH1 and ETH2 on the phyBOARD-i.MX7 development kit. This guide shows you how to connect and use these interfaces.
Requirements
CAT5e cable (comes included with the development kit)
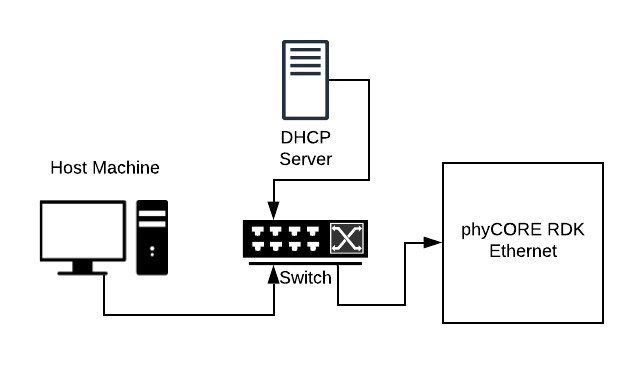
Network switch connected to a DHCP enabled network
Establishing a Connection
If a valid connection between the phyBOARD-i.MX7 and a DHCP enabled network is made before boot-up then the phyBOARD-i.MX7 will automatically negotiate a connection and will be assigned a unique IPv4 address.
After the connection is established, you can try the following command to ping a host. We’ll ping google.com in this example:
Target (Linux)ping google.com -c 10
Expected Outputroot@phyboard-zeta-imx7d-1:~# ping google.com -c 10 PING google.com (142.251.33.110): 56 data bytes 64 bytes from 142.251.33.110: seq=0 ttl=116 time=6.772 ms 64 bytes from 142.251.33.110: seq=1 ttl=116 time=5.927 ms 64 bytes from 142.251.33.110: seq=2 ttl=116 time=5.991 ms 64 bytes from 142.251.33.110: seq=3 ttl=116 time=6.005 ms 64 bytes from 142.251.33.110: seq=4 ttl=116 time=6.019 ms 64 bytes from 142.251.33.110: seq=5 ttl=116 time=6.131 ms 64 bytes from 142.251.33.110: seq=6 ttl=116 time=5.985 ms 64 bytes from 142.251.33.110: seq=7 ttl=116 time=5.955 ms 64 bytes from 142.251.33.110: seq=8 ttl=116 time=6.000 ms 64 bytes from 142.251.33.110: seq=9 ttl=116 time=5.884 ms --- google.com ping statistics --- 10 packets transmitted, 10 packets received, 0% packet loss round-trip min/avg/max = 5.884/6.066/6.772 ms
Finding IPv4 Address
To view the IP address assigned to your device’s network interfaces, use the following command:
Target (Linux)ip addr
Expected Outputroot@phyboard-zeta-imx7d-1:~# ip addr 1: lo: <LOOPBACK,UP,LOWER_UP> mtu 65536 qdisc noqueue state UNKNOWN group default qlen 1000 link/loopback 00:00:00:00:00:00 brd 00:00:00:00:00:00 inet 127.0.0.1/8 scope host lo valid_lft forever preferred_lft forever inet6 ::1/128 scope host valid_lft forever preferred_lft forever 2: can0: <NOARP,UP,LOWER_UP,ECHO> mtu 16 qdisc pfifo_fast state UP group default qlen 10 link/can 3: eth0: <BROADCAST,MULTICAST,UP,LOWER_UP> mtu 1500 qdisc mq state UP group default qlen 1000 link/ether c6:ab:9f:30:23:11 brd ff:ff:ff:ff:ff:ff inet 10.0.0.232/24 brd 10.0.0.232 scope global eth0 valid_lft forever preferred_lft forever inet 10.0.0.222/24 metric 1024 brd 10.0.0.222 scope global eth0 valid_lft forever preferred_lft forever inet6 fe80::c4ab:9fff:fe30:22222/64 scope link valid_lft forever preferred_lft forever 4: eth1: <NO-CARRIER,BROADCAST,MULTICAST,UP> mtu 1500 qdisc mq state DOWN group default qlen 1000 link/ether 6e:8f:2b:fb:ee:d5 brd ff:ff:ff:ff:ff:ff 5: sit0@NONE: <NOARP> mtu 1480 qdisc noop state DOWN group default qlen 1000 link/sit 0.0.0.0 brd 0.0.0.0In the above example, we can see that ETH1 was assigned the IPv4 address 10.0.0.222 and the other ethernet interfaces should behave similarly.
Note
Hardware designates X7 and X8 as ETH1 and ETH2, respectively, while software designates them as eth0 and eth1.
Changing Static IPv4 Address to DHCP
Regularly the IPv4 address assigned to your device is a static one. This limits the devices abilities. Abilities such as being remote accessed into with SSH. The following steps will show how to change the IPv4 address from static to DHCP for ETH1.
Edit the file /lib/systemd/network/10-eth0.network to edit ETH1.
Target (Linux)vi /lib/systemd/network/10-eth0.network
Change DHCP to equal “True” and remove the “Address=XXX.X.X.XXX” line.
Note
The vi text editor begins in “Command Mode” and you must first hit the ‘i’ key in order to enter “Insert Mode”. Using the arrow keys to navigate, make the necessary changes and then hit ESC to go back to “Command mode”. Now enter “:wq” to write the file and quit.
Pro Tip: Use the right click on your mouse to paste! This will only work if you are in “Insert Mode” first.
[Match]
Name=eth0

[Network]
DHCP=True
SSH into the phyCORE-i.MX7
Once the phyCORE-i.MX7’s IPv4 address is known, we can use it to interact with the development kit over the network. This section of the guide will walk through establishing an SSH connection with the hardware which can be a handy way to quickly get a second terminal session up and running. This might be useful if you are doing development directly on the target and need to process a second task in parallel with something running in the standard hardware UART console.
In order to most easily follow this section of the guide, you will want both the phyCORE-i.MX7 and your Ubuntu host machine connected to the same local area network (LAN).
Note
A Windows Command Prompt can be used instead of a Linux machine. Just skip the following update commands.
Using your Ubuntu host machine, start a new terminal session and use the following command to ensure that ssh is installed:
Host (Ubuntu)sudo apt-get update sudo apt-get install ssh
The phyCORE-i.MX7 Linux BSP has a ssh server installed and enabled by default so it is already pre-configured to accept ssh connections. Establish a connection with the development kit using the Ubuntu host machine:
Host (Ubuntu)ssh root@10.0.0.222
Expected Outputuser@ubuntu:~$ ssh root@10.0.0.222 The authenticity of host '10.0.0.222 (10.0.0.222)' can't be established. RSA key fingerprint is SHA256:ERfYI41VP/hXh17ulInjqWq5wIn4D2mO69H8PILHmW8. Are you sure you want to continue connecting (yes/no)? yes Warning: Permanently added '10.0.0.222' (RSA) to the list of known hosts. ____ _ _ __ __ _____ _____ ____ | _ \ | | | |\ \ / /|_ _|| ____| / ___| | |_) || |_| | \ V / | | | _| | | | __/ | _ | | | | | | |___ | |___ |_| |_| |_| |_| |_| |_____| \____| _ __ __ ____ _ ___ ____ _ _ __ __ / \ | \/ || _ \ | | |_ _|| _ \ | | | |\ \ / / / _ \ | |\/| || |_) || | | | | |_) || |_| | \ V / / ___ \ | | | || __/ | |___ | | | __/ | _ | | | /_/ \_\|_| |_||_| |_____||___||_| |_| |_| |_| ampliPHY Vendor xwayland (Phytec Vendor Distribution) BSP-Yocto-NXP-i.MX7-PD23.1.0 root@phyboard-zeta-imx7d-1:~#
Note
If you are having trouble establishing an SSH connection with the development kit:
Double check that the development kit is actually connected to the network by pinging a known host such as google.com in the target console.
Another common thing that trips up people is having a VPN enabled, which can cause your host machine to not find the phyCORE-i.MX7 target.
A final place to troubleshoot network related issues between the phyCORE-i.MX7 and the Ubuntu host machine is the network adapter settings, especially if you are using a Virtual Machine to host Ubuntu. In VMWare Workstation, the Virtual Machine’s Network Adapter settings look like the following:
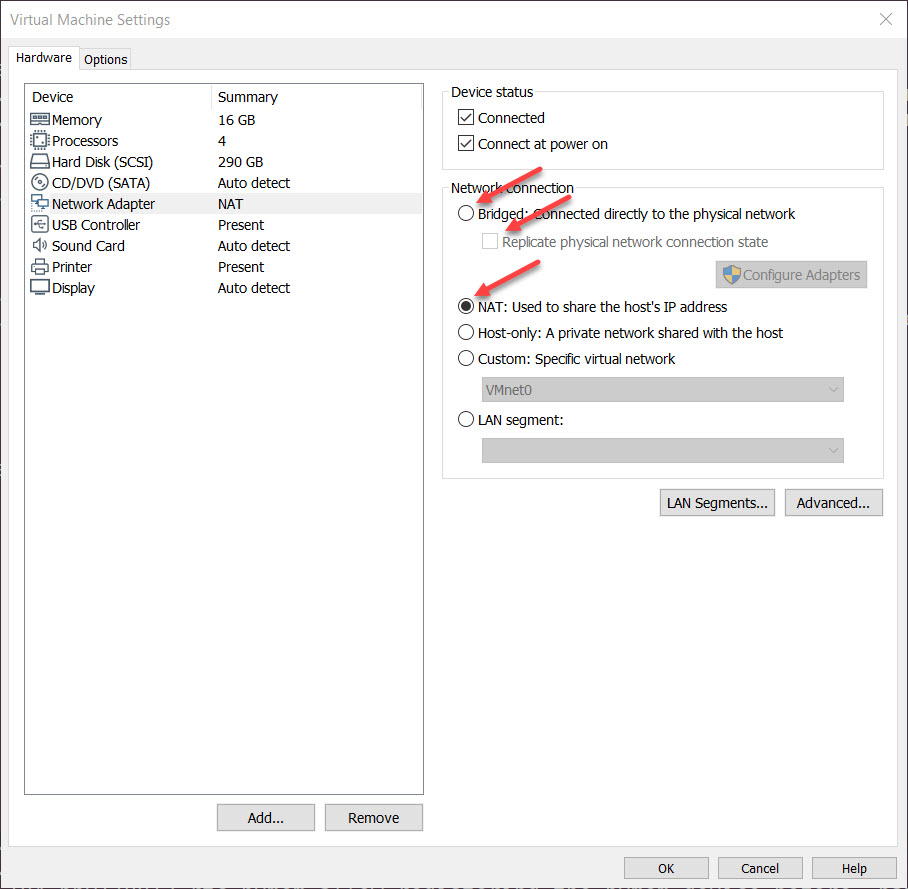
The network setting will likely have NAT selected by default and this should work for most development tasks. Switching this to Bridged and replicating a physical connection can sometimes help resolve problems depending on what you are trying to do.
Feel free to reach out at PHYTEC’s Support Portal if you have any questions or concerns.