Copying Files to the Device
There are several ways of transferring files to and from your target device. Please reference the following for some possible methods.
Using a Network
Note
Before being able to transfer files using network protocols, you will first need to establish a network connection and know the ip address of the target device. See the Ethernet Interface guide for more information.
Secure Copy ProtocolLink to Secure Copy Protocol
Secure Copy Protocol (SCP) is built around a Secure Shell connection (SSH) and offers all the same security features. One advantage of using this method for transferring single files is that it is generally pretty fast but you won’t get interactive functionality when pulling multiple files from a remote server. For example, you won’t be able to list out directory contents and see what other files are available. SCP also has no file size limitations.
Ubuntu Host Machine
Using the Terminal on your host machine, navigate to the directory containing the file you wish to transfer to the target device.
Host (Ubuntu)cd <insert-path-to-files>
Use the following command to transfer your file:
Host (Ubuntu)sudo scp <insert-name-of-file> root@<insert-IP-address>:~
Your copied file will appear in the root directory on the target device.
To go the other direction and retrieve files from the Target Hardware, just flip the source and destination arguments:
Host (Ubuntu)sudo scp root@<insert-IP-address>:<insert-name-of-file> <insert-path-to-destination>
Windows Host Machine
In order to use the SCP protocol using your Windows host machine, you will first need the PSCP command-line utility (which is not a standard internal command).
Use this link to download the most recent, stable version of pscp.exe (https://www.chiark.greenend.org.uk/~sgtatham/putty/latest.html).
Move pscp.exe to your Programs Folder and setup a PATH variable for ease of use.
Using the Command Prompt on your host machine, navigate to the directory containing the file you wish to transfer to the target device.
Host (Windows)dir <insert-path-to-files>
Use the following command to transfer your file:
Host (Windows)pscp -scp <insert-name-of-file> root@<insert-IP-address>:~
Your copied file will appear in the root directory on the target device.
To go the other direction and retrieve files from the Target Hardware, just flip the source and destination arguments:
Host (Windows)pscp -scp root@<insert-IP-address>:<insert-name-of-file> <insert-path-to-destination>
Network Filesystem ServerLink to Network Filesystem Server
A Network Filesystem Server (NFS) gives other systems the ability to mount a filesystem stored on a Host PC which is exported over the network. Aside from the initial setup, this is the easiest way to transfer files back and forth between systems for long term development.
Host Setup
On your Host Machine, create a directory to use as the filesystem on the NFS Server and ensure it is accessible:
Host (Ubuntu)sudo mkdir -p /mnt/testNFS sudo chown nobody:nogroup /mnt/testNFS sudo chmod 777 /mnt/testNFS
Run the following to update/install NFS packages on your Ubuntu host Machine:
Host (Ubuntu)sudo apt-get update sudo apt install nfs-kernel-server
Using your favorite text editor, open the file configuring exported filesystems. Use the following command to do this using the Vim Text Editor:
Host (Ubuntu)sudo vim /etc/exports
Add the following line to the end of the file (replace Xs with your phyCORE-i.MX8X’s IP address):
Host (Ubuntu)/mnt/testNFS XXX.XXX.XXX.XXX(rw,sync,no_root_squash,no_subtree_check)
Save and close the file.
Export the NFS Server:
Host (Ubuntu)sudo exportfs -va
Modify your firewall to allow your i.MX7 to mount the NFS Server’s filesystem:
Host (Ubuntu)firewall-cmd --add-port=2049/tcp
Restart your NFS Server:
Host (Ubuntu)sudo systemctl restart nfs-kernel-server
Now, you can add files to /mnt/testNFS to make them available to any clients that mount this NFS server.
Client Setup
Now that the Host Machine is setup as a NFS server, it is time to configure the phyCORE-i.MX8X as the client.
Create a directory to mount the NFS Server’s filesystem to:
Target (Linux)mkdir ~/testNFS
Mount the NFS Server (replace <host ip address> with the ip address of your Host Machine you set the NFS server on):
Target (Linux)sudo mount -t nfs <host ip address>:/mnt/testNFS ~/testNFS/
Now check out the contents of the mounted NFS server. The file we placed there previously should already be there:
Target (Linux)ls ~/testNFS/
You should find that when you add a file to this NFS directory (from either the side of the Server of the Client) that it appears automatically wherever the NFS server is mounted.
Using Removable Storage Devices
USB Storage Device
These instructions walkthrough exercising the USB Host interface on the development kit, but since your Ubuntu Host Machine is also a Linux system, you can similarly transfer files to the same storage media to exchange files.
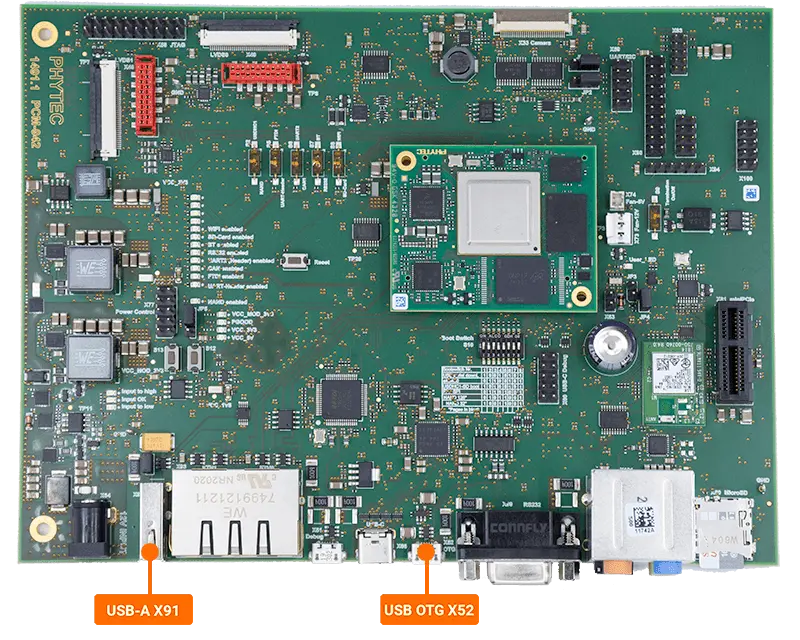
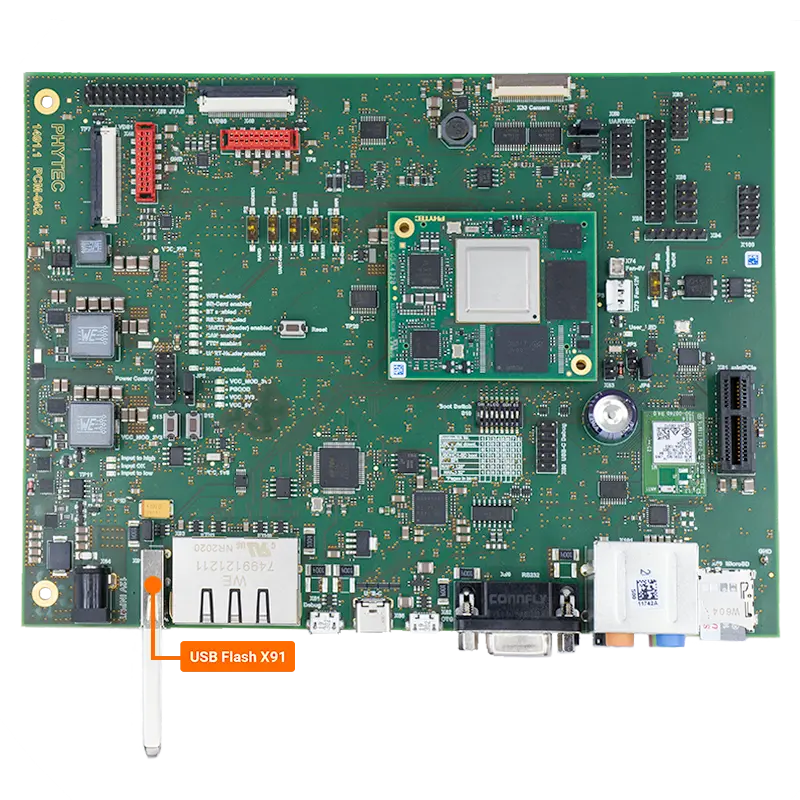
The USB Host interface uses a standard Type-A USB port (X91) and USB OTG interface uses a USB Micro-AB connector (X52).
Warning
There is a USB-C interface (X66) but the USB-C device mode is currently not functional.

Requirements
USB Storage Device
USB Micro-AB to USB-A cable
Configuring the Development Kit for USB Host Mode
Make sure the development kit is set to USB Host mode.
Target (Linux)echo host > /sys/kernel/debug/ci_hdrc.0/role
Expected Output[ 310.955318] ci_hdrc ci_hdrc.0: EHCI Host Controller [ 310.960257] ci_hdrc ci_hdrc.0: new USB bus registered, assigned bus number 3 [ 310.979804] ci_hdrc ci_hdrc.0: USB 2.0 started, EHCI 1.00 [ 310.986406] hub 3-0:1.0: USB hub found [ 310.990380] hub 3-0:1.0: 1 port detected
Make sure gpio30 is set to USB_A by echoing “0” to value.
Target (Linux)cd /sys/class/gpio/ echo 30 > export echo out > gpio30/direction echo 0 > gpio30/value
USB Host Connection (FAT32)
[  483.133241] usb 3-1: new high-speed USB device number 2 using ci_hdrc
[  483.290193] usb-storage 3-1:1.0: USB Mass Storage device detected
[  483.296774] scsi host0: usb-storage 3-1:1.0
[  485.299788] scsi 0:0:0:0: Direct-Access     Kingston DataTraveler 3.0 PMAP PQ: 0 ANSI: 6
[  485.310579] sd 0:0:0:0: [sda] 30277632 512-byte logical blocks: (15.5 GB/14.4 GiB)
[  485.319027] sd 0:0:0:0: [sda] Write Protect is off
[  485.324390] sd 0:0:0:0: [sda] No Caching mode page found
[  485.329739] sd 0:0:0:0: [sda] Assuming drive cache: write through
[  485.374504]  sda: sda1
[  485.380370] sd 0:0:0:0: [sda] Attached SCSI removable disk
Verify the drive mounted successfully by viewing the contents of the drive:
Target (Linux)ls /run/media/sda1/
Write to the USB Host Device
Generate a random 10 MB file to test transferring data from the storage device.
Target (Linux)dd if=/dev/urandom of=test.file count=10 bs=1M
Expected Output10+0 records in 10+0 records out 10485760 bytes (10 MB, 10 MiB) copied, 0.271254 s, 38.7 MB/s
Copy the file to your storage device.
Target (Linux)dd if=test.file of=/run/media/sda1/test.file bs=1M
Expected Output10+0 records in 10+0 records out 10485760 bytes (10 MB, 10 MiB) copied, 0.0946181 s, 111 MB/s
Read from the USB Host Device
Copy the test file created during the write process back to the host.
Target (Linux)dd if=/run/media/sda1/test.file of=test1.file bs=1M
Expected Output10+0 records in 10+0 records out 10485760 bytes (10 MB, 10 MiB) copied, 0.0776833 s, 135 MB/s
Make sure the file was not corrupted during the transfer using md5sum.
Target (Linux)md5sum test.file md5sum test1.file
Expected Output2290972242afe72ec4c603bcbf51ca05 test.file 2290972242afe72ec4c603bcbf51ca05 test1.file
Unmounting the Drive
Warning
Make sure the drive is unmounted prior to physically disconnecting the device.
Failure to do so may result in loss of data and corruption of files
umount /run/media/sda1
The Flashed SD Card (Root Partition)
In order to copy files to the primary boot media of the phyCORE-i.MX8X development kit, you will first have to power it off. Do this in your serial console with the following:
Target (Linux)poweroff
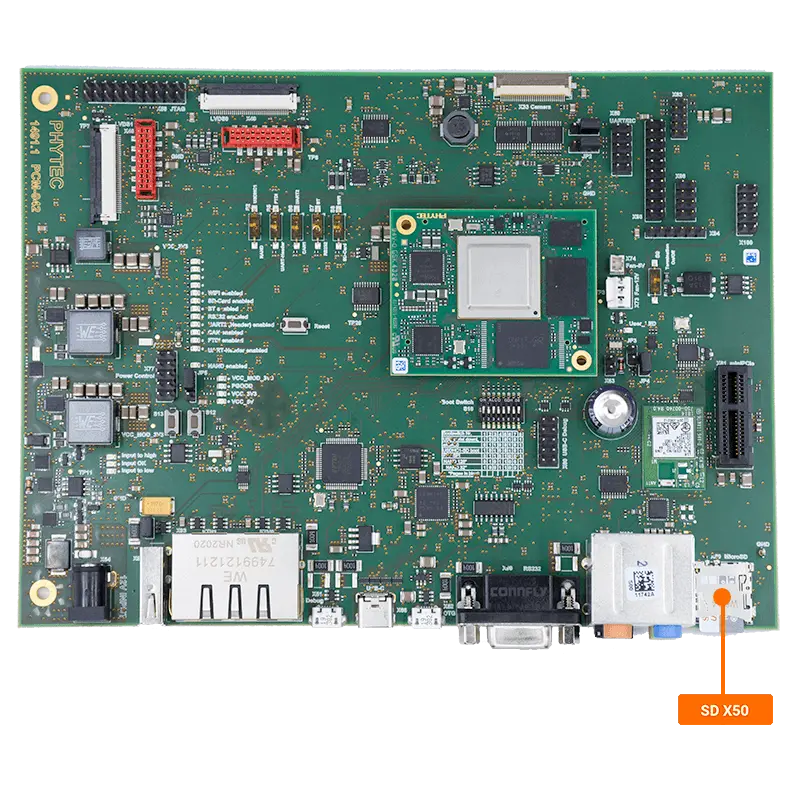
Remove the SD Card and connect it to your Ubuntu Host Machine. You will not be able to place files on the SD Card using Windows because the SD Card is formatted for Linux and Windows wont recognize it.
Drag and drop the file to the rootfs partition of the SD Card using the GUI like you normally would!
In order to copy files to the SD Card using the Terminal, this can be done with the standard ‘cp’ (copy) command. See the above section utilizing a USB storage device for more information.
The next time you boot your phyCORE-i.MX8X into Linux, using the same SD Card, your file should be present in the filesystem.
Warning
- The SD Card is formatted with a minimal root filesystem size by default and in order to transfer larger files it may become necessary to increase its size to take advantage of the full size of the SD Card.
Increase the Root Filesystem Partition of the SD Card
The SD Card device name is of the form /dev/sd[a-z] in Ubuntu and the letter identifier along with any partitions (signified by the numbers following the letter) on the SD Card are enumerated upon connection to the Host Machine. Look at the second output of the command and look for new devices that appeared there, the new device will correspond to the SD Card. Remember the /dev/sdX identifier corresponding to your SD Card as you will need to use this in the following step.
Warning
Be confident you have the correct /dev/sdX device identified for your SD Card before proceeding. Specifying the incorrect disk using the fdisk utility in the steps below can potentially destroy your Virtual Machine and will require you to set it back up again from scratch.
It is best to first backup the SD Card to a file just in case something goes terribly wrong and you end up losing its contents:
Host (Ubuntu)umount /dev/sdX* #unmount the entire SD Card, not just any single partition sudo dd if=/dev/sdX of=~/backup.sdcard bs=1M conv=fsync && sync
Use the fdisk utility and provided command sequence to create a new, larger root filesystem partition in the SD Card’s partition table:
Host (Ubuntu)sudo fdisk /dev/sdX # fdisk is an interactive utility, use the following command sequence # p (print the partition table and note the starting sector of the 2nd partition, call this START2. START2=196608 using the pre-built software) # d (delete a partition) # 2 (select the root filesystem) # n (create a new partition) # p (make it a primary partition) # 2 (make it the second partition) # START2 (specify the same starting sector for the 2nd partition as before) # ENTER (just hit ENTER to use the default size, which will automatically use up the remaining space on the SD Card) # w (write the changes)
It’s generally a good idea to disconnect and reconnect the SD Card from the Host Machine at this point to ensure the new partition table is being picked up by the kernel.
Finally, grow the root filesystem to take up the entire space in the partition:
Host (Ubuntu)sudo resize2fs /dev/sdX2
Non-flashed SD Card (Storage Device)
Note
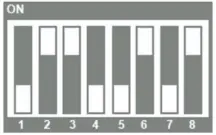
In order to follow this guide, you will have to boot from the on-board eMMC. See this eMMC guide for more information.

Requirements
SDHC SD card, at least 8GB for PHYTEC’s TISDK release image (Included in development kit)
Linux Host PC or Virtual Machine (Ubuntu recommended) (Only for Transfering Media from Host)
SD card reader (operational under Linux) (Only for Transfering Media from Host)
Hardware Setup
Mounting the SD Card
When an external SD Card is inserted into the development kit it is not mounted by default. It will be available as “/dev/mmcblk1”.
Expected Output[ 368.709002] mmc1: host does not support reading read-only switch, assuming write-enable [ 368.721029] mmc1: new high speed SDHC card at address 1234 [ 368.727454] mmcblk1: mmc1:1234 SA04G 3.64 GiB [ 368.734130] mmcblk1: p1
Create a temporary directory and mount the sd card.
Target (Linux)mkdir /home/root/temp
Tip
Writing to an SD Card is much like writing to a USB storage device, please reference the USB steps above for transferring files to and from the device.

