SD Card
Create a Bootable SD Card
In order to boot the phyCORE-i.MX8X development kit into Linux, it must load valid software from a memory storage device. It is typical for production systems to boot software from an onboard (non-removeable) memory storage device such as eMMC memory but booting from an SD Card is more convenient during development. The phyCORE-i.MX8X development kit is configured to boot from an SD Card by default.
A pre-configured SD Card should have been included in the box with your development kit but this guide will walk through the creation of a bootable SD Card using Pre-Built Binaries or images you have generated on your own by following the Build the BSP guide.
Requirements
Ubuntu 18.04 LTS, 64-bit Host Machine
If using a virtual machine, VMWare Workstation, VMWare Player, and VirtualBox are all viable solutions.
SD Card Reader operational under the Ubuntu Host Machine
4GB SD Card or larger
Flashing a Complete Image
Flashing is a term used to describe the process of burning software images to a flash memory storage device, hence flashing. This section of the guide will outline the steps for flashing the complete .sdcard.bz2 image format to an SD Card. The .sdcard.bz2 image format is a compressed binary consisting of all the necessary binaries needed for booting the phyCORE-i.MX8X into Linux. This includes the bootloader, kernel and root filesystem.
Run the following command without the SD Card connected to the Host Machine.
Host (Ubuntu)ls /dev/sd*
Connect the SD Card to the Ubuntu Host Machine.
Run the following command again with the SD Card connected to the Host Machine.
Host (Ubuntu)ls /dev/sd*
The SD Card device name is of the form /dev/sd[a-z] in Ubuntu and the letter identifier along with any partitions present on the SD Card are enumerated upon connecting the SD Card to the Host Machine. Look at the second output of the command and look for new devices that appeared there. The new device will correspond to the SD Card,. Remember the /dev/sdX identifier corresponding to your SD Card.
Warning
Be confident you have the correct /dev/sdX device identified for your SD Card before proceeding. It is very easy to accidently specify your Host Machine’s hard drive in the steps following this warning. Doing so would corrupt your Host Machine. A good sanity check is to verify which disk your system has mounted as the root filesystem and ensuring you DO NOT specify that same disk when working through the remainder of this guide. Mounted devices can be viewed with the ‘mount’ utility, here is an example:
Exampleuser@ubuntu:~$ mount sysfs on /sys type sysfs (rw,nosuid,nodev,noexec,relatime) proc on /proc type proc (rw,nosuid,nodev,noexec,relatime) udev on /dev type devtmpfs (rw,nosuid,relatime,size=8170248k,nr_inodes=2042562,mode=755) devpts on /dev/pts type devpts (rw,nosuid,noexec,relatime,gid=5,mode=620,ptmxmode=000) tmpfs on /run type tmpfs (rw,nosuid,noexec,relatime,size=1640224k,mode=755) /dev/sda1 on / type ext4 (rw,relatime,errors=remount-ro,data=ordered)...
We can see in the example that /dev/sda1 is mounted on ‘/’, which is the root directory of the root filesystem. /dev/sda should NOT be mistaken for your SD Card.
Unmount all partitions of the SD Card. Remember to replace ‘X’ with the identifier found in the previous step:
Host (Ubuntu)umount /dev/sdX*
Navigate to the directory containing the ‘.sdcard.bz2’ file you wish to flash. This might be wherever you downloaded the pre-built image or it could be the deployment directory of your local BSP build at $BUILDDIR/tmp/deploy/
Host (Ubuntu)cd <image location>
Flash the ‘.sdcard.bz2’ software image to the SD Card:
Host (Ubuntu)bzip2 -dc <YOCTO_IMAGE>-<YOCTO_MACHINE>.sdcard.bz2 | sudo dd of=/dev/sdX bs=1M && sync
Note
Note that you have to flash the SD Card image to the entirety of the SD Card. This is done by specify the output location of the flashing command as “of=/dev/sdX”, without a numbered partition specified. For example, if you try to flash the SD Card image to /dev/sdX1 this will result in a improperly formatted SD Card.
Updating Individual Parts of the SD Card
Once the SD Card has been formatted the first time via flashing the complete .sdcard.bz2, you do not need to flash the entire contents of the SD Card image again to update the image components. The bootloader, kernel and root filesystem can be updated individually (depending on the changes being tested) to potentially save a lot of time during development.
Updating the Kernel
First, remove the existing kernel image and device tree files:
Host (Ubuntu)rm /media/<user>/Boot imx8x-/Image rm /media/<user>/Boot\ imx8x-/*phytec-imx8qxp-*.dtb*
Copy the new Linux kernel, device tree binaries and applicable device tree overlays to the SD Card’s Boot partition:
Host (Ubuntu)cp Image /media/<user>/Boot imx8x-/; sync cp Image*.dtb /media/<user>/Boot\ imx8x-/phytec-imx8qxp-phycore-rdk-emmc.dtb; sync cp Image-*.dtbo /media/<user>/Boot\ imx8x-/; sync
Note
By default, U-Boot loads the dtb file named “phytec-imx8qxp-phycore-rdk-emmc.dtb” as the active device tree during boot. In order to instruct U-Boot to load a different device tree by a different name, reference the following steps:
Power on the board and press any key to stop autoboot and enter U-Boot.
Type the following commands:
Target (U-Boot)setenv fdt_file <dtb name> saveenv reset
U-Boot will now load the dtb file named ‘<dtb name>’ automatically during subsequent boots. Reset the U-Boot Environment to Default Settings
In order to revert the U-Boot environment back to its original settings, run the following:
Target (U-boot)env default -f -a saveenv boot
Updating the Root Filesystem
Unmount the SD Card’s root filesystem partition (the root filesystem takes up the entire second partition):
Host (Ubuntu)umount /dev/sdX2
Note
The ‘X’ here should be replaced with the identifier specifying your SD Card.
Flash the new filesystem to the SD Card:
Host (Ubuntu)sudo dd if=fsl-image-validation-imx-imx8x-phycore-kit.ext4 of=/dev/sdX2 bs=1M && sync
Note
The filesystem has to be flashed to the 2nd partition of the SD Card. A good sanity check is to mount the filesystem after is has been flashed to ensure it mounts as excepted.
Updating the Bootloader (U-Boot and SCFW)
Unmount all partitions of the SD Card:
Host (Ubuntu)umount /dev/sdX*
Flash the bootloader binary to the SD Card:
Host (Ubuntu)sudo dd if=imx-boot-imx8x-phycore-kit-sd.bin-flash of=/dev/sdX bs=1k seek=32 && sync
Tip
The imx-boot-imx8x-phycore-kit-sd.bin-flash binary can be thought of as a bundle that incorporates both u-boot.bin and the security binaries into one easy-to-flash file.
Boot from SD Card
The phyCORE-i.MX8X development kit is configured to boot from an SD Card slot by default and basic steps for performing this and establishing serial communication are outlined in the Quickstart. This guide is intended as a quicker but more in-depth reference:
Boot Switch SD Card Settings
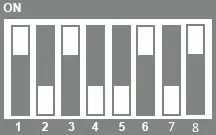
Configuration Switch Settings
S2 should be set to ON - USDCH1 enabled.
Warning
There is a silkscreen error on the 1491.0 PCB revision of the phyCORE-i.MX8X Carrier Board associated with the the Switch S2. The silkscreen will correctly reflect the following in future revisions 1491.1 and on:
ON = USDHC1 OFF = NAND
S5 should be set to ON - FTDI Debug Port enabled.
Connecting the power supply to the phyCORE-i.MX8X development kit with the board configured as outlined above will instruct the boot ROM to load the U-Boot bootloader from the SD Card. If you do not interrupt autoboot, U-Boot will load Linux and pass control to it automatically.
Configuring the Bootloader
When prompted in the initial console message upon connecting power, you can stop autoboot by pressing any key to manually configure the bootloader.
If the use of device tree overlays are required, such as for enabling UART2, WIFI, LVDS0/1, or the parallel camera, use the following command to list out your desired overlays by defining the ‘overlay_files’ variable:
Target (U-Boot)# List all overlays that apply to your use case setenv overlay_files phytec-imx8qxp-uart2.dtbo phytec-imx8qxp-wifi.dtbo phytec-imx8qxp-lvds.dtbo phytec-imx8qxp-parallel-camera.dtbo saveenv boot
Once you reach a login prompt, type “root” and hit Enter (there is no password by default).
Changes to the bootloader can be reverted back to their defaults by again stopping in U-Boot, following a shutdown or reboot. Once stopped in U-Boot, use the following to restore the default settings:
Target (U-Boot)env default -f -a saveenv boot