eMMC
Flash the eMMC
In addition to creating a standard SD card formatted with the phyCORE-i.MX8X Linux BSP, the following steps are required to further format the SD Card to hold a BSP Image destined for the onboard eMMC flash memory. This is because neither the SD Card’s boot or root filesystem partitions are formatted with enough space to contain an image of the SD Card itself by default.
Preparing the SD Card
Execute the following from the Ubuntu Host Machine
Connect the bootable SD Card to the Ubuntu Host Machine.
Create a new partition on the SD Card that is large enough to hold the SD Card image:
Host (Ubuntu)sudo fdisk /dev/sdX p print current partitions n new partition p primary 3 partition number <start> enter value after end of partition 2 (from partition table). <enter> Use default value for last sector to take advantage of the whole SD Card t Change partition system id 3 Partition number c FAT32 w write table to disk and exit sudo mkfs.vfat -n "data" /dev/sdX3 umount /dev/sdX*
Warning
The SD Card image will not fit in the SD card’s partitions created by the SD card image by default thus requiring this 3rd partition. You could alternatively enlarge the amount of extra space on the root partition manually or via recipe modifications when building the BSP.
Physically disconnect the SD Card from the Host Machine and then re-connect it. This will ensure that your host machine rereads the new partition information on the SD Card.
Copy the SD Card image to the new “data” partition of the SD Card:
Host (Ubuntu)cp fsl-image-validation-imx-imx8x-phycore-kit.sdcard.bz2 /media/<user>/data/; sync
Safely Eject the SD Card.
Flashing Images from Linux onto the eMMC
Configure the boot switches to boot from SD Card as described in the Boot Switch Interface Guide.
Boot from the SD Card into Linux.
Unmount all eMMC partitions:
Target (Linux)umount /dev/mmcblk0p*
Flash the eMMC with the SD Card image:
Target (Linux)bzip2 -dc /run/media/mmcblk1p3/fsl-image-validation-imx-imx8x-phycore-kit.sdcard.bz2 | dd of=/dev/mmcblk0 bs=1M && sync
Boot from eMMC
Once you have flashed the eMMC according to the instructions outlined in the Flash the eMMC guide, this guide may be used to configure the phyCORE-i.MX8X to then boot from the flashed eMMC.
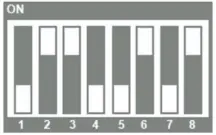
After flashing the eMMC, power off the board and configure the Boot Switch to boot from eMMC:
Boot Switch eMMC Settings

Configuration Switch Settings
S5 should be set to ON - FTDI Debug Port enabled.
Configuring the Bootloader
Connecting the power supply to the phyCORE-i.MX8X development kit with the board configured as outlined above will instruct the boot ROM to load the U-Boot bootloader from the eMMC flash onboard the SOM. Autoboot will attempt to run however the boot scripts implemented in U-Boot are configured for loading Linux from the SD Card and autoboot will fail.
Warning
Forgetting to change the environment variables in U-Boot can cause some confusion so be warned!
If the SD Card is still connected, U-Boot (loaded from eMMC) will still search the SD Card for the next stage of boot by default. This means you will boot into Linux from SD Card unless you change these variables.
If the SD Card was removed or disabled before powering on the kit, U-Boot will fail to load the kernel and it will try some fall back boot modes. You will see this output:
Example OutputHit any key to stop autoboot: 0 MMC: no card present MMC: no card present ** Bad device mmc 1 ** MMC: no card present ** Bad device mmc 1 **
Just reset the board and ensure to change the environment variables so that U-Boot searches the eMMC.
Stop in U-Boot after resetting the board. Use the following commands to instruct U-Boot to search the eMMC for the kernel and root filesystem:
setenv mmcdev 0
setenv mmcroot "/dev/mmcblk0p2 rootwait rw"
If the use of overlays is required, such as for enabling UART2, WiFi, LVDS0/1, or the parallel camera, stop in U-Boot and define the ‘overlay_files’ variable:
setenv overlay_files phytec-imx8qxp-uart2.dtbo phytec-imx8qxp-wifi.dtbo phytec-imx8qxp-lvds.dtbo phytec-imx8qxp-parallel-camera.dtbo # Choose all that apply to your use case
Save any changes and boot into Linux:
saveenv
boot
Log into Linux with “root”