eMMC
An embedded Multi-Media Card (eMMC) flash device is populated on the phyCORE-AM64x as a programmable nonvolatile storage. The eMMC flash is connected to the MMC0 8-bit interface of the phyCORE-AM64x, which supports the JEDEC eMMC electrical standard v5.1. This guide covers viewing partition information, managing background operations (BKOPS), resizing filesystems, enabling pseudo-SLC mode, erasing the device, and working with eMMC boot partitions. To learn more information about the phyCORE-AM64x eMMC flash memory, please see the eMMC section in Hardware Manual.
eMMC Hardware Partitions
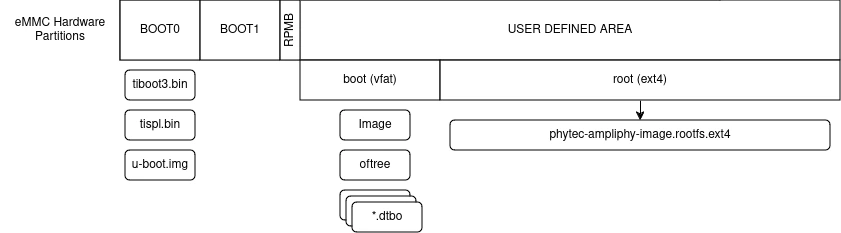
An eMMC device contains four different hardware partitions: user, boot0, boot1, and rpmb.
The user partition is called the User Data Area in the JEDEC standard and is the main storage partition. The partitions boot0 and boot1 can be used to host the bootloader and are more reliable. PHYTEC SoMs are delivered with the bootloader pre-flashed in the boot0 partition. Which partition the AM64x uses to load the bootloader is controlled by the boot configuration of the eMMC device. The partition rpmb is a small partition and can only be accessed via a trusted mechanism.
Furthermore, the user partition can be divided into four user-defined General Purpose Area Partitions. An explanation of this feature exceeds the scope of this document. For further information, see the JEDEC Standard Chapter Partition Management.
Note
Do not confuse eMMC partitions with partitions of a DOS, MBR, or GPT partition table.
Booting from eMMC
Detailed instructions on how to flash the WIC image to the eMMC can be found in Flashing the eMMC.
Writing and Reading from eMMC
The eMMC device is available as a block device in Linux. You can read and write data using standard Linux commands such as dd, cp, tar, etc.
Working with Files (Mounted Partitions)
If we have a valid filesystem on the eMMC device, we can mount it and access files normally. In this example, we will mount the second partition of the eMMC device, which is usually the root filesystem after flashing the wic image.
Create a mount point and mount the partition:
sh-phyboard-electra-am64xx-2:~# mkdir -p /mnt/emmc
sh-phyboard-electra-am64xx-2:~# mount /dev/mmcblk0p2 /mnt/emmc
Now you can use normal file operations
sh-phyboard-electra-am64xx-2:~# ls /mnt/emmc
lost+found  etc  home  lib  media  mnt  opt  proc  root  run  sbin  srv  sys  tmp  usr  var
Sync and unmount when done
sh-phyboard-electra-am64xx-2:~# sync
sh-phyboard-electra-am64xx-2:~# umount /mnt/emmc
Using dd to write and read data
In this example we can can generate some random data and write it to the eMMC device using dd. The data is read back and verified with an md5 checksum.
Generate a file with random data:
sh-phyboard-electra-am64xx-2:~# dd if=/dev/urandom of=test_pattern.bin bs=4M count=10 conv=fsync
Write the file to the eMMC device:
sh-phyboard-electra-am64xx-2:~# dd if=test_pattern.bin of=/dev/mmcblk0 bs=4M conv=fsync status=progress
sh-phyboard-electra-am64xx-2:~# sync
Read the data back from the eMMC device:
sh-phyboard-electra-am64xx-2:~# dd if=/dev/mmcblk0 of=readback.bin bs=4M count=10
sh-phyboard-electra-am64xx-2:~# sync
Verify the data:
sh-phyboard-electra-am64xx-2:~# md5sum test_pattern.md5
84eb20fc15cce1be1e4bd0c1de94ffda  test_pattern.bin

sh-phyboard-electra-am64xx-2:~# md5sum readback.bin
84eb20fc15cce1be1e4bd0c1de94ffda  readback.bin
The md5 checksum from test_pattern.bin and readback.bin should match.
Erasing the eMMC
It is possible to erase the eMMC device directly rather than overwriting it with zeros. The eMMC block management algorithm will erase the underlying MLC or TLC or mark these blocks as discard. The data on the device is lost and will be read back as zeros.
After booting from SD Card execute:
sh-phyboard-electra-am64xx-2:~# blkdiscard -f --secure /dev/mmcblk0
The option –secure ensures that the command waits until the eMMC device has erased all blocks. The -f (force) option disables all checking before erasing and it is needed when the eMMC device contains existing partitions with data.
Note
The following command also destroys all information on the device, but is bad for wear leveling and takes much longer:
dd if=/dev/zero of=/dev/mmcblk0 conv=fsync
Extended CSD Register
eMMC devices have an extensive amount of extra information and settings that are available via the Extended CSD registers. For a detailed list of the registers, see manufacturer datasheets and the JEDEC standard.
In the Linux user space, you can query the registers:
sh-phyboard-electra-am64xx-2:~# mmc extcsd read /dev/mmcblk0
You will see:
=============================================
Extended CSD rev 1.8 (MMC 5.1)
=============================================

Card Supported Command sets [S_CMD_SET: 0x01]
[...]
Enabling Background Operations (BKOPS)
In contrast to raw NAND Flash, an eMMC device contains a Flash Transfer Layer (FTL) that handles the wear leveling, block management, and ECC of the raw MLC or TLC. This requires some maintenance tasks (for example erasing unused blocks) that are performed regularly. These tasks are called Background Operations (BKOPS).
By default (depending on the chip), the background operations may or may not be executed periodically, impacting the worst-case read and write latency.
The JEDEC Standard has specified a method since version v4.41 that the host can issue BKOPS manually. See the JEDEC Standard chapter Background Operations and the description of registers BKOPS_EN (Reg: 163) and BKOPS_START (Reg: 164) in the eMMC datasheet for more details.
Meaning of Register BKOPS_EN (Reg: 163) Bit MANUAL_EN (Bit 0):
Value 0: The host does not support the manual trigger of BKOPS. Device write performance suffers.
Value 1: The host does support the manual trigger of BKOPS. It will issue BKOPS from time to time when it does not need the device.
The mechanism to issue background operations has been implemented in the Linux kernel since v3.7. You only have to enable BKOPS_EN on the eMMC device.
The JEDEC standard v5.1 introduces a new automatic BKOPS feature. It frees the host to trigger the background operations regularly because the device starts BKOPS itself when it is idle (see the description of bit AUTO_EN in register BKOPS_EN (Reg: 163)).
To enable BKOPS, use:
sh-phyboard-electra-am64xx-2:~# mmc bkops_en manual /dev/mmcblk0
To ensure that the new setting is taken over and the kernel triggers BKOPS by itself, shut down the system:
sh-phyboard-electra-am64xx-2:~# poweroff
To check whether BKOPS_EN is set, execute:
sh-phyboard-electra-am64xx-2:~# mmc extcsd read /dev/mmcblk0 | grep BKOPS_EN
The output will be, for example:
Disable background operations handshake [BKOPS_EN]: 0x00
#OR
Enable background operations handshake [BKOPS_EN]: 0x01
Where value 0x00 means BKOPS_EN is disabled and device write performance suffers. 0x01 means BKOPS_EN is enabled and the host will issue background operations from time to time.
Note
The BKOPS_EN bit is one-time programmable only. It cannot be reversed.
Enable pseudo-SLC Mode
eMMC devices use MLC or TLC (https://en.wikipedia.org/wiki/Multi-level_cell) to store the data. Compared with SLC used in NAND Flash, MLC or TLC have lower reliability and a higher error rate at lower costs.
If you prefer reliability over storage capacity, you can enable the pseudo-SLC mode or SLC mode. The method used here employs the enhanced attribute, described in the JEDEC standard, which can be set for continuous regions of the device. The JEDEC standard does not specify the implementation details and the guarantees of the enhanced attribute. This is left to the chipmaker. For the Micron chips, the enhanced attribute increases the reliability but also halves the capacity.
Warning
When enabling the enhanced attribute on the device, all data will be lost.
The following sequence shows how to enable the enhanced attribute.
First obtain the current size of the eMMC device with:
sh-phyboard-electra-am64xx-2:~# parted -m /dev/mmcblk0 unit B print
To get the maximum size of the device after pseudo-SLC is enabled use:
sh-phyboard-electra-am64xx-2:~# mmc extcsd read /dev/mmcblk0 | grep ENH_SIZE_MULT -A 1
Now, you can set enhanced attribute for the whole device using the size shown in the previous command:
sh-phyboard-electra-am64xx-2:~# mmc enh_area set -y 0 <size_in_KiB> /dev/mmcblk0
To ensure that the new setting has taken over, shut down the system and perform a power cycle:
sh-phyboard-electra-am64xx-2:~# poweroff