Flashing the eMMC
Before continuing, it is recommended to review the Booting Essentials chapter, which explains how to boot the device from various accessible sources, a crucial step for the flashing process. Additionally, refer to the Copying Files to the Device chapter to understand how to transfer files to specific storage mediums. Following this, we will explore various methods for flashing eMMC storage, including using an SD card, a network connection, USB, or utilizing partup or WIC-based images.
Flash eMMC from SD Card
By default, the phyBOARD-Electra AM64x is configured to boot from an SD Card. This is generally one of the most convenient methods to boot your hardware throughout development because it allows for easy software updates and file transfers between your Host and target systems. In addition to creating a standard bootable SD card formatted with the phyCORE-AM64x Linux BSP, the following steps can be used to burn bootable software images to the onboard eMMC flash memory of the SOM, thus freeing up the SD Card slot on the carrier board.
The easiest way to access the SOM’s eMMC is to boot the SOM into Linux from an SD Card (you may already be doing this). The Linux instance running from the SD Card will need access to software binaries to flash to the eMMC; thus, we will also need to transfer those binaries to the SD Card so that they are present and accessible at runtime.
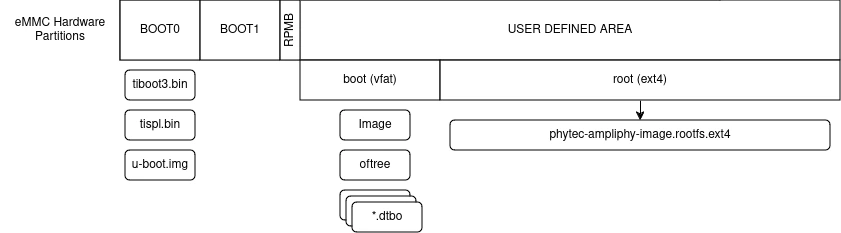
Layout of a partup flashed eMMC
To generate bootable partup artifacts, we utilize partup. After flashing with partup, the eMMC layout is defined as follows:
Flash eMMC from SD card in U-Boot
Download a pre-built image from Pre-Built Binaries or see Build the BSP to build you own WIC image.
U-Boot is not able to decompress our XZ-compressed WIC image. Please decompress the image on your host machine before use.
sh-host:~$ unxz -k phytec-container-image-phyboard-electra-am64xx-2.rootfs.wic.xz
By default, the SD card rootfs comes with a minimal size to save flashing time. Extend this partition by using the Copying Files to the Device guide. Copy the WIC image (phytec-container-image-phyboard-electra-am64xx-2.rootfs.wic) to the EXT4 rootfs partition.
Configure the bootmode switch to SD Card and insert the SD Card.
Power on the board and stop in U-Boot.
Load the image:
sh-uboot:~# ls mmc 1:2
<DIR>       4096 .
<DIR>       4096 ..
                 ...
       884537344 phytec-container-image-phyboard-electra-am64xx-2.rootfs.wic

sh-uboot:~# load mmc 1:2 0xA0000000 phytec-container-image-phyboard-electra-am64xx-2.rootfs.wic
Note
This step works only if the image file size does not exceed the available RAM in the Bootloader, as some RAM regions are reserved for components like OP-TEE. If the image file is too large, refer to the ‘Flash eMMC from SD card in Linux’ subsection.
Switch the mmc dev to use the eMMC device:
sh-uboot:~# mmc list
mmc@fa10000: 0
mmc@fa00000: 1 (SD)

sh-uboot:~# mmc dev 1
switch to partitions #0, OK
mmc1 is current device
Flash your WIC image from the SD card to eMMC. This will partition the card and copy bootloader files, Image, dtb, dtbo, and root file system to eMMC:
sh-uboot:~# setexpr nblk ${filesize} / 0x200
sh-uboot:~# mmc write 0xA0000000 0x0 ${nblk}

MMC write: dev # 0, block # 0, count 1190716 ... 1190716 blocks written: OK
Update the Bootloader to the eMMC’s dedicated boot0 partition:
# Select eMMC boot0 partition
sh-uboot:~# mmc dev 0 1

sh-uboot:~# load mmc 1 ${loadaddr} tiboot3.bin
sh-uboot:~# mmc write ${loadaddr} 0x0 0x400

sh-uboot:~# load mmc 1 ${loadaddr} tispl.bin
sh-uboot:~# mmc write ${loadaddr} 0x400 0x1000

sh-uboot:~# load mmc 1 ${loadaddr} u-boot.img
sh-uboot:~# mmc write ${loadaddr} 0x1400 0xC00
To give the ROM access to the boot partition, the following commands must be used for the first time:
sh-uboot:~# mmc partconf 0 1 1 1
sh-uboot:~# mmc bootbus 0 2 0 0
Power off the board and change the bootmode switch to eMMC, see Booting Essentials.
Flash eMMC from SD card in Linux
You can also flash the eMMC on Linux. You only need a partup package or WIC image saved on the SD card.
Show your saved partup package or WIC image files on the SD card:
sh-phyboard-electra-am64xx-2:~# ls
phytec-container-image-phyboard-electra-am64xx-2.rootfs.partup
phytec-container-image-phyboard-electra-am64xx-2.rootfs.wic.bmap
phytec-container-image-phyboard-electra-am64xx-2.rootfs.wic.xz
Show list of available MMC devices:
sh-phyboard-electra-am64xx-2:~# ls /dev | grep mmc
mmcblk0
mmcblk0boot0
mmcblk0boot1
mmcblk0rpmb
mmcblk1
mmcblk1p1
mmcblk1p2
mmcblk1p3
Note
The eMMC device can be recognized by the fact that it contains two boot partitions: (mmcblk0boot0; mmcblk0boot1)
Write the image to the eMMC device (MMC device 0 without partition) using partup:
sh-phyboard-electra-am64xx-2:~# partup install phytec-container-image-phyboard-electra-am64xx-2.rootfs.partup /dev/mmcblk0
Flashing the partup package has the advantage of using the full capacity of the eMMC device, adjusting partitions accordingly.
Note
Alternatively, bmaptool may be used instead:
sh-phyboard-electra-am64xx-2:~# bmaptool copy phytec-container-image-phyboard-electra-am64xx-2.rootfs.wic.xz /dev/mmcblk0
When utilizing bmap, it becomes necessary to manually update the bootloader files individually. This is due to the fact that wic images store the bootloader files in a distinct FAT/boot partition, which is incompatible with eMMC devices.
sh-phyboard-electra-am64xx-2:~# echo 0 > /sys/class/block/mmcblk0boot0/force_ro
sh-phyboard-electra-am64xx-2:~# dd if=/boot/tiboot3.bin of=/dev/mmcblk0boot0 count=1024 conv=fsync
sh-phyboard-electra-am64xx-2:~# dd if=/boot/tispl.bin of=/dev/mmcblk0boot0 seek=1024 count=3072 conv=fsync
sh-phyboard-electra-am64xx-2:~# dd if=/boot/u-boot.img of=/dev/mmcblk0boot0 seek=5120 count=3072 conv=fsync
The following must be run once per eMMC device in order for it to allow the bootROM to load the bootloaders from it. Once done for a given phyCORE-AM64x SOM, you won’t ever have to do this again for the life of that device.
sh-phyboard-electra-am64xx-2:~# mmc bootpart enable 1 1 /dev/mmcblk0
sh-phyboard-electra-am64xx-2:~# mmc bootbus set single_backward x1 x8 /dev/mmcblk0
sh-phyboard-electra-am64xx-2:~# mmc hwreset enable /dev/mmcblk0
Power off the development kit and configure the hardware to boot from the onboard eMMC flash. See the section Booting Essentials.
Flash eMMC from Network
The phyBOARD-Electra AM64x features an Ethernet connector, allowing updates over a network. Ensure the development host is properly configured, with a DHCP server connected to the target and a TFTP server set up.
From a high-level point of view, an eMMC device is like an SD card. Therefore, it is possible to flash the WIC image (<name>.wic) from the Yocto build system directly to the eMMC. The image contains the bootloader, kernel, device tree, device tree overlays, and root file system.
Flash eMMC from Network in U-Boot
U-Boot is not able to decompress our XZ-compressed WIC image. Please decompress the image on your host machine before use.
sh-host:~$ unxz -k phytec-container-image-phyboard-electra-am64xx-2.rootfs.wic.xz
Load your image via network to RAM:
sh-uboot:~# dhcp 0xA0000000 phytec-container-image-phyboard-electra-am64xx-2.rootfs.wic
Note
This step works only if the image file size does not exceed the available RAM in the Bootloader, as some RAM regions are reserved for components like OP-TEE. If the image file is too large, refer to the ‘Flash eMMC from Network in Linux’ subsection.
Write the image to the eMMC:
sh-uboot:~# dhcp 0xA0000000 phytec-container-image-phyboard-electra-am64xx-2.rootfs.wic
sh-uboot:~# mmc dev 0
sh-uboot:~# setexpr nblk ${filesize} / 0x200
sh-uboot:~# mmc write 0xA0000000 0x0 ${nblk}
Update the Bootloader to the eMMC’s dedicated boot0 partition:
sh-uboot:~# # Select eMMC boot0 partition
sh-uboot:~# mmc dev 0 1

sh-uboot:~# tftp ${loadaddr} ti-boot-container.img
sh-uboot:~# mmc write ${loadaddr} 0x0 0x2000
To give the ROM access to the boot partition, the following commands must be used for the first time:
sh-uboot:~# mmc partconf 0 1 1 1
sh-uboot:~# mmc bootbus 0 2 0 0
Power off the board and change the bootmode switch to eMMC, see Booting Essentials.
Flash eMMC from Network in Linux
Download the partup image:
sh-phyboard-electra-am64xx-2:~# tftp -r phytec-container-image-phyboard-electra-am64xx-2.rootfs.partup -g 192.168.3.10
Now copy the image to the eMMC device using partup:
sh-phyboard-electra-am64xx-2:~# partup install phytec-container-image-phyboard-electra-am64xx-2.rootfs.partup /dev/mmcblk0
Note
Alternatively, bmaptool may be used instead:
sh-phyboard-electra-am64xx-2:~# tftp -r phytec-container-image-phyboard-electra-am64xx-2.rootfs.wic.xz -g 192.168.3.10
sh-phyboard-electra-am64xx-2:~# tftp -r phytec-container-image-phyboard-electra-am64xx-2.rootfs.wic.bmap -g 192.168.3.10
sh-phyboard-electra-am64xx-2:~# bmaptool copy phytec-container-image-phyboard-electra-am64xx-2.rootfs.wic.xz /dev/mmcblk0
When utilizing bmaptool, it becomes necessary to manually update the bootloader files individually. This is due to the fact that wic images store the bootloader files in a distinct FAT/boot partition, which is incompatible with eMMC devices.
sh-phyboard-electra-am64xx-2:~# echo 0 > /sys/class/block/mmcblk0boot0/force_ro
sh-phyboard-electra-am64xx-2:~# tftp -r ti-boot-container.img -g 192.168.3.10
sh-phyboard-electra-am64xx-2:~# dd if=ti-boot-container.img of=/dev/mmcblk0boot0 conv=fsync
The following must be run once per eMMC device in order for it to allow the bootROM to load the bootloaders from it. Once done for a given phyCORE-AM64x SOM, you won’t ever have to do this again for the life of that device.
sh-phyboard-electra-am64xx-2:~# mmc bootpart enable 1 1 /dev/mmcblk0
sh-phyboard-electra-am64xx-2:~# mmc bootbus set single_backward x1 x8 /dev/mmcblk0
sh-phyboard-electra-am64xx-2:~# mmc hwreset enable /dev/mmcblk0
Power off the board and change the bootmode switch to eMMC, see Booting Essentials.
Flash eMMC from Network in Linux from Host perspective
Download the partup image from our downloads server, see Pre-Built Binaries.
Copy the image to the target:
sh-host:~$ scp phytec-container-image-phyboard-electra-am64xx-2.rootfs.partup [email protected]
Flash using partup:
sh-host:~$ ssh [email protected] "partup install phytec-container-image-phyboard-electra-am64xx-2.rootfs.partup /dev/mmcblk0"
Power off the board and change the bootmode switch to eMMC, see Booting Essentials.
Flash eMMC from USB
The phyBOARD-Electra AM64x provides two USB 2.0 Dual-Role Devices (DRD) subsystems via the three USB connectors (X43, X36, and X34). This guide will show you how to utilize the USB interface for flashing the eMMC device, either by using USB/DFU or a simple USB flash drive. The only requirement for flashing from a USB flash drive is a USB drive containing all relevant bootloader images and a phytec-container-image-phyboard-electra-am64xx-2.rootfs.partup or phytec-container-image-phyboard-electra-am64xx-2.rootfs.wic.
Flash eMMC from USB flash drive in U-Boot
Load your image from USB drive to RAM:
sh-uboot:~# usb start
sh-uboot:~# load 0xA0000000 phytec-container-image-phyboard-electra-am64xx-2.rootfs.wic
Write the image to the eMMC:
sh-uboot:~# mmc dev 0
sh-uboot:~# setexpr nblk ${filesize} / 0x200
sh-uboot:~# mmc write 0xA0000000 0x0 ${nblk}
Update the Bootloader to the eMMC’s dedicated boot0 partition:
# Select eMMC boot0 partition
sh-uboot:~# mmc dev 0 1

sh-uboot:~# load usb 0 ${loadaddr} ti-boot-container.img
sh-uboot:~# mmc write ${loadaddr} 0x0 0x2000
To give the ROM access to the boot partition, the following commands must be used for the first time:
sh-uboot:~# mmc partconf 0 1 1 1
sh-uboot:~# mmc bootbus 0 2 0 0
Flash eMMC from USB flash drive in Linux
Mount your USB flash drive:
sh-phyboard-electra-am64xx-2:~# mkdir /mnt/usb
sh-phyboard-electra-am64xx-2:~# mount /dev/sda1 /mnt/usb
Write the image to the eMMC device (MMC device 0 without partition) using partup:
sh-phyboard-electra-am64xx-2:~# partup install /mnt/usb/phytec-container-image-phyboard-electra-am64xx-2.rootfs.partup /dev/mmcblk0
Flashing the partup package has the advantage of using the full capacity of the eMMC device, adjusting partitions accordingly.
Note
Alternatively, bmaptool may be used instead:
sh-phyboard-electra-am64xx-2:~# bmaptool copy /mnt/usb/phytec-container-image-phyboard-electra-am64xx-2.rootfs.wic.xz /dev/mmcblk0
When utilizing bmaptool, it becomes necessary to manually update the bootloader files individually. This is due to the fact that wic images store the bootloader files in a distinct FAT/boot partition, which is incompatible with eMMC devices.
sh-phyboard-electra-am64xx-2:~# echo 0 > /sys/class/block/mmcblk0boot0/force_ro
sh-phyboard-electra-am64xx-2:~# dd if=/mnt/usb/ti-boot-container.img of=/dev/mmcblk0boot0 conv=fsync
The following must be run once per eMMC device in order for it to allow the bootROM to load the bootloaders from it. Once done for a given phyCORE-AM64x SOM, you won’t ever have to do this again for the life of that device.
sh-phyboard-electra-am64xx-2:~# mmc bootpart enable 1 1 /dev/mmcblk0
sh-phyboard-electra-am64xx-2:~# mmc bootbus set single_backward x1 x8 /dev/mmcblk0
sh-phyboard-electra-am64xx-2:~# mmc hwreset enable /dev/mmcblk0
Power off the development kit and configure the hardware to boot from the onboard eMMC flash. See the section Booting Essentials.
RAUC
The RAUC (Robust Auto-Update Controller) mechanism support has been added to meta-ampliphy. It controls the procedure of updating a device with new firmware. This includes updating the Linux kernel, Device Tree, and root filesystem. PHYTEC has written an online manual on how we have intergraded RAUC into our BSPs: L-1006e.A5 RAUC Update & Device Management Manual.