CAN
The phyCORE-AM64x SOM provides Controller Area Network (M_CAN) ports. These interfaces support CAN and CAN FD (flexible data-rate) specifications, conforming with CAN protocol version 2.0 part A, B and ISO 11898-1:2015. This guide will walk-through the basic usage of this interface by transferring data to and from a host PC. To learn more information about the phyCORE-AM64x CAN serial interface, please see section 7.1 in the Hardware Manual.
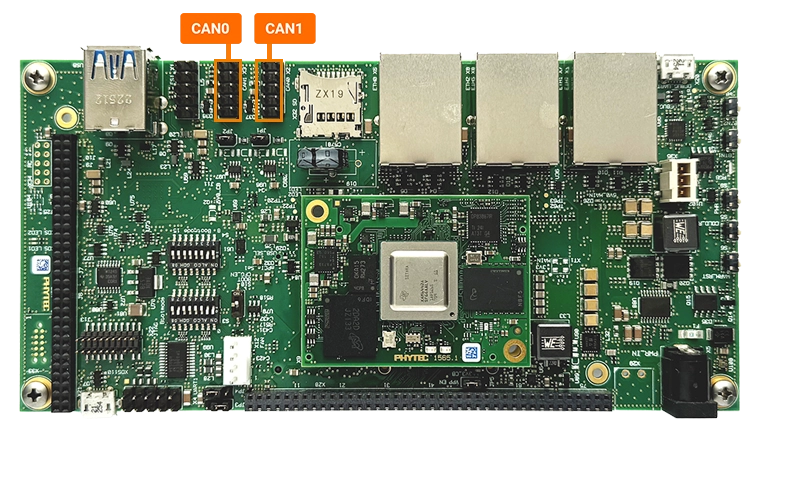
Interface Name |
Hardware Reference |
|---|---|
main_mcan0 |
X2 |
main_mcan1 |
X3 |
Requirements
DB9 Male to RS232 Female Cable (Included in development kit)
CAN Cable
CAN to USB Adapter
Setup the CAN Network
Connect a D-sub 9 ribbon cable (included in development kit) to the CAN0 connector X2 (red line indicates Pin 1).
Connect the CAN to USB adapter to your host PC (USB port) and the D-sub 9 ribbon cable that is now attached to the CAN0 connector X2 on the development kit.
Setup CAN Software
Install
can-utilson the Host System
To use the necessary CAN tools, install the can-utils package on your host system:
sh-host:~$ sudo apt update
sh-host:~$ sudo apt install can-utils
Verify Matching CAN Bitrates on Host and Target
Ensure that the CAN bitrates on both the host and target systems are identical. Bring up the can interface and check the bitrate using the following commands:
On the target (e.g., main_mcan0):
sh-phyboard-electra-am64xx-2:~# ip link set up main_mcan0
sh-phyboard-electra-am64xx-2:~# ip -details link show main_mcan0 | grep bitrate
          bitrate 500000 sample-point 0.875
On the host (e.g., can0):
sh-host:~$ sudo ip link set up can0
sh-host:~$ ip -details link show can0 | grep bitrate
          bitrate 500000 sample-point 0.800
          dbitrate 8000000 dsample-point 0.800
Adjust CAN Bitrate (if needed)
If the bitrate or sample point differs between the host and target, temporarily update the configuration using these commands:
On the target (e.g., main_mcan0):
sh-phyboard-electra-am64xx-2:~# ip link set main_mcan0 down
sh-phyboard-electra-am64xx-2:~# ip link set main_mcan0 up type can bitrate 500000 sample-point 0.800
On the host (e.g., can0):
sh-host:~$ sudo ip link set can0 down
sh-host:~$ sudo ip link set can0 up type can bitrate 500000 sample-point 0.800
Changing the CAN interface
There are two ways to modify the CAN interface configuration. This section will explain how to change the CAN bitrate from 500 kbit/s to 1 Mbit/s.
Runtime Configuration
To change the interface on the running system:
Edit the network configuration file:
sh-phyboard-electra-am64xx-2:~# vi /lib/systemd/network/11-main_mcan.network
Modify the Address line under the [CAN] section:
[CAN]
BitRate=1000000
Restart the network service:
sh-phyboard-electra-am64xx-2:~# systemctl restart systemd-networkd
Build-time Configuration
To permanently change the default static IP:
Edit the network configuration in your BSP layer:
meta-ampliphy/recipes-core/systemd/systemd-conf/11-main_mcan.network
Update the bitrate line as shown above
Rebuild the BSP image
Send CAN Messages
In this example, you’ll verify data transfer from the phyCORE-AM64x to the host PC via CAN.
In a terminal on the host PC, use candump to capture all error and data frames on the
can0interface:
sh-host:~$ candump can0,0:0,#FFFFFFFF
Note
You can explore more options for using candump by running:
sh-host:~$ man candump
In another terminal, access the Linux console on the phyCORE-AM64x and send an example CAN frame using the following command:
sh-phyboard-electra-am64xx-2:~# cansend main_mcan0 000#FE.ED.C0.DE.CA.FE.BA.BE
After sending, the candump terminal should display the transmitted CAN message. For example:
sh-host:~$ candump can0,0:0,#FFFFFFFF
  can0  000   [8]  FE ED C0 DE CA FE BA BE
You can modify the three-character CAN ID (before the # symbol) or the data payload (after the #) to send different messages.
candump runs continuously in a loop. Press Ctrl+C to terminate the tool.
Receive CAN Messages
After verifying data transfer from the phyCORE-AM64x to the host PC, you can test the reverse direction by following these steps.
In the Linux console on the phyCORE-AM64x, use
candumpto capture all error and data frames on the|intf-can0-dev-name|interface:
sh-phyboard-electra-am64xx-2:~# candump main_mcan0,0:0,#FFFFFFFF
On the host PC, send an example CAN frame using the following command:
sh-host:~$ cansend can0 005#CA.FE.BA.BE.FE.ED.C0.DE
After sending the frame, the candump terminal on the phyCORE-AM64x should display the transmitted CAN message. For example:
sh-phyboard-electra-am64xx-2:~# candump main_mcan0,0:0,#FFFFFFFF
  main_mcan0  005   [8]  CA FE BA BE FE ED C0 DE
As before, feel free to modify the three-character CAN ID (before the # symbol) or the data payload (after the #) to test different messages.
candump runs in a continuous loop. Use Ctrl+C to terminate it when finished.
Generate CAN Messages
Manually sending data frames is useful for testing specific commands and verifying connectivity. However, the can-utils package also includes a tool called cangen that automatically generates CAN frames with varying CAN IDs and data content.
In the Linux console of the phyCORE-AM64x, use
candumpto monitor incoming CAN messages:
sh-phyboard-electra-am64xx-2:~# candump main_mcan0,0:0,#FFFFFFFF
In another terminal on the host PC, use
cangento generate random CAN frames:
sh-host:~$ cangen can0
Back on the phyCORE-AM64x, the
candumpterminal will display multiple incoming CAN messages, similar to the following example:
sh-phyboard-electra-am64xx-2:~# candump main_mcan0,0:0,#FFFFFFFF
  main_mcan0  144   [7]  3C 51 75 7C CA B1 47
  main_mcan0  413   [3]  92 B3 8D
  main_mcan0  15A   [8]  D8 B4 00 68 64 FA D2 2E
  main_mcan0  0A6   [8]  5E 97 E9 18 40 5A 6E 5E
  main_mcan0  44C   [8]  6A 30 39 11 F7 1C 60 34
  main_mcan0  34F   [8]  82 BA E1 7B 1F 3D FD 54
  main_mcan0  2A3   [3]  09 04 77
  main_mcan0  17E   [8]  FE 75 54 74 C2 1A 80 79
  main_mcan0  7B2   [8]  8C CC C7 55 C6 EB 72 5D
  main_mcan0  48E   [8]  F4 2E 69 63 E8 35 3B 4F
  main_mcan0  2EC   [8]  4C 30 0E 7E 92 D3 77 45
  main_mcan0  56A   [8]  D2 2D E6 23 B7 B1 04 6F
  main_mcan0  253   [8]  AE CE 64 23 A3 6D CC 4E
  main_mcan0  448   [1]  C2
  main_mcan0  274   [8]  63 B2 E1 24 F2 BB 28 2A
  main_mcan0  146   [1]  B4
  main_mcan0  79C   [1]  BF
  main_mcan0  35F   [3]  12 CA 2D
  main_mcan0  77F   [8]  DE 11 D3 6E EA 04 69 01
Press Ctrl+C to stop cangen on the host PC and exit the listening mode on the phyCORE-AM64x.
CAN FD
To verify if CAN FD is enabled, check the statistics of the CAN interface:
sh-phyboard-electra-am64xx-2:~# ip -details link show main_mcan0
3: main_mcan0: <NOARP,UP,LOWER_UP,ECHO> mtu 16 qdisc pfifo_fast state UP mode DEFAULT group default qlen 10
    link/can  promiscuity 0 allmulti 0 minmtu 0 maxmtu 0
    can state ERROR-ACTIVE (berr-counter tx 0 rx 0) restart-ms 0
          bitrate 500000 sample-point 0.800
          tq 12 prop-seg 63 phase-seg1 64 phase-seg2 32 sjw 16 brp 1
          m_can: tseg1 2..256 tseg2 2..128 sjw 1..128 brp 1..512 brp_inc 1
          m_can: dtseg1 1..32 dtseg2 1..16 dsjw 1..16 dbrp 1..32 dbrp_inc 1
          clock 80000000 numtxqueues 1 numrxqueues 1 gso_max_size 65536 gso_max_segs 65535 tso_max_size 65536 tso_max_segs 65535 gro_max_size 65536 gso_ipv4_max_size 65536 gro_ipv4_max_size 65536 parentbus platform parentdev 20701000.can
If the interface does not display can <FD> in the output or lacks the dbitrate property, CAN FD needs to be enabled. Use the following commands to enable it. Ensure the dbitrate and dsample-point match the counterpart system or define common values.
sh-phyboard-electra-am64xx-2:~# ip link set main_mcan0 down
sh-phyboard-electra-am64xx-2:~# ip link set main_mcan0 up type can bitrate 500000 sample-point 0.800 fd on dbitrate 500000 dsample-point 0.800
Verify the updated configuration.
sh-phyboard-electra-am64xx-2:~# ip -details link show main_mcan0
3: main_mcan0: <NOARP,UP,LOWER_UP,ECHO> mtu 72 qdisc pfifo_fast state UP mode DEFAULT group default qlen 10
    link/can  promiscuity 0 allmulti 0 minmtu 0 maxmtu 0
    can <FD> state ERROR-ACTIVE (berr-counter tx 0 rx 0) restart-ms 0
          bitrate 500000 sample-point 0.800
          tq 12 prop-seg 63 phase-seg1 64 phase-seg2 32 sjw 16 brp 1
          m_can: tseg1 2..256 tseg2 2..128 sjw 1..128 brp 1..512 brp_inc 1
          dbitrate 500000 dsample-point 0.800
          dtq 50 dprop-seg 15 dphase-seg1 16 dphase-seg2 8 dsjw 4 dbrp 4
          m_can: dtseg1 1..32 dtseg2 1..16 dsjw 1..16 dbrp 1..32 dbrp_inc 1
          clock 80000000 numtxqueues 1 numrxqueues 1 gso_max_size 65536 gso_max_segs 65535 tso_max_size 65536 tso_max_segs 65535 gro_max_size 65536 gso_ipv4_max_size 65536 gro_ipv4_max_size 65536 parentbus platform parentdev 20701000.can
As you can see, the interface now has CAN FD enabled and a dbitrate set.
Testing the CAN FD Connection
The can-utils package includes canfdtest, a tool for testing CAN FD communication.
Run the following command to the Host PC:
sh-host:~$ canfdtest -v can0
Open a terminal on the phyCORE-AM64x and run the command with the
-goption to generate messages. Add-l 10000to limit the test to 10,000 messages:
sh-phyboard-electra-am64xx-2:~# canfdtest -v -g -l 10000 main_mcan0
interface = main_mcan0, family = 29, type = 3, proto = 1
.......................................
Test messages sent and received: 10000
Exiting...
canfdtest instances will run in a loop. Press Ctrl+C on the Host PC to stop the test.