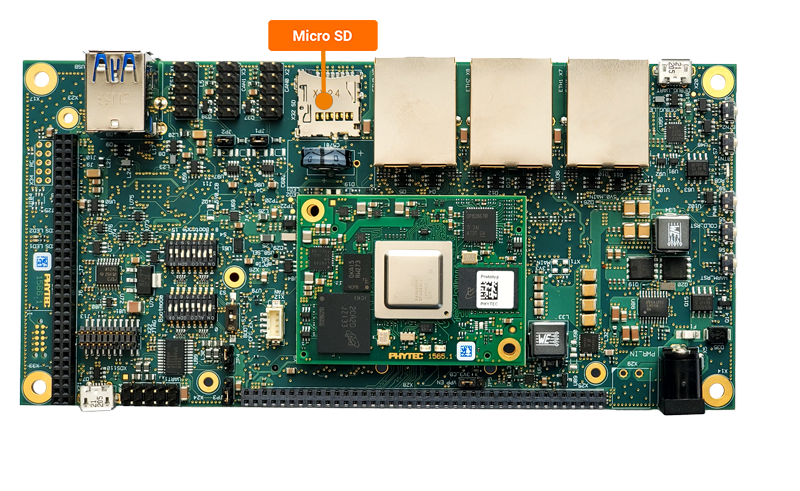
SD Card
The SD card interface can be used as a boot device or plug-and-play external media. This guide will walk through reading and writing to the phyCORE-AM64x development kit’s mirco-SD card. For information on how to boot the development kit from SD card see the guide SD Card. More information on the SD card interface all together can be found in the section 6.2.2 in the Hardware Manual.
Requirements
SDHC SD card, at least 8GB for PHYTEC’s TISDK release image (Included in development kit)
Linux Host PC or Virtual Machine (Ubuntu recommended) (Only for Transfering Media from Host)
SD card reader (operational under Linux) (Only for Transfering Media from Host)
Transfering Media on Target
This portion of the guide will show how to read and write files with the SD card interface from the development kit.
Mounting the SD card
When an external SD card is inserted, it will be mounted automatically and can be seen as /dev/mmcblk1 in Linux when booting from SD card.
Verify that the SD card has been mounted.
Target (Linux)mount | grep mmc
Expected Outputroot@phyboard-electra-am64xx-2:~# mount | grep mmc /dev/mmcblk1p2 on / type ext4 (rw,relatime) /dev/mmcblk1p1 on /boot type vfat (rw,relatime,fmask=0022,dmask=0022,codepage=437,iocharset=iso8859-1,shortname=mixed,errors=remount-ro)
See the contents of the SD card.
Target (Linux)ls /boot
Write to the SD Card
Create a text file and copy (cp) the file to the SD card.
Target (Linux)echo "SD card Test" > sdcard.txt cp sdcard.txt /boot/sdcard.txt
Verify that the file wasn’t corrupted with md5sum. Both the hashes should match.
Target (Linux)md5sum sdcard.txt /boot/sdcard.txt
Expected Outputroot@phyboard-electra-am64xx-2:~# md5sum sdcard.txt /boot/sdcard.txt cf7b014f4f2517400c1fc33b851e7da4 sdcard.txt cf7b014f4f2517400c1fc33b851e7da4 /boot/sdcard.txt
Read from the SD Card
Copy the file from the SD card to the root directory
Target (Linux)cp /boot/sdcard.txt ~/read-sd.txt
Verify that the file wasn’t corrupted with md5sum. Both the hashes should match.
Target (Linux)md5sum /boot/sdcard.txt read-sd.txt
Expected Outputroot@phyboard-electra-am64xx-2:~# md5sum /boot/sdcard.txt read-sd.txt cf7b014f4f2517400c1fc33b851e7da4 /boot/sdcard.txt cf7b014f4f2517400c1fc33b851e7da4 read-sd.txt
Note
- Using Your Linux Machine
You can see the sdcard.txt file on your Linux Ubuntu machine via a SD card reader (operational under Linux).
Power off and remove the power supply from the development kit.
Target (Linux)poweroff
Insert the SD card into the reader which is connected to your Linux Host machine.
Two USB partitions should appear. Double click both.
One of these should be the root filesystem which will be labeled ‘/root’
In the ‘/root’ parition you should see the file sdcard.txt
Transfering Media from Host
The SD card can be used to transfer files to and from the development kit too, the only down side for this is that you will want to power off the development kit before removing the primary boot media. This guide assumes that the SD card contains all the necessary files and images needed to boot the development kit, refered to as “a bootable SD card”. To find out more on how to create a bootable SD card please see the guide SD Card.
Power off the development kit.
Target (Linux)poweroff
Remove the SD card and connect it to your Linux machine via an SD card reader.
Note
You will not be able to place files on the SD Card using Windows because the SD Card is formatted for Linux. Windows does not recognize the format.
The SD Card is formatted with a minimal root filesystem size by default and in order to transfer larger files it may become necessary to increase its size to take advantage of the full size of the SD Card.
Increase the root filesystem partition of the SD card.
Run the following command without the SD card connected to the host machine.
Host (Ubuntu)ls /dev/sd*
Connect the bootable SD card to your Ubuntu host machine.
Run the following command with the SD card connected to the host machine.
Host (Ubuntu)ls /dev/sd*
The SD card device name is of the form /dev/sd[a-z] in Ubuntu and the letter identifier along with any partitions (signified by the numbers following the letter) on the SD card are enumerated upon connection to the host machine. Look at the second output of the command and look for new devices that appeared there, the new device will correspond to the SD card. Remember the /dev/sdX identifier corresponding to your SD card as you will need to use this in the following step.
Be confident you have the correct */dev/sdX* device identified for your SD card before proceeding. Specifying the incorrect disk using the ‘fdisk’ utility in the steps below can potentially destroy your Virtual Machine and will require you to set it back up again from scratch.
It is best to first backup the SD card to a file just in case something goes terribly wrong and you end up losing its contents:
Host (Ubuntu)umount /dev/sdX* #unmount the entire SD Card, not just any single partition sudo dd if=/dev/sdX of=~/backup.sdcard bs=1M conv=fsync && sync
Use the fdisk utility and provided command sequence to create a new, larger root filesystem partition in the SD card’s partition table:
Host (Ubuntu)sudo fdisk /dev/sdX # fdisk is an interactive utility, use the following command sequence # p (print the partition table and note the starting sector of the 2nd partition, call this START2. START2=196608 using the pre-built software) # d (delete a partition) # 2 (select the root filesystem) # n (create a new partition) # p (make it a primary partition) # 2 (make it the second partition) # START2 (specify the same starting sector for the 2nd partition as before) # ENTER (just hit ENTER to use the default size, which will automatically use up the remaining space on the SD Card) # w (write the changes)
Disconnect and reconnect the SD card from the host machine at this point to ensure the new partition table is being picked up by the kernel.
Finally, grow the root filesystem to take up the entire space in the partition:
Host (Ubuntu)sudo resize2fs /dev/sdX2
Drag and drop the file to the rootfs partition of the SD card using the GUI.
In order to copy files to the SD card using the terminal, this can be done with the standard ‘cp’ (copy) command. See the above section “Transfering Media from Target” for more information.
The next time you boot your phyCORE-AM64x into Linux, using the same SD Card, your file should be present in the filesystem.