SD Card
Create A Bootable SD Card
This guide explains how to create a bootable SD card for the phyCORE-AM65x Development Kit using Linux. You will need the following to complete these instructions:
SDHC SD card, at least 4GB for PHYTEC’s TISDK release images Linux Host PC or Virtual Machine Ubuntu 16.04 LTS recommended SD card reader Creating a bootable SD card requires an SD card reader operational under Linux to format and access the Linux partition of the card. If you do not have SD card access under Linux then copying the bootloader and mounting the root filesystem on SD/MMC card will not be possible.
Pre-built images are available on PHYTEC’s Artifactory. If you have built your own images, then the images are located in: <YOCTO_DIR>/build/arago-tmp-external-linaro-toolchain/deploy/images/<MACHINE>/
Note that the names of the images differ between releases. YOCTO_IMAGE in the instructions below refers to the Yocto image name that was used to build the image, and YOCTO_MACHINE refers to the machine that was selected to build the image. Refer to the “Built Images” section of the Quickstart pertaining to the specific release you are using for clarification on image names.
Note
Boot switches on phyCORE-AM65x Development Kit will have to be set in order to specify the location of the primary bootloader. See the Boot Mode Section on the Booting Essentials page.
Using Pre-Built Images
Download Pre-Built Binaries for the latest BSP release
Download TI create-sdcard.sh script which will be used to partition your SD card.
Note
For more information regarding the script, see: http://processors.wiki.ti.com/index.php/Processor_SDK_Linux_create_SD_card_script
From Terminal, navigate to the directory containing the create-sdcard.sh script (the command below assumes your default download directory is Downloads).
Host (Ubuntu)cd Downloads
Add executable permissions to the create-sdcard.sh script.
Host (Ubuntu)chmod +x create-sdcard.sh
Connect the SD card to the host PC
From a terminal run the SD card partition script with root permissions
Host (Ubuntu)sudo ./create-sdcard.sh
Select the drive corresponding to the SD card
Expected Output################################################################################ This script will create a bootable SD card from custom or pre-built binaries. The script must be run with root permissions and from the bin directory of the SDK Example: $ sudo ./create-sdcard.sh Formatting can be skipped if the SD card is already formatted and partitioned properly. ################################################################################ Available Drives to write images to: # major minor size name 1: 8 32 7761920 sdc Enter Device Number or n to exit: 1
Enter 2 for the number of partitions
Expected Output################################################################################ Number of partitions needed [2/3] : 2 Now partitioning sdc with 2 partitions... ################################################################################ Now making 2 partitions ################################################################################ 1024+0 records in 1024+0 records out 1048576 bytes (1.0 MB) copied, 0.913801 s, 1.1 MB/s Disk /dev/sdc doesn't contain a valid partition table DISK SIZE - 7948206080 bytes Checking that no-one is using this disk right now ... OK Disk /dev/sdc: 966 cylinders, 255 heads, 63 sectors/track sfdisk: ERROR: sector 0 does not have an msdos signature /dev/sdc: unrecognized partition table type Old situation: No partitions found New situation: Units = cylinders of 8225280 bytes, blocks of 1024 bytes, counting from 0 Device Boot Start End #cyls #blocks Id System /dev/sdc1 * 0+ 8 9- 72261 c W95 FAT32 (LBA) /dev/sdc2 10 965 956 7679070 83 Linux /dev/sdc3 0 - 0 0 0 Empty /dev/sdc4 0 - 0 0 0 Empty Successfully wrote the new partition table Re-reading the partition table ... If you created or changed a DOS partition, /dev/foo7, say, then use dd(1) to zero the first 512 bytes: dd if=/dev/zero of=/dev/foo7 bs=512 count=1 (See fdisk(8).) ################################################################################ Partitioning Boot ################################################################################ mkfs.fat 3.0.26 (2014-03-07) mkfs.fat: warning - lowercase labels might not work properly with DOS or Windows ################################################################################ Partitioning rootfs ################################################################################ mke2fs 1.42.9 (4-Feb-2014) Filesystem label=rootfs OS type: Linux Block size=4096 (log=2) Fragment size=4096 (log=2) Stride=0 blocks, Stripe width=0 blocks 480496 inodes, 1919767 blocks 95988 blocks (5.00%) reserved for the super user First data block=0 Maximum filesystem blocks=1967128576 59 block groups 32768 blocks per group, 32768 fragments per group 8144 inodes per group Superblock backups stored on blocks: 32768, 98304, 163840, 229376, 294912, 819200, 884736, 1605632 Allocating group tables: done Writing inode tables: done Creating journal (32768 blocks): done Writing superblocks and filesystem accounting information: doneEnter n when asked to continue. Files will be copied to the partitions manually.
Expected Output################################################################################ Partitioning is now done Continue to install filesystem or select 'n' to safe exit **Warning** Continuing will erase files any files in the partitions ################################################################################ Would you like to continue? [y/n] : n
Eject and then re-connect the SD Card to automatically mount the SD Card and then find where it was mounted. You can confirm the mount point of the ‘/dev/sdX’ device with the following command:
Host (Ubuntu)mount
Expected Outputuser@ubuntu:~$ mount sysfs on /sys type sysfs (rw,nosuid,nodev,noexec,relatime) proc on /proc type proc (rw,nosuid,nodev,noexec,relatime) udev on /dev type devtmpfs (rw,nosuid,relatime,size=5347324k,nr_inodes=1336831,mode=755) ... /dev/sdc2 on /media/user/root type ext4 (rw,nosuid,nodev,relatime,uhelper=udisks2) /dev/sdc1 on /media/user/boot type vfat (rw,nosuid,nodev,relatime,uid=1000,gid=1000,fmask=0022,dmask=0022,codepage=437,iocharset=iso8859-1,shortname=mixed,showexec,utf8,flush,errors=remount-ro,uhelper=udisks2)
In the above example output we can see that the the SD Card’s two partition (/dev/sdc1 and /dev/sdc2) are mounted in /media/<user>/ .
Use the terminal to copy the bootloaders (u-boot and system firmware) to the boot partition
Host (Ubuntu)cp tiboot3.bin tispl.bin u-boot.img sysfw.itb /media/<username>/boot/ && sync
Use the terminal to extract the filesystem to the root partition. The filesystem includes the Linux kernel.
Host (Ubuntu)sudo tar -xf tisdk-default-image-am65xx-phycore-kit.tar.xz -C /media/<username>/rootfs/ && sync
Unmount the partitions and remove the SD card
Host (Ubuntu)umount /media/<username>/boot /media/<username>/rootfs
You SD card should now be ready to boot your hardware into Linux.
Updating Individual Parts of a Bootable SD Card
This section describes the process for updating individual components of an SD Card if you already have one that has been formatted as described above.
Once the SD card has been formatted, you may update the kernel, root filesystem, and U-Boot files individually.
Bootloader (U-Boot and System Firmware)
Remove the existing U-Boot images:
Host (Ubuntu)rm /media/<username>/boot/tiboot3.bin && sync rm /media/<username>/boot/tispl.bin && sync rm /media/<username>/boot/u-boot.img && sync rm /media/<username>/boot/sysfw.itb && sync
Copy the new images to the boot partition of the SD card:
Host (Ubuntu)cp tiboot3.bin tispl.bin u-boot.img sysfw.itb /media/<username>/boot/ && sync
Root File System
If replacing the root filesystem, remove the existing:
Host (Ubuntu)sudo rm -rf /media/<username>/rootfs/* && sync
Load the new filesystem to the rootfs partition on the SD card:
Host (Ubuntu)sudo tar -xf tisdk-rootfs-image-am65xx-phycore-kit.tar.xz -C /media/<username>/rootfs/ && sync
Linux Kernel
Warning
If you do not need to update your Linux kernel or device tree images, this step should be skipped. The root file system already contains the kernel and default device tree images in its boot subdirectory.
Remove the existing Linux kernel and device tree images:
Host (Ubuntu)sudo rm /media/<username>/rootfs/boot/Image && sync sudo rm /media/<username>/rootfs/boot/k3-am65xx-phycore-kit.dtb && sync
Load the new Linux kernel and device tree images to the boot subdirectory on the root file system partition of the SD card. Note that U-Boot expects the kernel to be named Image and the default device tree image image to be named k3-am65xx-phycore-kit.dtb:
Host (Ubuntu)sudo cp Image /media/<username>/rootfs/boot/ && sync sudo cp k3-am65xx-phycore-kit.dtb /media/<username>/rootfs/boot/ && sync
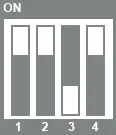
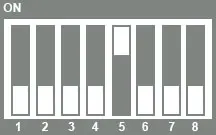
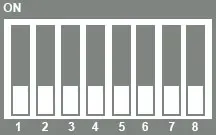
Booting from SD Card
The phyCORE-AM65x development kit is configured to boot from an SD Card slot by default and basic steps for performing this and establishing serial communication are outlined in the Quickstart. Boot switch (aka DIP switches) settings determine the location and method the boot ROM loads the first stage bootloader into memory before executing it.
Boot Switch Settings
JP7 should be disabled.