eMMC
This guide describes the process for flashing and booting from eMMC on the phyCORE-AM65x Development Kit. These instructions will be useful if you want to:
Flash images because eMMC is empty
Upgrade to a new release
Use custom-built images
Requirements
An SD card that has been prepared with the instructions found in Create a Bootable SD Card. These instructions are intended for flashing images from the SD card to eMMC.
The .ext4 filesystem image copied to your bootable SD card. For this release the filesystem image is tisdk-rootfs-image-am65xx-phycore-kit.ext4 and will be included at the rootfs/boot/ directory on the SD Card provided with the development kit.
Partition eMMC
eMMC partitioning can be done from U-Boot or Linux. Both options are effectively the same, you may choose the option most suitable for your development purposes. Both options are described below.
Option 1: Partition eMMC from U-Boot
First generate two universally unique identifiers (UUIDs) for the partition table (GPT) that you will be writing to eMMC. Run the following command twice using your Host Machine:
Host (Ubuntu)uuidgen
Expected Outputuser@ubuntu:~$ uuidgen 399c32a9-8f88-4402-a15b-26d92274dab3 user@ubuntu:~$ uuidgen b4f58302-85f1-4922-bcb5-02a1de3a3062
Note
The “uuidgen” command line utility generates unique identifiers so it is normal for it to provide you with UUIDs different than the example above.
Keep track of these UUIDs by leaving the Terminal open, writing them down or saving them to a file. We will use them in the following steps.
Boot the phyCORE-AM65x from SD Card. Press any key within 3 seconds to halt autoboot and enter U-Boot.
Use the following commands to set the identifiers for the eMMC partitions to the generated values and write the new GPT partition table to eMMC.
Target (U-Boot)setenv uuid_gpt_disk <first UUID> setenv uuid_gpt_rootfs <second UUID> gpt write mmc 0 ${partitions}Expected Output=> setenv uuid_gpt_disk 399c32a9-8f88-4402-a15b-26d92274dab3 => setenv uuid_gpt_rootfs b4f58302-85f1-4922-bcb5-02a1de3a3062 => gpt write mmc 0 ${partitions} Writing GPT: success!Verify the GPT:
Select the on board eMMC device:
Target (U-Boot)mmc dev 0
Print the partition map:
Target (U-Boot)mmc part
Expected Output=> mmc part Partition Map for MMC device 0 -- Partition Type: EFI Part Start LBA End LBA Name Attributes Type GUID Partition GUID 1 0x00000022 0x0072bfde "rootfs" attrs: 0x0000000000000000 type: ebd0a0a2-b9e5-4433-87c0-68b6b72699c7 guid: b4f58302-85f1-4922-bcb5-02a1de3a3062Verify that partitioning was a success:
Target (U-Boot)gpt verify mmc 0 ${partitions}
Option 2: Partition eMMC from Linux
Boot from SD and boot fully into Linux. Log into Linux and use parted with the following options to create and write a new GPT partition table to eMMC:
umount /dev/mmcblk0p1
parted /dev/mmcblk0 -s mklabel GPT
parted /dev/mmcblk0 -s mkpart rootfs ext4 34s 100%
sync
Flash the Bootloader
Flashing the bootloader can be done from U-Boot or Linux. Both options are effectively the same, you may choose the option most suitable for your development purposes. Both options are described below.
Option 1: Flash the Boot Loader from U-Boot
Boot from SD and press any key to stop autoboot when prompted to enter the U-Boot command line. Copy the boot loader files from the boot partition of the SD card to the hardware boot partition of the eMMC:
Target (U-Boot)mmc dev 0 1 fatload mmc 1 ${loadaddr} tiboot3.bin mmc write ${loadaddr} 0x0 0x400 fatload mmc 1 ${loadaddr} tispl.bin mmc write ${loadaddr} 0x400 0x1000 fatload mmc 1 ${loadaddr} u-boot.img mmc write ${loadaddr} 0x1400 0x2000 fatload mmc 1 ${loadaddr} sysfw.itb mmc write ${loadaddr} 0x3600 0x800Give the AM65x ROM bootloader access to the boot partition and enable hardware reset. These commands only need to be run once per eMMC chip:
Target (U-Boot)mmc partconf 0 1 1 1 mmc bootbus 0 2 0 0 mmc rst-function 0 1
Option 2: Flash the Boot Loader from Linux
Boot from SD and boot fully into Linux. Log into Linux and use dd to copy the boot loader files from the boot partition of the SD card to the hardware boot partition of the eMMC after enabling write access:
Target (Linux)echo 0 > /sys/block/mmcblk0boot0/force_ro dd if=/run/media/mmcblk1p1/tiboot3.bin of=/dev/mmcblk0boot0 bs=512 count=1024 dd if=/run/media/mmcblk1p1/tispl.bin of=/dev/mmcblk0boot0 bs=512 seek=1024 count=4096 dd if=/run/media/mmcblk1p1/u-boot.img of=/dev/mmcblk0boot0 bs=512 seek=5120 count=8192 dd if=/run/media/mmcblk1p1/sysfw.itb of=/dev/mmcblk0boot0 bs=512 seek=13824 count=2048 sync
Give the AM65x ROM bootloader access to the boot partition and enable hardware reset. These commands only need to be run once per eMMC chip:
Target (Linux)mmc bootpart enable 1 1 /dev/mmcblk0 mmc bootbus set single_backward x1 x8 /dev/mmcblk0 mmc hwreset enable /dev/mmcblk0
Flash the Root Filesystem
Note
The filesystem can only be flashed from Linux due to the size of the filesystem image provided with this BSP release. Flashing from U-Boot may be possible with a more minimal image.
Boot from SD and boot fully into Linux. Log into Linux and use dd to copy the root filesystem from the SD card to eMMC:
Target (Linux)dd if=/boot/tisdk-rootfs-image-am65xx-phycore-kit.ext4 of=/dev/mmcblk0p1 bs=1M && sync
Booting from eMMC
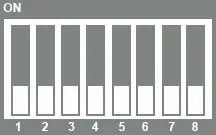
The phyCORE-AM65x development kit is configured to boot from an SD card slot by default. Therefore you’ll have to change the DIP switches to reflect the eMMC boot mode configuration seen below.
Boot Switch Settings
JP7 should be disabled.