OSPI Boot
An Octal Serial Peripheral Interface (OSPI) Flash is populated on the SOM as a programmable nonvolatile storage and can also be leveraged as boot media. This guide will walk through how to flash the SOM’s OSPI via U-boot, followed by booting from OSPI. For more information on OSPI, please see the phyCORE-AM64x Hardware Manual.
Flashing the OSPI
The easiest way to access the SOM’s OSPI is to boot the SOM into U-Boot from an SD card (you may already be doing this). This guide will require a “Bootable SD card”, an SD card that has been flashed with the development kit’s BSP image. For instructions on how to create a bootable SD card, see this guide SD Card.
Power on the development kit and hit any key to stop in U-Boot.
Note
Be sure that you are booting the kit from SD card!
Within U-Boot, flash both SPLs and the U-Boot image into the OSPI storage device.
Target (U-Boot)sf probe fatload mmc 1 $loadaddr tiboot3.bin sf update $loadaddr 0x0 $filesize fatload mmc 1 $loadaddr tispl.bin sf update $loadaddr 0x100000 $filesize fatload mmc 1 $loadaddr u-boot.img sf update $loadaddr 0x300000 $filesize
Unplug power from the kit. Follow the next section “Boot from OSPI” to configure the hardware.
Boot from OSPI
The phyCORE-AM64x development kit is configured to boot from an SD Card slot by default. This guide will serve to provide basic steps for booting from the SOM’s onboard OSPI flash memory after it has been flashed.
Keep the bootable SD card inserted in the kit if you want to boot all the way into Linux.
Due to the OSPI NOR Flash’s limited size, the steps above only flash the bootloader. The SD card still contains the kernel and root filesystem for the BSP image.
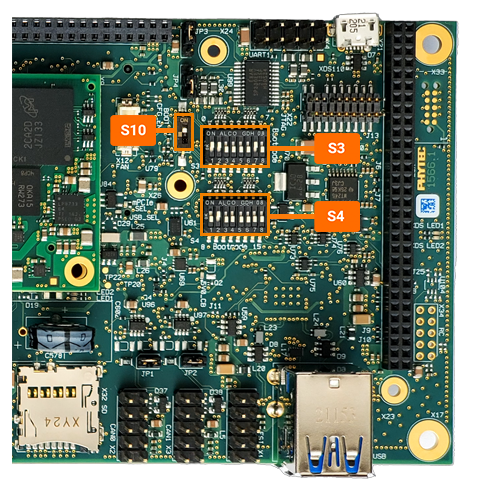
S10 should be ON
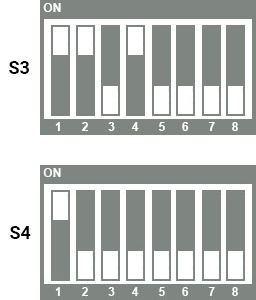
Note
Be mindful of the switch orientation!
Initramfs with OSPI
You can also include an initramfs and kernel on the OSPI NOR, which will allow you to boot into Linux using OSPI. Again, you will need to be booted into U-Boot with an SD card, and this guide also expects that you have a USB drive with an initramfs image on it. The name of the initramfs image will vary depending on what machine you are using.
Target (U-Boot)sf probe fatload mmc 1 $loadaddr tiboot3.bin sf update $loadaddr 0x0 $filesize fatload mmc 1 $loadaddr tispl.bin sf update $loadaddr 0x100000 $filesize fatload mmc 1 $loadaddr u-boot.img sf update $loadaddr 0x300000 $filesize fatload mmc 1 $loadaddr k3-am642-phyboard-electra-rdk.dtb sf update $loadaddr 0x740000 $filesize setenv size_fdt $filesize fatload mmc 1 $loadaddr Image sf update $loadaddr 0x800000 $filesize setenv size_kern $filesize usb start fatload usb 0 $loadaddr phytec-initramfs-image-phyboard-electra-am64xx-2.cpio.xz sf update $loadaddr 0x1e00000 $filesize setenv size_fs $filesize saveenv env export -c $loadaddr sf update $loadaddr 0x700000 $filesize sf update $loadaddr 0x720000 $filesize
Now change your board to OSPI boot mode using the boot switches as shown above.
Once you boot into linux, in order to populate the /dev directory, you must run the following command. Once /dev is populated, you can write to the eMMC.
Target (Linux)mount -t devtmpfs udev /dev
Limitations with OSPI
Unfortunatly, only SOMs with 64MB or more of NOR have space for a root filesystem. If you do not have space for a root file system, PHYTEC recommends to load a Kernel and root filesystem via Ethernet.