eMMC
Flashing the eMMC
By default, the phyCORE-AM64x development kit is configured to boot from an SD Card. This is generally one of the most convenient methods to boot your hardware throughout development because it allows for easy software updates and file transfers between your Host and target systems. In addition to creating a standard bootable SD card formatted with the phyCORE-AM64x Linux BSP, the following steps can be used to burn bootable software images to the onboard eMMC flash memory of the SOM, thus freeing up the SD Card slot on the carrier board.
The easiest way to access the SOM’s eMMC is to boot the SOM into Linux from an SD Card (you may already be doing this). The Linux instance running from the SD Card will need access to software binaries to flash to the eMMC; thus, we will also need to transfer those binaries to the SD Card so that they are present and accessible at runtime.
Note
When you boot into Linux from an SD Card, obviously all the required binaries for boot are all already present on the SD Card. But, the tricky part with copying the “in-use” software components, specifically the root filesystem of the SD Card, is that it is already actively mounted in memory while Linux is up and running. This makes copying the root filesystem to the eMMC complicated and prone to filesystem corruption/errors. For this reason, it is best to transfer the tarballed rootfs to the SD Card itself so that we have a inactive, unmounted copy of the root filesystem in userspace (it’s sort of like root filesystem “inception”, like that one confusing movie with Leonardo DiCaprio).
What You’ll Need
Ubuntu 20.04 LTS, 64-bit Host Machine or a Windows Machine
If using a virtual machine, VMWare Workstation, VMWare Player, and VirtualBox are all viable solutions.
SD Card Reader
4GB micro-SD Card or larger (Included in development kit)
Preparing to Flash eMMC (Software)
Download the prebuilt SD card image (wic.xz) on your machine from the Pre-Built Binaries.
Warning
The machine number for the BSP image can be impacted based on the processor you are developing with. Please refer to the table in the Release notes to assist in selecting the correct machine.
Linux Machine
Power off the development kit and insert the micro-SD card from the development kit to your SD card reader.
Target (Linux)poweroff
Transfer the SD card image onto the SD card.
Host (Ubuntu)cd <image location> sudo cp phytec-headless-image-phyboard-electra-am64xx-2.wic.xz /media/<user>/root sudo sync /media/<user>/root
Safely eject the SD card from the Linux host machine.
Insert the micro-SD card into the development kit.
Windows Machine (SCP)
These instructions would work with a Linux machine as well via terminal.
With the develeopment kit booted into Linux, confirm the development kit’s ethernet IP address (DHCP). For more information on how to change the from a static IP address to a DHCP address, see the Ethernet interface guide.
Target (Linux)ip addr
Open the Command Prompt tool on Windows and navigate to the directory where the SD card image and bootloader files are located.
Host (Windows)cd <insert-path-to-files>
Transfer the files to the development kit’s root directory.
Host (Windows)scp "phytec-headless-image-phyboard-electra-am64xx-2.wic.xz" root@<insert-IP-address>:~
Preparing to Flash eMMC (Hardware)
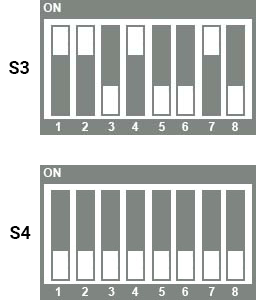
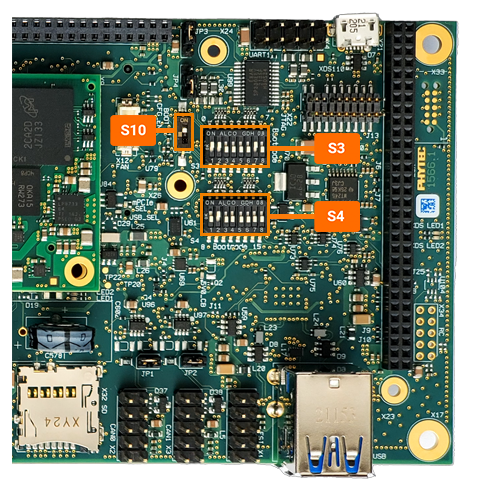
With the development kit powered off, verify that the boot switches are set to boot from SD card, not eMMC.
See the table on Booting Essentials page to confirm SD card boot switches.
Starting with a Clean eMMC
Check the eMMC for existing filesystem partitions
Note
The eMMC is /dev/mmcblk0 and the SD Card is /dev/mmcblk1.
fdisk -l /dev/mmcblk0
You should see something like the following:
Disk /dev/mmcblk0: 15 GB, 15913189376 bytes, 31080448 sectors
485632 cylinders, 4 heads, 16 sectors/track
Units: sectors of 1 * 512 = 512 bytes

Device       Boot StartCHS    EndCHS        StartLBA     EndLBA    Sectors  Size Id Type
/dev/mmcblk0p1    32,0,1      1023,3,16         2048   30777310   30775263 14.6G 83 Linux
root@phyboard-electra-am64xx-2:~#
In the above example output, we see that /dev/mmcblk0 has a single partition on it. For the sake of this guide, we are going to first delete any and all existing partitions so that we can start from a clean eMMC flash device. We can do this using an ‘fdisk’ interactive session.
Target (Linux)umount /dev/mmcblk0* fdisk /dev/mmcblk0 # Use the following command sequence for reference once in the fdisk interactive session. d # delete partition (you will need to repeat this for every partition present) w # write the changes to the disk
Flash the eMMC
Now we can flash the eMMC using the SD card binary you previously downloaded.
Target (Linux)xzcat -dc phytec-headless-image-phyboard-electra-am64xx-2.wic.xz | dd of=/dev/mmcblk0 bs=4M conv=fsync
Now when you run the following ‘fdisk’ command the eMMC should be partitioned into two parts.
Target (Linux)fdisk -l /dev/mmcblk0
Expected OutputDisk /dev/mmcblk0: 15 GB, 15913189376 bytes, 31080448 sectors 242816 cylinders, 4 heads, 32 sectors/track Units: sectors of 1 * 512 = 512 bytes Device Boot StartCHS EndCHS StartLBA EndLBA Sectors Size Id Type /dev/mmcblk0p1 * 16,0,1 1023,3,32 2048 322975 320928 156M c Win95 FAT32 (LBA) /dev/mmcblk0p2 1023,3,32 1023,3,32 323584 1050907 727324 355M 83 Linux
Now we must also flash the bootloader to the eMMC.
Target (Linux)echo 0 > /sys/class/block/mmcblk0boot0/force_ro dd if=/boot/tiboot3.bin of=/dev/mmcblk0boot0 count=2048 conv=fsync dd if=/boot/tispl.bin of=/dev/mmcblk0boot0 seek=2048 count=4096 conv=fsync dd if=/boot/u-boot.img of=/dev/mmcblk0boot0 seek=6144 count=8192 conv=fsync
The following must be run once per eMMC device in order for it to allow the bootROM to load the bootloaders from it. Once done for a given phyCORE-AM64x SOM, you won’t ever have to do this again for the life of that device.
Target (Linux)mmc bootpart enable 1 1 /dev/mmcblk0 mmc bootbus set single_backward x1 x8 /dev/mmcblk0 mmc hwreset enable /dev/mmcblk0
Power off the development kit and configure the hardware to boot from the onboard eMMC flash. See the section “Booting from eMMC” for more information on that.
Booting from eMMC
The phyCORE-AM64x development kit is configured to boot from an SD card slot by default. Therefore you’ll have to change the DIP switches to reflect the eMMC boot mode configuration seen below.
Boot Switch Settings
S10 should be ON