UART
During development, it may be beneficial to leverage the primary UART debug interface for loading your boot binaries onto the phyCORE-AM62x development kit. This guide will walk through the process of booting into U-Boot via UART.
Requirements
Hardware
Ubuntu 24.04 LTS or newer
If using a virtual machine, VMWare Workstation, VMWare Player, and VirtualBox are all viable solutions.
USB-A to USB micro cable
Software
Prepare the following U-Boot images by building the BSP (Build the BSP) or downloading the pre-built (Pre-Built Binaries) image files. These images will be used for downloading to and booting on the phyCORE-AM62x via UART:
* tiboot3.bin
* tispl.bin
* u-boot.img
Prepare the Host System
- This guide assumes the following:
The console is connected to ttyUSB0 of the Ubuntu Host Machine.
lrzsz package is installed on the Ubuntu Host Machine. To install lrzsz, run:
sh-host:~$ sudo apt update && sudo apt install lrzsz minicom
Make sure you are part of the
dialoutgroup.sh-host:~$ sudo usermod -a -G dialout $USER
Note
You may need to restart your computer for the dialout permission to take effect.
Booting from UART
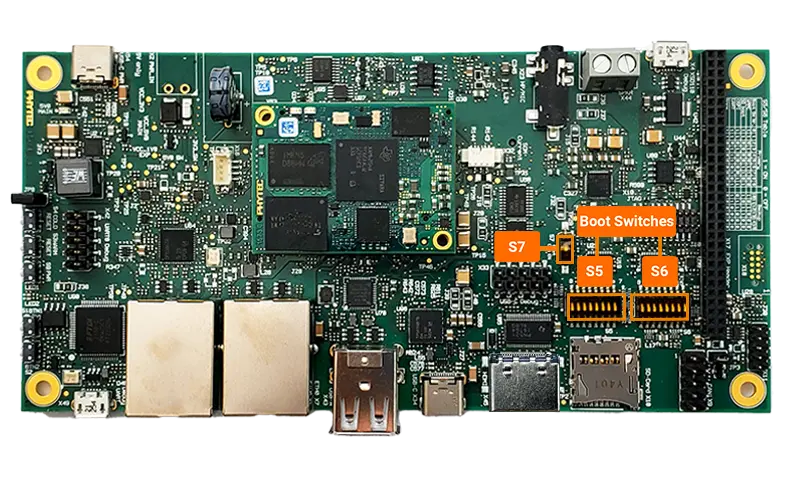
Boot Switch Settings
The phyCORE-AM62x development kit is configured to boot from an SD Card slot by default and basic steps for performing this and establishing serial communication are outlined in the Quickstart. We need to modify the default boot configuration to UART Boot AND connect the development kit’s Debug UART interface to your Ubuntu Host Machine.
S7 should be ON to override default boot settings.
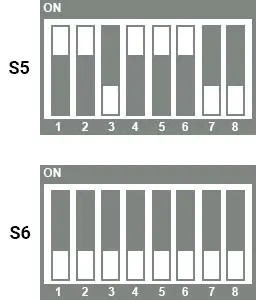
Note
Be mindful of the switch orientation!
Prepare the Development Kit
Once configured, connect your phyCORE-AM62x development kit’s Debug UART interface to your Ubuntu Host Machine.
Power-on the development kit.
To test your setup thus far, open a serial console within your Ubuntu Host Machine:
Use the following command to start a serial connection with the development kit:
sh-host:~$ minicom -b 115200 -D /dev/ttyUSB0
In UART Boot mode, you should see the following string of characters printed to the terminal:
01000000011a0000616d36327800000000000000475020200100010001000100C
You should also see the final “C” character continuously printed to the terminal.
You must now close the minicom session for the remaining steps to work. To close minicom, first enter Ctrl-A and then hit the X key (Ctrl-A and then the Z key will give you a command reference for more options).
Loading the Bootloader Binaries
Enter the following commands in your Ubuntu Host Machine in order to load the multiple stages of the bootloaders in sequence. Be sure to replace the <path to> substring within each command to reflect the appropriate filesystem path your build system has these files stored.
sh-host:~$ stty -F /dev/ttyUSB0 115200
sh-host:~$ sb --xmodem <path to>/tiboot3.bin > /dev/ttyUSB0 < /dev/ttyUSB0
sh-host:~$ sb --ymodem <path to>/tispl.bin > /dev/ttyUSB0 < /dev/ttyUSB0
sh-host:~$ sb --ymodem <path to>/u-boot.img > /dev/ttyUSB0 < /dev/ttyUSB0
Once complete, you can reopen minicom to access the U-Boot console:
sh-host:~$ minicom -b 115200 -D /dev/ttyUSB0
Debugging Bootloader Loading
Uploading bootloader images via the console UART interface can make debugging boot failures challenging. However, Minicom supports scripting, which allows us to upload images while simultaneously monitoring the console output. To use this feature, create a file named debug-uart.script with the following content. Be sure to update <path to> accordingly.
timeout 300
print "\n"
! sx -kb <path to>/tiboot3.bin > /dev/ttyUSB0 < /dev/ttyUSB0
expect "Trying"

print "\n"
! sx -kb <path to>/tispl.bin > /dev/ttyUSB0 < /dev/ttyUSB0
expect "Trying"

print "\n"
! sx -kb <path to>/u-boot.img > /dev/ttyUSB0 < /dev/ttyUSB0
Next, launch Minicom and specify the script:
sh-host:~$ minicom -b 115200 -D /dev/ttyUSB0 -S debug-uart.script