GPIO
General-Purpose Input/Output (GPIO) pins can be configured as either inputs or outputs. Many signals on the phyCORE-Connector can be used as GPIOs through multiplexing. The AM62Px processor features five independent GPIO modules. For detailed information about the phyCORE-AM62Px GPIO interface, please refer to the GPIO section in the Hardware Manual
GPIO Signal Names and Chip Mapping
GPIOn_x is a generic name used to describe a GPIO signal, where n represents the specific GPIO module and x represents one of the input/output signals associated with the module. Usually you find these names in the schematics and in comments in our device trees in the muxing section.
The AM62Px provides three GPIO modules:
GPIO0
GPIO1
MCU_GPIO0
Linux represents these modules as gpiochips. You can list them using the gpiodetect command:
phyboard-lynx-am62pxx-1:~# gpiodetect
gpiochip0 [4201000.gpio] (24 lines)          # MCU_GPIO0
gpiochip1 [600000.gpio] (92 lines)           # GPIO0
gpiochip2 [601000.gpio] (52 lines)           # GPIO1
gpiochip3 [tps65219-gpio.2.auto] (3 lines)   # PMIC GPIO (WKUP_I2C0 @ 0x30)
gpiochip4 [2-0020] (16 lines)                # TCA6416A U73 on I2C1 @ 0x20
gpiochip5 [2-0021] (16 lines)                # TCA6416A U74 on I2C1 @ 0x21
The second column shows the hardware address of each GPIO module. In the device tree, these GPIOs are accessed using node labels:
main_gpio0 (gpio@600000)
main_gpio1 (gpio@601000)
mcu_gpio0 (gpio@4201000)
Note
GPIO chip numbers may change between system boots. For consistent numbering, configure udev rules.
Active GPIO Signals
The following command shows GPIO signals that are currently allocated by kernel drivers. These GPIOs are already in use and attempting to access them with gpioget or gpioset will result in a “Device or resource busy” error.
See the allocated GPIO signals by running:
phyboard-lynx-am62pxx-1:~# cat /sys/kernel/debug/gpio
gpiochip0: GPIOs 512-535, parent: platform/4201000.gpio, 4201000.gpio:

gpiochip1: GPIOs 536-627, parent: platform/600000.gpio, 600000.gpio:
 gpio-549 (                    |green:heartbeat     ) out lo
 gpio-608 (                    |home                ) in  lo

gpiochip2: GPIOs 628-679, parent: platform/601000.gpio, 601000.gpio:
 gpio-678 (                    |id                  ) in  hi

gpiochip3: GPIOs 680-682, parent: i2c/0-0030, tps65219-gpio.2.auto, can sleep:

gpiochip4: GPIOs 683-698, parent: i2c/2-0020, 2-0020, can sleep:
 gpio-683 (HDMI_RESETn         |p0-hog              ) out hi
 gpio-684 (ETH1_RESETn         |PHY reset           ) out hi ACTIVE LOW
 gpio-685 (AUDIO_RESETn        |reset               ) out hi ACTIVE LOW
 gpio-686 (USB_HUB_EN          )
 gpio-687 (DSI0_TP_RST         )
 gpio-688 (USB_HUB_GLOBAL_RSTz |p5-hog              ) out hi
 gpio-689 (LVDS_BKLT_EN        )
 gpio-690 (CAN0_nEN            |standby             ) out lo
 gpio-691 (WL_HOST_WAKE        )
 gpio-692 (BT_HOST_WAKE        )
 gpio-693 (USER_LED2           )
 gpio-694 (USER_BUT2           |menu                ) in  lo IRQ
 gpio-695 (UART1_nSHDN         )
 gpio-696 (UART1_MODE_SEL      )
 gpio-697 (DE485_F232          )
 gpio-698 (UART1_LB            )

gpiochip5: GPIOs 699-714, parent: i2c/2-0021, 2-0021, can sleep:
 gpio-699 (CSI0_OE             )
 gpio-700 (CSI0_SHUTTER        )
 gpio-701 (CSI0_TRIGGER        )
 gpio-702 (CSI0_STROBE         )
 gpio-703 (DSI_LED_COMM        )
 gpio-704 (MCU_LIGHT_INTn      )
 gpio-705 (MCU_TEMP_INTn       )
 gpio-706 (M2_BT_DEV_WAKE      )
 gpio-707 (AUDIO_GPIO          )
 gpio-708 (nFAN_OUT            )
Using GPIOs
To access GPIOs from userspace applications, use the libgpiod library. This library provides tools for interacting with Linux GPIO devices. Here are some common usage examples:
List all available GPIO chips:
phyboard-lynx-am62pxx-1:~# gpiodetect
gpiochip0 [4201000.gpio] (24 lines)          # MCU_GPIO0
gpiochip1 [600000.gpio] (92 lines)           # GPIO0
gpiochip2 [601000.gpio] (52 lines)           # GPIO1
gpiochip3 [tps65219-gpio.2.auto] (3 lines)   # PMIC GPIO (WKUP_I2C0 @ 0x30)
gpiochip4 [2-0020] (16 lines)                # TCA6416A U73 on I2C1 @ 0x20
gpiochip5 [2-0021] (16 lines)                # TCA6416A U74 on I2C1 @ 0x21
Display detailed GPIO chip information (names, consumers, direction, active state, and flags):
phyboard-lynx-am62pxx-1:~# gpioinfo -c gpiochip2
Read the value of a GPIO (e.g GPIO 36 from chip2):
phyboard-lynx-am62pxx-1:~# gpioget -c gpiochip2 36
Set the value of GPIO 36 on chip2 to 0 and exit tool:
phyboard-lynx-am62pxx-1:~# gpioset -z -c gpiochip2 36=0
Note
Interacting with a Signal as GPIO requires a proper muxing. The signal needs to be muxed in mux mode 7 (GPIO).
GPIOs via sysfs
Warning
Accessing GPIOs via sysfs is deprecated. We strongly encourage using libgpiod instead.
Sysfs GPIO access is no longer enabled by default. To enable it, enable CONFIG_EXPERT & CONFIG_GPIO_SYSFS in the kernel configuration.
Using LEDs
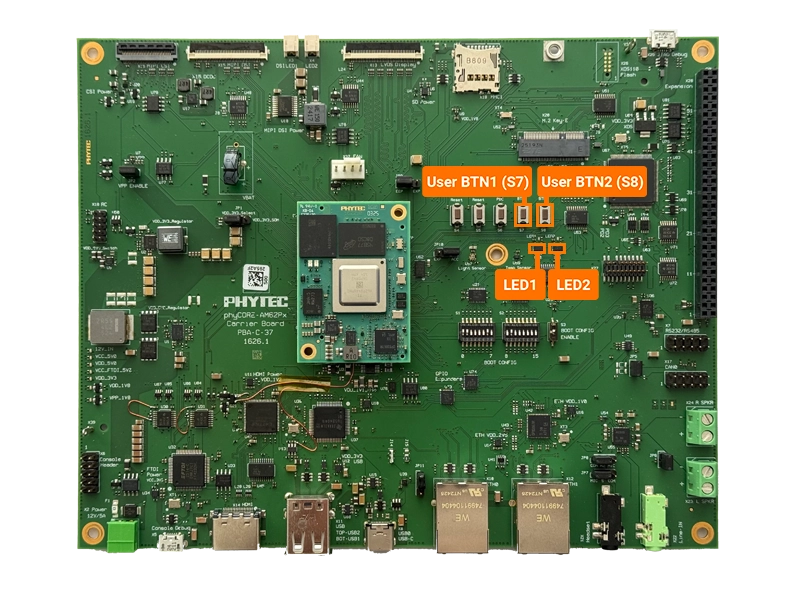
The phyBOARD-Lynx AM62Px features several user-controllable LEDs that are connected to GPIO pins. While these LEDs can be controlled through the standard GPIO interface, Linux provides a dedicated LED subsystem that offers a more convenient way to manage them.
LED Control Interface
The LED subsystem is accessible through the sysfs interface at /sys/class/leds/. Each LED has its own directory containing control files:
brightness: Write values to control the LED state0turns the LED offAny non-zero value turns the LED on
max_brightness: Read-only file showing the maximum brightness valuetrigger: Allows setting automatic triggers (e.g., heartbeat, disk activity)
Note
While the interface supports brightness levels, most onboard LEDs are simple on/off LEDs without hardware brightness control. Any non-zero brightness value will simply turn them on.
Available LEDs
To list all available LEDs on your system:
phyboard-lynx-am62pxx-1:~# ls /sys/class/leds/
green:heartbeat@  mmc0::@  mmc1::@
Controlling LEDs
You can control LEDs using simple shell commands:
To toggle the LEDs ON:
phyboard-lynx-am62pxx-1:~# echo 255 > /sys/class/leds/led-1/brightness
To toggle the LEDs OFF:
phyboard-lynx-am62pxx-1:~# echo 0 > /sys/class/leds/led-1/brightness
Advanced Usage
For more details about LED configuration, refer to the Linux kernel documentation at https://www.kernel.org/doc/Documentation/leds/leds-class.txt
Set LED triggers (e.g., for heartbeat effect):
phyboard-lynx-am62pxx-1:~# echo heartbeat > /sys/class/leds/green\:heartbeat/trigger
Disable LED trigger:
phyboard-lynx-am62pxx-1:~# echo none > /sys/class/leds/green\:heartbeat/trigger