eMMC
Flashing the eMMC SD Card
The phyCORE-i.MX7 development kit is delivered with a pre-flashed eMMC. The following instructions for flashing images from a Network will be useful if you want to:
Flash images because eMMC is empty
Upgrade to a new release
Use custom built images
Pre-built images are available on PHYTEC’s Artifactory. If you have built your own images by following the :ref: buildBSP-7 guide, then the images are located in: $YOCTO_DIR/build/tmp/deploy/images/imx7d-phyboard-zeta-004/
Note that the names of the images differ between releases. YOCTO_IMAGE in the instructions below refers to the Yocto image name that was used to build the image, and YOCTO_MACHINE refers to the machine that was selected to build the image. Refer to the “Built Images” section of the Quickstart pertaining to the specific release you are using for clarification on image names.
Setup
You will have to expand the rootfs partition of the SD Card such that it is large enough to hold your SD Card Image. This step needs to be performed only once for a given SD Card:
Take your bootable SD Card and connect it to your Ubuntu Host Machine.
In the Terminal, install gparted:
Host (Ubuntu)sudo apt-get install gparted
Run gparted:
Host (Ubuntu)sudo gparted
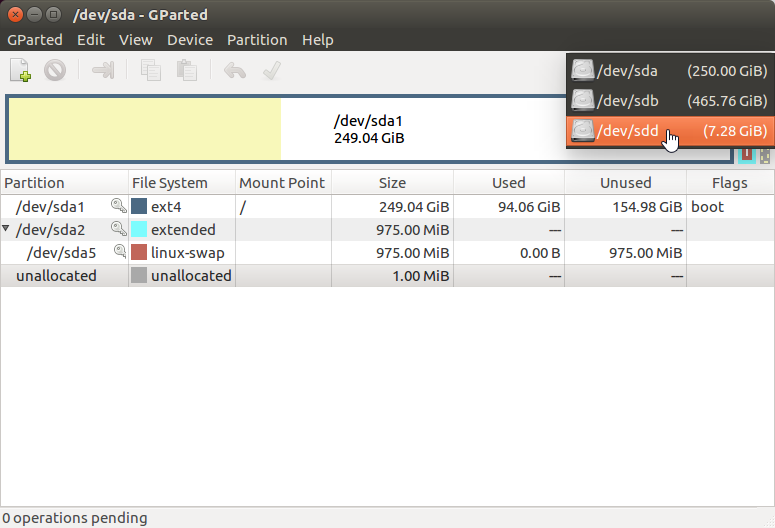
Select the bootable SD Card in the upper right drop down menu:
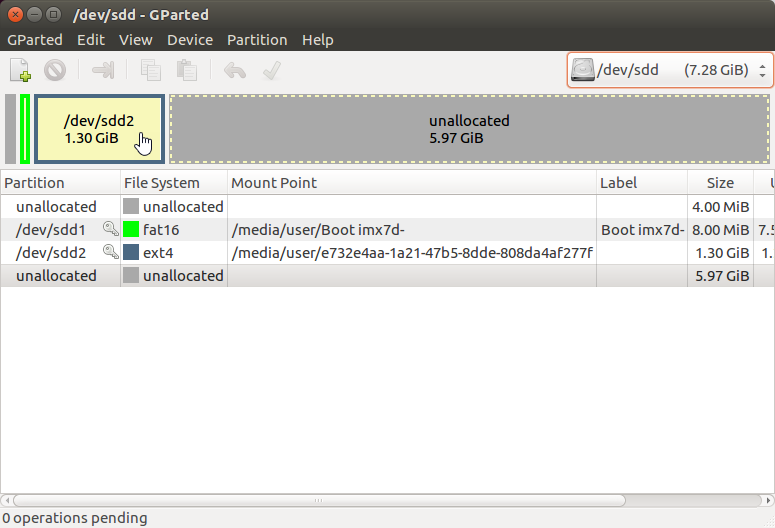
Select the rootfs partition:
Select the Resize/Move button at the top toolbar:

Enter the maximum size of the partition as the new size before hitting the Resize button:

Apply the operation:
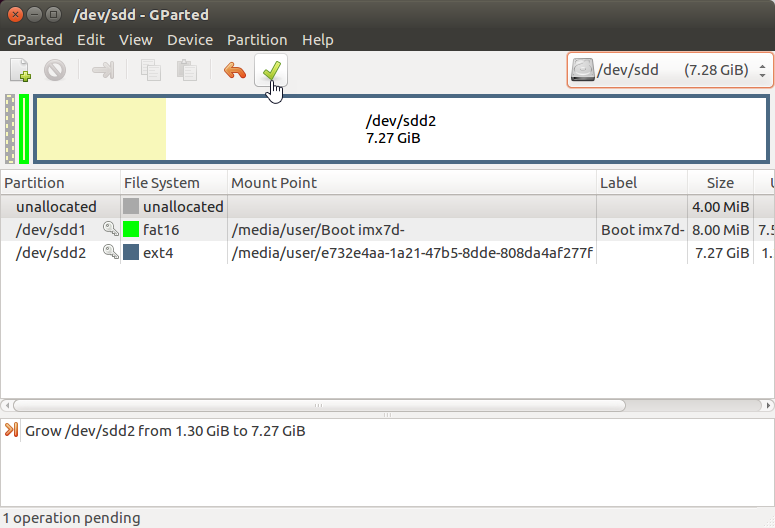
Once the partition is successfully resized, close gparted. You will need this reformatted SD Card to complete the rest of this guide.
Download the following files to your Ubuntu Host Machine or locate the ones you built.
SD Card Image - (you only need this file to flash the eMMC, the rest are for demonstrating how to update specific components on your eMMC and are not necessary)
Copy the downloaded files to the SD Card:
Host (Ubuntu)sudo cp ~/Downloads/fsl-image-validation-imx-imx7d-phyboard-zeta-004.sdcard.bz2 /media/user/e732e4aa-1a21-47b5-8dde-808da4af277f/home/root #optional files sudo cp ~/Downloads/zImage /media/user/e732e4aa-1a21-47b5-8dde-808da4af277f/home/root sudo cp ~/Downloads/zImage-imx7d-phyboard-zeta-004.dtb /media/user/e732e4aa-1a21-47b5-8dde-808da4af277f/home/root sudo cp ~/Downloads/u-boot.imx /media/user/e732e4aa-1a21-47b5-8dde-808da4af277f/home/root sudo cp ~/Downloads/fsl-image-validation-imx-imx7d-phyboard-zeta-004.ext4 /media/user/e732e4aa-1a21-47b5-8dde-808da4af277f/home/root
Safely eject your SD Card and connect it to your phyCORE-i.MX7 development kit.
Configure your phyCORE-i.MX7 development kit to boot from SD Card and boot into Linux. See :ref: bootswitches-7 for more information.
Flash the eMMC
Since the UUIDs of the partitions in the sdcard image do not change, it is recommended that you manually format the SD card if you plan on using it after flashing the image to eMMC, otherwise if using the sdcard image for both eMMC and SD, mmcblk0p1 and mmcblk1p1 as well as mmcblk0p2 and mmcblk1p2 will have the same UUID.
Lets ensure that the file transferred successfully to the target.
Target (Linux)ls ~
You should see the file fsl-image-validation-imx-imx7d-phyboard-zeta-004.sdcard.bz2 listed in the output of the above command.
Unmount the eMMC:
Target (Linux)umount /run/media/mmcblk2p*
Now flash the eMMC:
Target (Linux)bzip2 -dc fsl-image-validation-imx-imx7d-phyboard-zeta-004.sdcard.bz2 | sudo dd of=/dev/mmcblk2 bs=1MB && sync
Now you are set to boot from eMMC. Poweroff the board, adjust the boot switches to boot from eMMC and then give it a shot!
Updating Individual Images
Updating individual images is not necessary if you just performed the steps above. The SD Card image contains everything it needs to configure your eMMC to boot into Linux (the SD Card Image contains the kernel, device tree, boot-loader and root filesystem). Updating each of these individually is only necessary if you made some change to the component in question and your eMMC has previously been flashed.
Warning
The following instructions assume that you are booted into Linux from an SD Card.
Linux/DTB
Copy the kernel and device tree to the boot partition of the SD Card:
Target (Linux)cp ~/zImage /run/media/mmcblk2p1 cp ~/zImage-imx7d-phyboard-zeta-004.dtb /run/media/mmcblk2p1/oftree
Notice that we changed the name of the device tree when we transferred it to the phyCORE-i.MX7. This is because U-Boot expects the device tree to be named oftree.
U-Boot
Unmount the eMMC:
Target (Linux)umount /run/media/mmcblk2p*
Now write U-Boot:
Target (Linux)sudo dd if=u-boot.imx of=/dev/mmcblk2 bs=512 seek=2 conv=fsync
Root Filesystem
Boot Options in U-Boot
The target can be booted from on-board media. In our standard configuration, this BSP release loads the kernel and root filesystem from MMC if an SD card is inserted in the micro SD card slot. If no SD card is present, it will boot from eMMC.
Stand Alone SD/MMC Card Boot
- This is the default boot configuration. Simply type the following:
- Target (U-Boot)
boot
Tip
You can always reset the boot environment settings back to their defaults with the following command:
Target (U-Boot)env default -f -a saveenv reset
Stand Alone eMMC Boot
By default, the U-Boot environment is configured to autodetect which mmc interface U-boot was booted from (See Boot Configurations) and boot the kernel and root file system from the same device. However, if you would like to boot Linux from eMMC regardless of the boot source for U-Boot, then disable auto-detection and set the mmc boot device to mmc1 by modifying the environment as follows:
Target (U-Boot)setenv mmcautodetect no setenv mmcdev 1 setenv mmcroot '/dev/mmcblk2p2 rootwait rw' saveenv reset
After resetting the board, let it boot fully into Linux.
Flashing the eMMC from a Network
The phyCORE-i.MX7 development kit is delivered with a pre-flashed eMMC. The following instructions for flashing images from a Network will be useful if you want to:
Flash images because eMMC is empty
Upgrade to a new release
Use custom built images
Pre-built images are available on PHYTEC’s Artifactory. If you have built your own images by following the :ref: buildBSP-7 guide, then the images are located in: $YOCTO_DIR/build/tmp/deploy/images/imx7d-phyboard-zeta-004/
Note that the names of the images differ between releases. YOCTO_IMAGE in the instructions below refers to the Yocto image name that was used to build the image, and YOCTO_MACHINE refers to the machine that was selected to build the image. Refer to the “Built Images” section of the Quickstart pertaining to the specific release you are using for clarification on image names.
Setup
You will have to expand the rootfs partition of the SD Card such that it is large enough to hold your SD Card Image. This step needs to be performed only once for a given SD Card:
Take your bootable SD Card and connect it to your Ubuntu Host Machine.
In the Terminal, install gparted:
Host (Ubuntu)sudo apt-get install gparted
Run gparted:
Host (Ubuntu)sudo gparted
Select the bootable SD Card in the upper right drop down menu:
Select the rootfs partition:
Select the Resize/Move button at the top toolbar:
Enter the maximum size of the partition as the new size before hitting the Resize button:
Apply the operation:
Once the partition is successfully resized, close gparted. You will need this reformatted SD Card to complete the rest of this guide.
Download the following files to your Ubuntu Host Machine or locate the ones you built.
SD Card Image - (you only need this file to flash the eMMC, the rest are for demonstrating how to update specific components on your eMMC and are not necessary)
Configure your phyCORE-i.MX7 development kit to boot from SD Card and boot into Linux. See :ref: bootswitches-7 for more information.
Note
You will have to make a valid connection between your phyCORE-i.MX7 development kit and your Local Area Network. Please see the :ref: eth-7 guide for more information.
Once booted into Linux, enter the following command to find your phyCORE-i.MX7’s IPv4 address:
Target (Linux)ifconfig
Expected Outputroot@imx7d-phyboard-zeta-004:~# ifconfig eth0 Link encap:Ethernet HWaddr 50:2d:f5:0b:44:80 inet addr:192.168.3.147 Bcast:192.168.3.255 Mask:255.255.255.0 inet6 addr: fe70::532d:f4bf:fe1b:4570/64 Scope:Link UP BROADCAST RUNNING MULTICAST DYNAMIC MTU:1500 Metric:1 RX packets:1039100 errors:0 dropped:0 overruns:0 frame:0 TX packets:838837 errors:0 dropped:0 overruns:0 carrier:0 collisions:0 txqueuelen:1000 RX bytes:753235205 (718.3 MiB) TX bytes:41375018 (39.4 MiB) eth1 Link encap:Ethernet HWaddr 50:3d:f4:0b:44:81 UP BROADCAST MULTICAST DYNAMIC MTU:1500 Metric:1 RX packets:0 errors:0 dropped:0 overruns:0 frame:0 TX packets:0 errors:0 dropped:0 overruns:0 carrier:0 collisions:0 txqueuelen:1000 RX bytes:0 (0.0 B) TX bytes:0 (0.0 B) lo Link encap:Local Loopback inet addr:127.0.0.1 Mask:255.0.0.0 inet6 addr: ::1/128 Scope:Host UP LOOPBACK RUNNING MTU:65536 Metric:1 RX packets:6 errors:0 dropped:0 overruns:0 frame:0 TX packets:6 errors:0 dropped:0 overruns:0 carrier:0 collisions:0 txqueuelen:1000 RX bytes:1416 (1.3 KiB) TX bytes:1416 (1.3 KiB)
We can see in the above example that the IPv4 address is 192.168.3.147
Flash the eMMC
Transfer the complete SD Card Image to the target (replace the X’s with the IPv4 address of your phyCORE-i.MX7):
Host (Ubuntu)sudo scp ~/Downloads/fsl-image-validation-imx-imx7d-phyboard-zeta-004.sdcard.bz2 root@XXX.XXX.XXX.XXX:~
Lets ensure that the file transferred successfully to the target.
Target (Linux)ls ~
You should see the file fsl-image-validation-imx-imx7d-phyboard-zeta-004.sdcard.bz2 listed in the output of the above command.
Unmount the eMMC:
Target (Linux)umount /run/media/mmcblk2p*
Now flash the eMMC:
Target (Linux)bzip2 -dc fsl-image-validation-imx-imx7d-phyboard-zeta-004.sdcard.bz2 | sudo dd of=/dev/mmcblk2 bs=1MB && sync
Now you are set to boot from eMMC. Poweroff the board, adjust the boot switches to boot from eMMC and then give it a shot!
Updating Individual Images
Updating individual images is not necessary if you just performed the steps above. The SD Card image contains everything it needs to configure your eMMC to boot into Linux (the SD Card Image contains the kernel, device tree, boot-loader and root filesystem). Updating each of these individually is only necessary if you made some change to the component in question. The following instructions assume that you are booted into Linux from an SD Card and that your phyCORE-i.MX7 development kit is already connected to your Local Area Network.
Linux/DTB
Transfer the kernel and device tree to the target (replace the X’s with the IPv4 address of your phyCORE-i.MX7). Since the eMMC is already partitioned and mounted we can just transfer these files directly to the eMMC:
Host (Ubuntu)sudo scp ~/Downloads/zImage root@XXX.XXX.XXX.XXX:/run/media/mmcblk2p1 sudo scp ~/Downloads/zImage-imx7d-phyboard-zeta-004.dtb root@XXX.XXX.XXX.XXX:/run/media/mmcblk2p1/oftree
Notice that we changed the name of the device tree when we transferred it to the phyCORE-i.MX7. This is because U-Boot expects the device tree to be named oftree.
Lets ensure that the file transferred successfully to the target.
Target (Linux)ls /run/media/mmcblk2p1You should see the files zImage and oftree listed in the output of the above command.
U-Boot
Transfer the new U-Boot image to the target (replace the X’s with the IPv4 address of your phyCORE-i.MX7):
Host (Ubuntu)sudo scp ~/Downloads/u-boot.imx root@XXX.XXX.XXX.XXX:~
Unmount the eMMC:
Target (Linux)umount /run/media/mmcblk2p*
Now write U-Boot:
Target (Linux)sudo dd if=u-boot.imx of=/dev/mmcblk2 bs=512 seek=2 conv=fsync
Root Filesystem
Transfer the new U-Boot image to the target (replace the X’s with the IPv4 address of your phyCORE-i.MX7):
Host (Ubuntu)sudo scp ~/Downloads/fsl-image-validation-imx-imx7d-phyboard-zeta-004.ext4 root@XXX.XXX.XXX.XXX:~
Unmount the eMMC’s rootfs partition:
Target (Linux)umount /run/media/mmcblk2p2
Flash the root filesystem to the eMMC’s 2nd partition:
Target (Linux)dd if=fsl-image-validation-imx-imx7d-phyboard-zeta-004.ext4 of=/dev/mmcblk2p2 bs=1M && sync
Boot Options in U-Boot
The target can be booted from on-board media. In our standard configuration, this BSP release loads the kernel and root filesystem from MMC if an SD card is inserted in the micro SD card slot. If no SD card is present, it will boot from eMMC.
Stand Alone SD/MMC Card Boot
This is the default boot configuration. Simply type the following:
Stand Alone eMMC Boot
By default, the U-Boot environment is configured to autodetect which mmc interface U-boot was booted from (See Boot Configurations) and boot the kernel and root file system from the same device. However, if you would like to boot Linux from eMMC regardless of the boot source for U-Boot, then disable auto-detection and set the mmc boot device to mmc1 by modifying the environment as follows:
Target (U-Boot)setenv mmcautodetect no setenv mmcdev 1 setenv mmcroot '/dev/mmcblk2p2 rootwait rw' saveenv reset
After resetting the board, let it boot fully into Linux.