SD Card
Create a Bootable SD Card
In order to create a bootable SD card a BSP image has to be flashed onto it. Flashing is a term used to describe the process of burning software images to a flash memory storage device, hence flashing. This section of the guide will outline the steps for flashing the complete .wic.xz image format to an SD Card. The .wic.xz image format is a compressed binary consisting of all the necessary binaries, as well information about the require disk partitions needed for booting the phyCORE-AM57x into Linux. This includes the bootloader, kernel and root filesystem.
In order to boot the phyCORE-AM57x development kit into Linux, it must load valid software from a memory storage device. It is typical for production systems to boot software from an onboard (non-removable) memory storage device such as eMMC memory but booting from an SD Card is more convenient during development. The phyCORE-AM57x development kit is configured to boot from an SD Card by default.
A pre-configured SD Card should have been included in the box with your development kit but this guide will walk through the creation of a bootable SD Card using Pre-Built Binaries or images you have generated on your own by following the Build the BSP guide.
Requirements
SDHC SD card, at least 4GB (Included in development kit)
SD card reader
Ubuntu 20.04 LTS, 64-bit Host Machine with root permission. (For Updating Individual Parts)
If using a virtual machine, VMWare Workstation, VMWare Player, and VirtualBox are all viable solutions.
Windows 10
If flashing whole default wic.xz image onto SD card.
Download Pre-Built Binaries (unless using custom image)
phytec-qt5demo-image-phycore-am57xx-1.wic.xz
Note
If you have built your own images by following the Build the BSP guide, then the images are located in: $YOCTO_DIR/build/arago-tmp-external-linaro-toolchain/deploy/images/<MACHINE>/
Flashing SD Card with Pre-Built Binaries
Windows 10
Download the SD card flasher app BalenaEtcher
Download the prebuilt SD card image Pre-Built Binaries.
Now that your system is setup, use the BalenaEtcher SD card flasher to create a bootable SD card.
Open BalenaEthcher and select “Flash from file”.
Select the ‘phytec-qt5demo-image-phycore-am57xx-1.wic.xz’ SD card image file from your Downloads folder.
Then insert the SD card into the SD card reader.
Click on “Select Target” and select the SD card.
Begin flashing the SD card by pressing “Flash!”
Once BalenaEtcher is done flashing the SD card image, eject the SD card from the Host PC and insert the SD card into the development kit.
See the section “Booting from SD Card” for more information.
Linux (Ubuntu)
Download the pre-built Pre-Built Binaries for the latest BSP release and navigate to the location of these files using your Linux Host Machine:
Host (Ubuntu)cd ~/Downloads
Run the following command without the SD card connected to the host machine.
Host (Ubuntu)ls /dev/sd*
Connect the SD card to the Ubuntu host machine.
Run the following command again with the SD card connected to the host machine.
Host (Ubuntu)ls /dev/sd*
Unmount the SD card from the host machine. Do not remove the card from the machine.
Host (Ubuntu)umount /dev/sdX*
Start with a clean SD card by deleting any previous partitions on the device.
Host (Ubuntu)fdisk /dev/sdX # Use the following command sequence for reference once in the fdisk interactive session. d # delete partition (you will need to repeat this for every partition present) w # write the changes to the disk
Navigate to the directory containing the ‘.wic.xz’ file you wish to flash. This might be wherever you downloaded the pre-built image or it could be the deployment directory of your local BSP build at $YOCTO_DIR/build/arago-tmp-external-linaro-toolchain/deploy/images/<MACHINE>/
Host (Ubuntu)cd <image location>
Flash the .wic.xz image to the SD Card:
Host (Ubuntu)sudo xz -dc phytec-qt5demo-image-phycore-am57xx-1.wic.xz | sudo dd of=/dev/sdc bs=4M conv=fsync
Re-insert the SD card into the SD card reader to see the newly flashed partitions.
Two USB partitions should appear. Double click both. There should be a /boot and /root partition.
Unmount the partitions before removing the SD card:
Host (Ubuntu)umount /media/<user>/boot /media/<user>/rootfs
The SD card should now be ready to boot your target hardware into Linux. For more information on how to boot from SD card, see the section “Booting from SD Card”.
Updating Individual Parts (Advanced, Linux Machine)
Once the SD card has been formatted the first time via flashing the complete .wic.xz image, you do not need to flash the entire contents of the SD Card image again to update the image components. The bootloader, kernel and root filesystem can be updated individually (depending on the changes being tested) to potentially save a lot of time during development. Find all the images and binaries for the phyCORE-AM57x development kit on the Pre-Built Binaries page.
Updating the Kernel
First, remove the existing kernel image and device tree files pertaining to your SOM (in this example we will assume the SOM is the standard kit option PCM-057-41300111I):
Host (Ubuntu)sudo rm /media/<user>/root/boot/zImage sudo rm /media/<user>/root/boot/oftree sudo rm /media/<user>/root/boot/am57xx-phytec-pcm-948.dtb #Base Kernel Device Tree Blob for CB sudo rm /media/<user>/root/boot/am5728-phytec-pcm-948-40300111I.dtb #Base Kernel Device Tree Blob
Note
You may notice that the /boot directory contains many dtb files for various SOM configurations. This is because the EEPROM on the phyCORE-AM57x SOM is used to help select which device tree should be used at boot. This strategy allows for the use of a single software image to support all phyCORE-AM57x variants.
For more information on this EEPROM mechanism, checkout Using the PHYTEC EEPROM Flashtool guide.
Load the new Linux kernel and device tree images to the SD Card.
Host (Ubuntu)sudo cp zImage /media/<user>/root/boot/ sudo cp oftree /media/<user>/root/boot/ sudo cp am57xx-phytec-pcm-948.dtb /media/<user>/root/boot/ sudo cp am5728-phytec-pcm-948-40300111I.dtb /media/<user>/root/boot/ sudo sync /media/<user>/root/boot/Note
The U-boot expects the kernel to be named zImage and the standard SOM dtb file to be named am5728-phycore-kit-41300111i.dtb for the standard development kit.
Updating the Root Filesystem
Delete the contents of the current root filesystem:
Host (Ubuntu)sudo rm -rf /media/<user>/root/*
Extract the new filesystem to the SD Card:
Host (Ubuntu)sudo tar -xf phytec-qt5demo-image-phycore-am57xx-1.tar.xz -C /media/<user>/root/ && sync
Note
The tar.xz file can be found and downloaded in the first link on the Pre-Built Binaries page.
Updating the Bootloader
Remove the existing U-Boot and MLO images:
Host (Ubuntu)sudo rm /media/<user>/boot/u-boot.img sudo rm /media/<user>/boot/MLO
Copy the new images to the SD Card:
Host (Ubuntu)sudo cp u-boot.img /media/<user>/boot/u-boot.img && sync sudo cp MLO /media/<user>/boot/MLO && sync
Booting from SD Card
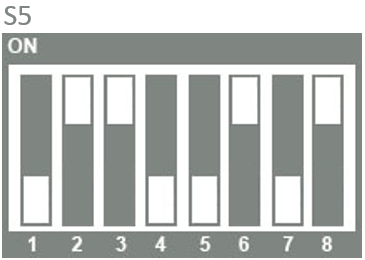
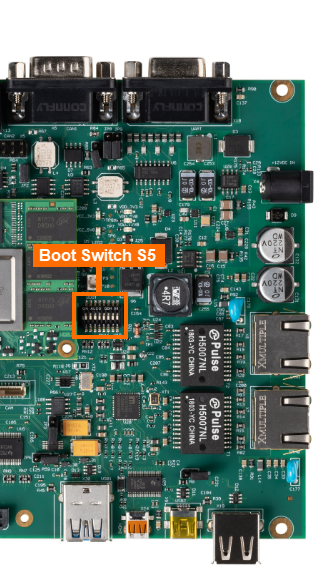
The phyCORE-AM57x development kit is configured to boot from an SD card slot by default and basic steps for performing this and establishing serial communication are outlined in the Quickstart. Boot switch (aka DIP switches) settings determine the location and method the boot ROM loads the first stage bootloader into memory before executing it.
With the phyCORE-AM57x Development kit powered off, set the following boot switch settings to boot from the SD Card.