NAND
The phyCORE-AM57x can be populated with an NAND flash as an easy to program nonvolatile memory. This guide will walk through how to flash a new image, custom image or default image onto NAND. For more information on NAND Flash Memory, please see section 6.3 in the Hardware Manual.
Note
NAND boot is only supported by the phycore-am57xx-3 BSP image. Please see the Release Notes for further details on phycore-am57xx-3.
Requirements
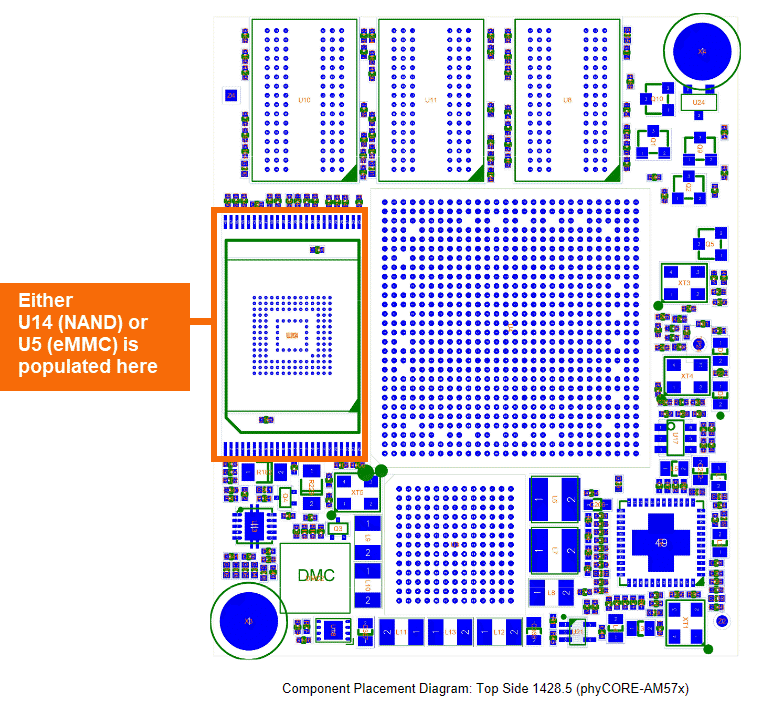
In order to flash images to the NAND storage device you will first need a SOM with NAND Flash populated. NAND is not offered on the standard development kit. The PCM-057-40A00111I.A0 SOM configuration is the one that is specifically needed for this guide. The SOM can have either an eMMC (U5) or NAND (U14) component placed here, as this is a multi-footprint design.
Download the following pre-built binaries or use your custom files.
If you have built your own images then the images are located in: $YOCTO_DIR/build/tmp/deploy/images/
Bootable SD Card
Booting from phycore-am57xx-3
Optional CAT5e cable (comes included with the development kit)
Used to transfer binaries to SD card
Optional Network switch connected to a DHCP enabled network
Used to transfer binaries to SD card
Verify NAND
Note
The Linux commands listed in this section will only work correctly if Linux is booted from SD card.
Using an SD card, boot your phyCORE-AM57x SOM with NAND Flash into Linux.
Once logged in as root, run the following command to make sure that NAND was detected and configured.
Target (Linux)dmesg | grep -i 'nand'
Example Outputroot@phycore-am57xx-3:~# dmesg | grep -i nand [ 0.000000] Kernel command line: console=ttyS2,115200n8 root=ubi0:rootfs rw ubi.mtd=NAND.file-system rootfstype=ubifs rootwait=1 [ 8.205078] omap2-nand 8000000.nand: GPIO lookup for consumer rb [ 8.205078] omap2-nand 8000000.nand: using device tree for GPIO lookup [ 8.205108] of_get_named_gpiod_flags: parsed 'rb-gpios' property of node '/ocp/gpmc@50000000/nand@0,0[0]' - status (0) [ 8.205261] nand: device found, Manufacturer ID: 0x2c, Chip ID: 0xd3 [ 8.211639] nand: Micron MT29F8G08ABACAWP [ 8.215698] nand: 1024 MiB, SLC, erase size: 256 KiB, page size: 4096, OOB size: 224 [ 8.223480] omap2-nand 8000000.nand: using prefetch polled xfer mode [ 8.235015] 7 fixed-partitions partitions found on MTD device omap2-nand.0 [ 8.241912] Creating 7 MTD partitions on "omap2-nand.0": [ 8.247283] 0x000000000000-0x000000040000 : "NAND.SPL" [ 8.253540] 0x000000040000-0x000000080000 : "NAND.SPL.backup1" [ 8.260437] 0x000000080000-0x0000000c0000 : "NAND.SPL.backup2" [ 8.267303] 0x0000000c0000-0x000000100000 : "NAND.SPL.backup3" [ 8.274169] 0x000000100000-0x000000300000 : "NAND.u-boot" [ 8.280792] 0x000000300000-0x000000340000 : "NAND.u-boot-env" [ 8.287628] 0x000000340000-0x000040000000 : "NAND.file-system" [ 9.806457] ubi0: attached mtd6 (name "NAND.file-system", size 1020 MiB)
Lets also take the chance to test that the NAND is operational:
Target (Linux)flash_erase /dev/mtd4 0 0 nandtest -p 25 /dev/mtd4
You should see a number of tests execute and pass.
Software Setup
This example will use the Secure Copy Protocol (SCP), which requires a network connection. Discover more mediums that can assist in copying files by following the guide Copying Files to the Device.
Copy the downloaded or custom binaries over to the SD card into the /root partition in the home directory.
Connect the development kit to your local network using either ethernet port.
Confirm the development kit’s ethernet IP address (DHCP). For more information on how to change the from a static IP address to a DHCP address, see the Ethernet interface guide.
Target (Linux)ip addr
Transfer files via Windows Command Prompt or Linux terminal.
Host (Ubuntu or Windows)cd <file location> sudo scp MLO u-boot.img phytec-qt5demo-image-phycore-am57xx-3.ubi root@<devkit_ip_address>:./home/
Flashing NAND
Now lets flash each image:
Target (Linux)#Flash MLO flash_erase /dev/mtd0 0 0 nandwrite -p /dev/mtd0 MLO #Flash MLO into all backup partitions flash_erase /dev/mtd1 0 0 nandwrite -p /dev/mtd1 MLO flash_erase /dev/mtd2 0 0 nandwrite -p /dev/mtd2 MLO flash_erase /dev/mtd3 0 0 nandwrite -p /dev/mtd3 MLO #Flash U-Boot flash_erase /dev/mtd4 0 0 nandwrite -p /dev/mtd4 u-boot.img #Flash the rootfs flash_erase /dev/mtd6 0 0 ubiformat /dev/mtd6 -f phytec-qt5demo-image-phycore-am57xx-3.ubi
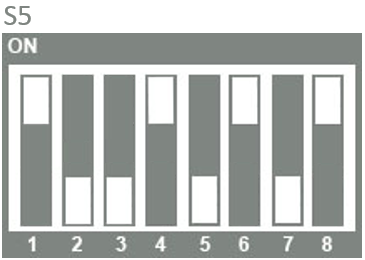
Booting from NAND
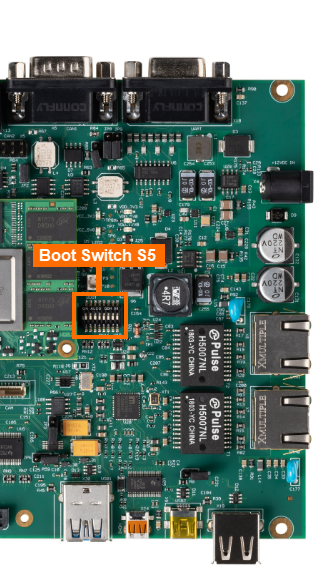
With the phyCORE-AM57x Development kit powered off, set the following boot switch settings to boot from NAND.