Flashing with USB-OTG
The RT1170 supports downloading and flashing SPI-NOR Flash via its USB OTG interface. This section explains how to use NXP’s blhost tool to flash an image from a Linux Ubuntu PC.
Requirements
Hardware
Ubuntu 24.04 LTS or newer
If using a virtual machine, VMWare Workstation, VMWare Player, and VirtualBox are all viable solutions.
Micro-USB to USB-A cable
Software
Prepare the following images by building the firmware (Building the Firmware) or downloading the pre-built versions (Pre-Built Binaries). These images will be used to flash the phyCORE-RT1170 via USB:
* ivt_flashloader.bin
* zephyr.bin
Note
ivt_flashloader.bin is only available via Pre-Built Binaries and is not part of the Zephyr build output.
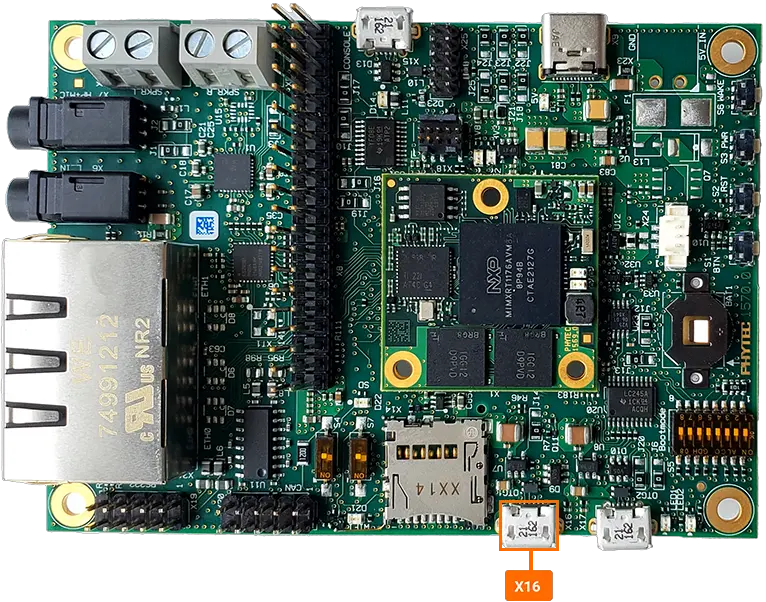
Prepare the Development Kit
The phyCORE-RT1170 development kit is configured to boot from SPI-NOR Flash by default. For flashing via USB-OTG, we need to change the boot configuration to the USB-OTG Serial Downloader mode.
Ensure that switch S7 is set to OFF.
Verify that boot switch S5 is configured for USB-OTG Serial Downloader mode.

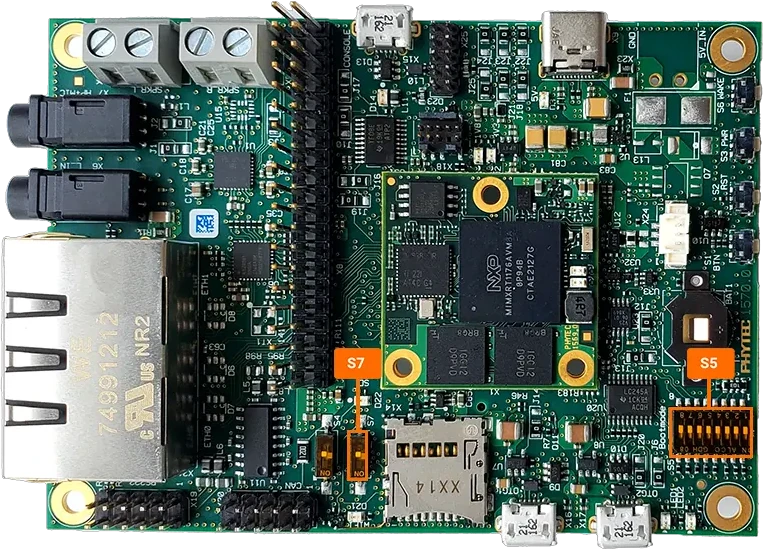
Note
Pay close attention to switch orientation!
Use the provided 5V USB-C power supply to power the phyCORE-RT1170 development kit through the X9 power connector. The system will automatically boot.

Install & Configure SPSDK
Install Python 3, pip, and the virtual environment tools:
sh-host:~$ sudo apt update && sudo apt install python3 python3-pip python3-venv
Create and activate a Python virtual environment in the same folder where your firmware files are located:
sh-host:~$ python3 -m venv myenv
sh-host:~$ source myenv/bin/activate
Install SPSDK using pip:
sh-host:~$ pip install spsdk
Add udev rules to allow SPSDK to access USB devices:
sh-host:~$ cat <<EOF>> 50-nxp.rules
SUBSYSTEM=="hidraw", KERNEL=="hidraw*", ATTRS{idVendor}=="0d28", MODE="0666"
SUBSYSTEM=="hidraw", KERNEL=="hidraw*", ATTRS{idVendor}=="1fc9", MODE="0666"
SUBSYSTEM=="hidraw", KERNEL=="hidraw*", ATTRS{idVendor}=="15a2", MODE="0666"
EOF
sh-host:~$ sudo mv 50-nxp.rules /etc/udev/rules.d/
sh-host:~$ sudo udevadm control --reload-rules
sh-host:~$ sudo udevadm trigger
Verify that the host system can communicate with the RT1170 via USB:
sh-host:~$ blhost -u 0x1fc9:0x013d get-property 1
Response status = 0 (0x0) Success.
Response word 1 = 1258487809 (0x4b030001)
Current Version = K3.0.1
Loading the Flashloader
Load the ivt_flashloader.bin image into the RT1170:
sh-host:~$ blhost -u 0x1fc9:0x013d load-image ivt_flashloader_user.bin
Once loaded, the RT1170 exposes a new USB interface with a different vendor and product ID. Verify the flashloader is running:
sh-host:~$ blhost -u 0x15a2:0x0073 get-property 1
Note
After loading the flashloader, the original USB device ID is no longer valid. Use 0x15a2:0x0073 for all further communication.
Flashing the Firmware
Configure the SPI-NOR Flash memory by selecting the correct instance and settings:
sh-host:~$ blhost -u 0x15a2:0x0073 fill-memory 0x00002000 4 0xCF900001
sh-host:~$ blhost -u 0x15a2:0x0073 configure-memory 9 0x00002000
sh-host:~$ blhost -u 0x15a2:0x0073 fill-memory 0x00002000 4 0xC0000007
sh-host:~$ blhost -u 0x15a2:0x0073 configure-memory 9 0x00002000
You can verify the SPI-NOR was initialized correctly by listing all available memory regions. The FLEX-SPI-NOR section represents the SPI-NOR Flash:
sh-host:~$ blhost -u 0x15a2:0x0073 list-memory
Internal Flash:
Internal RAM:
    Region 0: 0x00000000 - 0x0003FFFF; Total Size: 256.0 kiB
    Region 1: 0x20000000 - 0x2003FFFF; Total Size: 256.0 kiB
    Region 2: 0x20200000 - 0x2037FFFF; Total Size: 1.5 MiB
External Memories:
SEMC-NAND:
  Not Configured
SPI-NAND:
  Not Configured
SD:
  Not Configured
MMC:
  Not Configured
FLEX-SPI-NOR:
  Start Address = 0x30000000  Total Size = 8.0 MiB  Page Size = 256  Sector Size = 4096  Block Size = 65536
SPI-MEM:
  Not Configured
Before flashing, you need to erase the previous content. Two options are available:
1. Erase the entire flash (takes ~15 seconds, so we increase the timeout):
sh-host:~$ blhost -u 0x15a2:0x0073 -t 30000 flash-erase-all 9
2. Erase the first 512 KiB only, sufficient for a Zephyr binary:
sh-host:~$ blhost -u 0x15a2:0x0073 flash-erase-region 0x30000000 0x80000
Now flash the Zephyr binary to the SPI-NOR Flash:
sh-host:~$ blhost -u 0x15a2:0x0073 write-memory 0x30000000 zephyr.bin
Booting the Firmware
Set the boot switch back to QSPI Flash mode and perform a power cycle. The new firmware should now boot successfully.