How to Develop C Applications Using the Eclipse IDE - UNTESTED
This guide will show you how to setup the Eclipse IDE to cross-develop applications for Yocto-based PHYTEC BSPs. This guide was tested and written for use with the phyCORE-i.MX7 development kit, but it should be applicable for other PHYTEC products (more on this to come)!
Note
In order to follow this guide you will first have to build the BSP, in its entirety, on your Host Machine.
If you have never built the BSP before, instructions for setting up your Host environment and building the BSP can be found here (Build the BSP). After completing the build, use the same Terminal session to continue following this guide.
If you have already built the BSP, but are using a new Terminal session since then:
We will need to first re-setup some environment variables to run bitbake commands.
If you followed the BSP Development Guide exactly and used the recommended install directories then the root of your Yocto tree should reside at /opt/PHYTEC_BSPs/yocto_imx7. We will first need to navigate to this directory (if you built your BSP somewhere else just navigate there instead):
Hodt (Ubuntu)cd /opt/PHYTEC_BSPs/yocto_imx7
Set the $YOCTO_DIR environment variable:
Host (Ubuntu)export YOCTO_DIR=`pwd`
Set the TEMPLATECONF variable which is used to set the source of the local configuration files (conf/bblayers.conf and conf/local.conf):
Host (Ubuntu)TEMPLATECONF=$YOCTO_DIR/sources/meta-phytec/meta-phytec-fsl/conf source sources/poky/oe-init-build-env build
Now continue on with the guide using the same Terminal session.
Install the SDK
With your build environment set (see the above NOTE for more information), navigate to the build directory of your BSP:
Host (Ubuntu)cd $YOCTO_DIR/build/
Run the following command to add IDE support to your BSP:
Host (Ubuntu)bitbake meta-ide-support
Now build the SDK installer (this will include a tool-chain consisting of your cross-compiler, linker and assembler):
Host (Ubuntu)MACHINE=imx7d-phyboard-zeta-004 bitbake fsl-image-gui -c populate_sdk
This will take some time to complete.
The “populate_sdk” command will generate a bash script (.sh file) in the $YOCTO_DIR/build/tmp/deploy/sdk directory. Execute the created script to install the SDK on the Host machine by using the following command.
After the script starts it will ask for a directory to install the SDK, I recommend just hitting enter for the default location (/opt/fsl-imx-x11/4.14-sumo).
Host (Ubuntu)./tmp/deploy/sdk/fsl-imx-x11-glibc-x86_64-fsl-image-gui-cortexa7hf-neon-toolchain-4.14-sumo.sh
During the install you should be prompted with a message stating the following:
Expected OutputEach time you wish to use the SDK in a new shell session, you need to source the environment setup script e.g . /opt/fsl-imx-x11/4.14-sumo/environment-setup-cortexa7hf-neon-poky-linux-gnueabi
This message is important to notice. If you open a new Terminal session, you will need to run this command in order to configure your development environment for cross-compiling applications. The “.” at the beginning of this command is the shorthand for “source”.
Install and Setup Eclipse
Download the installer from https://wiki.eclipse.org/Eclipse_Installer
Navigate to the download directory (this might be different on your machine):
Host (Ubuntu)cd ~/Downloads/
Create a directory for installing the Eclipse IDE (you can choose somewhere else to install it if you want):
Host (Ubuntu)mkdir ~/eclipse/
Now unpack the installer tarball to the eclipse install location we just created:
Host (Ubuntu)sudo tar -xvzf eclipse-inst-linux64.tar.gz -C ~/eclipse/
The Eclipse IDE runs on Java so we will need a JDK (Java Development Kit). At the time of writing this article I used the latest JDK13 (jdk-13.0.1_linux-x64_bin.tar.gz) which you can find HERE. Head to that link and download it!
Let’s install the Java package. We are going to stick the JDK right inside the Eclipse installer directory to make our lives easier (you can of course change the install location to suit your needs if you have to):
Host (Ubuntu)sudo tar -xvzf jdk-13.0.1_linux-x64_bin.tar.gz -C ~/eclipse/eclipse-installer/
Before running the Eclipse installer, navigate to the Eclipse installer directory. Change the permissions on the installer configuration file so we can edit it, then modify the installer configuration file so the installer knows where we installed the SDK.
Host (Ubuntu)cd ~/eclipse/eclipse-installer/ sudo chmod 777 eclipse-inst.ini vim eclipse-inst.ini
The last command we used will open the install script in the Vim Text editor (you can use a different editor if you’d like). At the very top of the file, add the following:
eclipse-inst.ini-vm /home/<user>/eclipse/eclipse-installer/jdk-13.0.1/bin/java
Notice that you will have to change the path to reflect your home directory. You must use an absolute path in this file for the script to successfully find your SDK.
Once the installer script is modified, saved, and closed we can actually run it. Lets do that!
Host (Ubuntu)./eclipse-inst
You should eventually be prompted by this window:
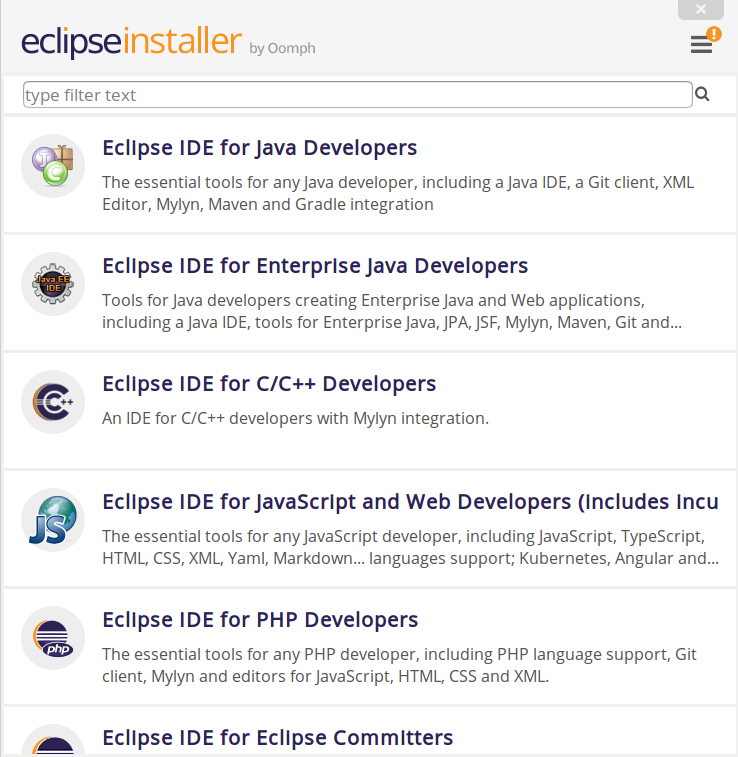
Select “Eclipse IDE for C/C++ Developers”
Select the browse icon on the right of the “Java 1.8+ VM” field and use the GUI to navigate to the JDK directory (~/eclipse/eclipse-installer/jdk-13.0.1) before selecting OK.
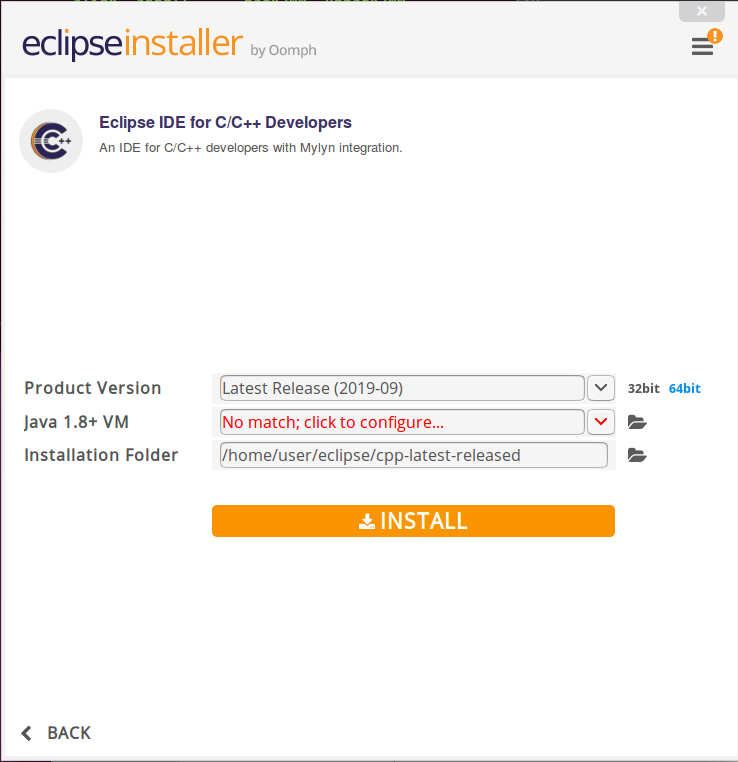
In this step, we are pointing the installer to the root of the JDK directory so that it can recursively search for the Java VM (aka, the Java Runtime Environment) which was included with the JDK installed earlier.
Now Hit that Install Button!
Once installation completes, DON’T Launch the Eclipse IDE! It won’t run properly if we click the very enticing and very green Launch button in the GUI, just exit the installer.
We will have to launch Eclipse directly from the Terminal we were first using in order to have the correct environment.
Launching the Eclipse IDE
Note
In order to launch the Eclipse IDE in the correct environment to cross-compile applications for your target hardware, we will first have to setup a Terminal session to launch Eclipse from.
If you just finished installing the Eclipse IDE using the instructions outlined above in this article :
You are good to go! Continue from here using the same Terminal session you started this guide with.
If you have installed the Eclipse IDE before and are using a new Terminal session:
Each time you wish to cross-compile applications in the Eclipse IDE you will first need to source the environment before launching Eclipse. Eclipse must be launched from the same Terminal session the environment was sourced in.
If you followed the BSP Development Guide exactly and used the recommended install directories then the root of your Yocto tree should reside at /opt/PHYTEC_BSPs/yocto_imx7. We will first need to navigate to this directory (if you built your BSP somewhere else just navigate there instead):
Host (Ubuntu)cd /opt/PHYTEC_BSPs/yocto_imx7Source the environment using the following command:
Host (Ubuntu)source /opt/fsl-imx-x11/4.14-sumo/environment-setup-cortexa7hf-neon-poky-linux-gnueabi
Now continue on with the guide using the same Terminal session.
With the environment set (did you see the NOTE immediately above this sentence?) run the following command to Launch the Eclipse IDE:
Host (Ubuntu)~/eclipse/cpp-latest-released/eclipse/eclipse
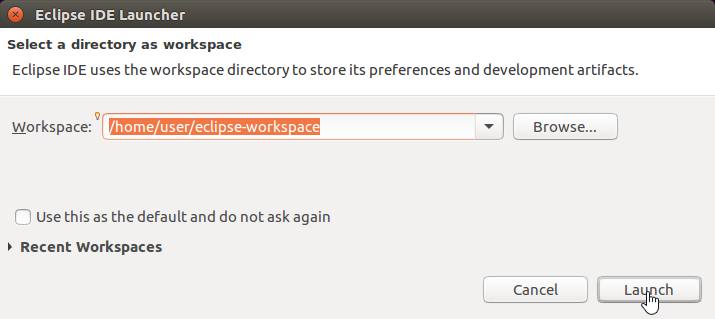
When prompted, select a directory as your workspace (I left it as the default):
Note
Info Banner!
If you have already completed the “Configuring your Workspace” section below this info banner, for a given workspace, then those settings will have been preserved there. If you launched that same workspace in the last step then you can skip the “Configuring your Workspace” section below and go directly to “Creating and Configuring a New Application” (or you can pick up where you left off on an application you have already created and configured).
If this is your first time creating a workspace (or if it is a new one) for cross-compiling applications for your target device, you should begin at this info banner and continue on to the bottom of this article!
Configuring your Workspace
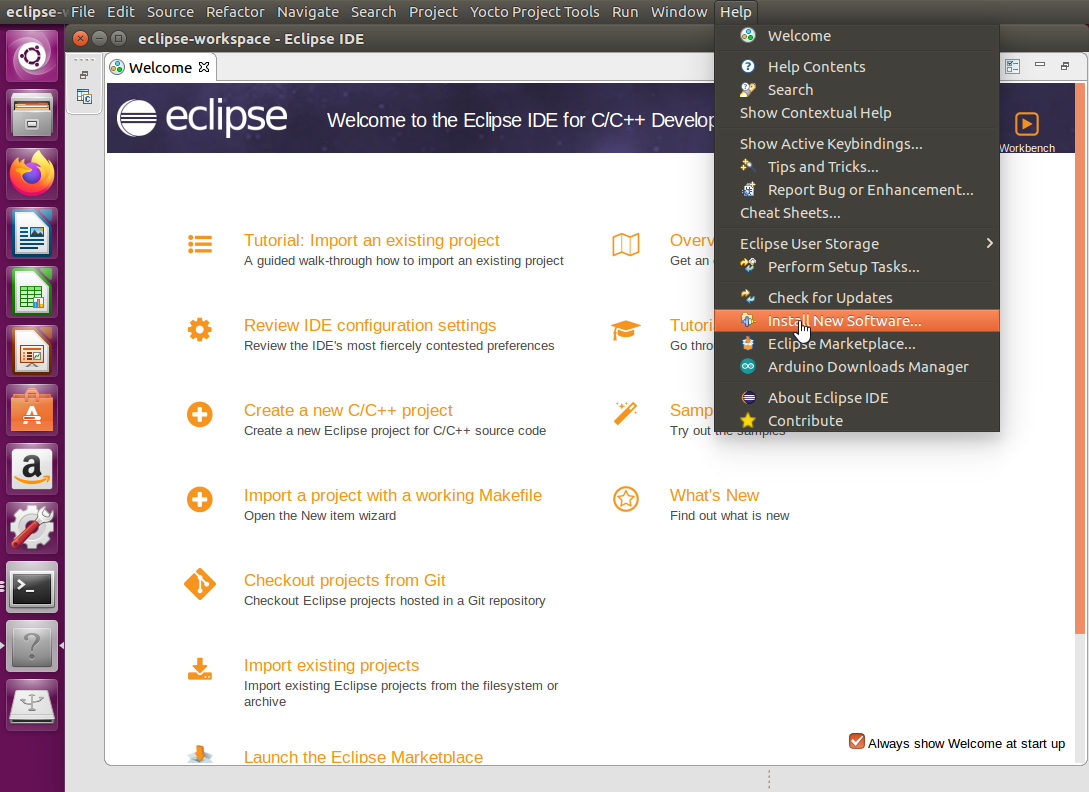
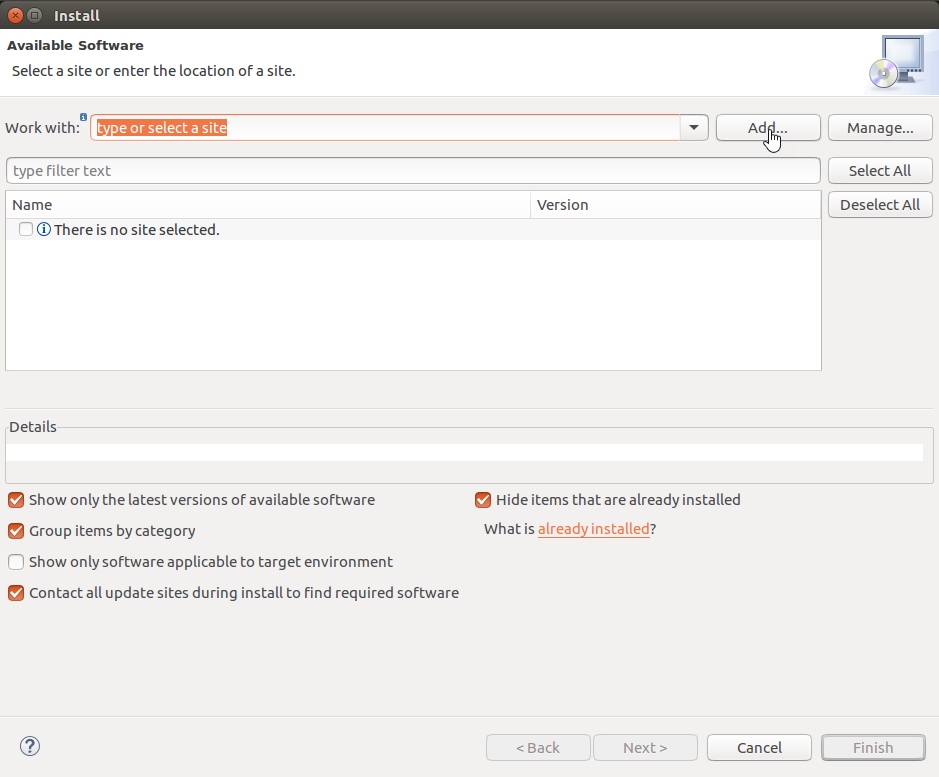
We need to configure this workspace before creating a new project. Navigate to Help → Install New Software:
In the Install window that appears, select “Add…”:
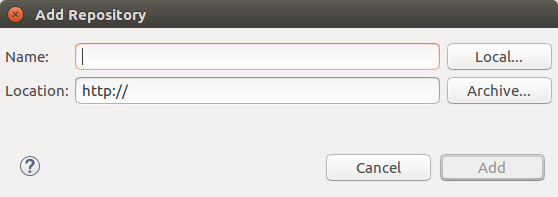
Another window should have popped up for adding a repository.
Head to THIS LINK to find the latest Eclipse plug-in for Oxygen and copy the link address:

Fill out the fields in the “Add Repository” window with these values (the 3rd column titled “Some Notes” contains relevant information but can otherwise be ignored):
Add Repository Field
Value
Some Notes
Name
yocto_plugin
This field could actually be named anything you want
Location
http://downloads.yoctoproject.org/releases/eclipse-plugin/2.6.1/oxygen/
At the time of writing the latest plug-in for Oxygen was 2.6.1 and this is the link address found in the previous step
Now click “Add”.
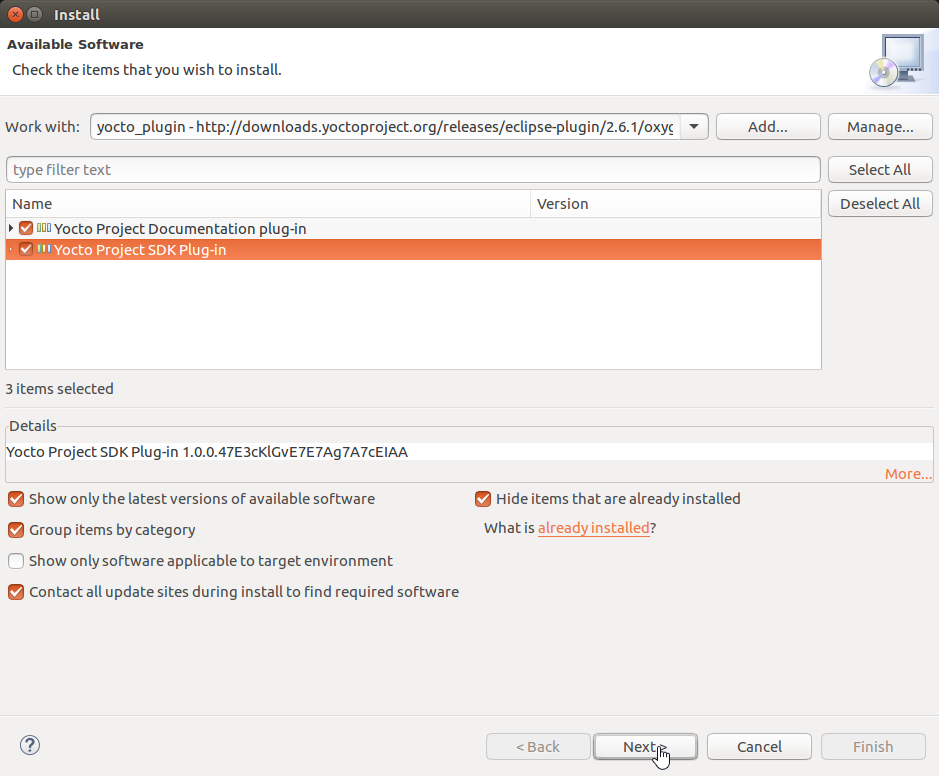
The Install window should now show a couple of plug-in options available for installation. Select all of the plug-ins, select Next a couple of times, accept a license agreement, and finally select Finish once you can.
You should be prompted with a window asking if you would like to restart Eclipse to have the changes take effect. Go ahead and agree to the restart.
If the restart prompt doesn’t appear after a couple of minutes, you can manually trigger a restart by navigating to File → Restart.
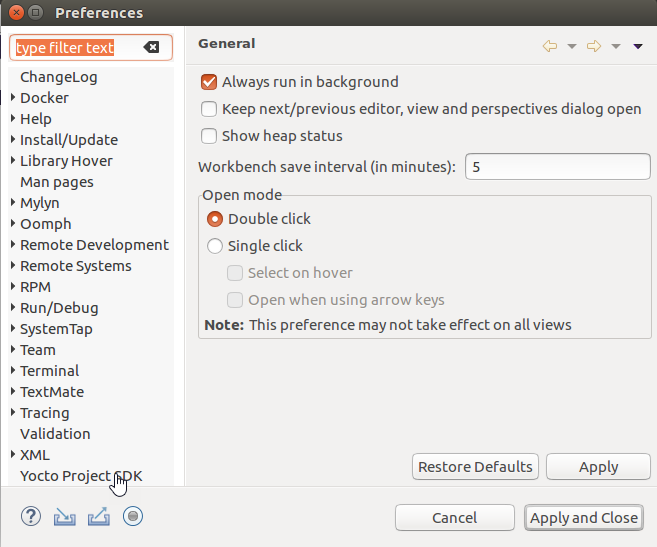
Now with the plug-ins installed, lets configure the workspace to use the SDK we previously setup. Navigate to Window → Preferences:
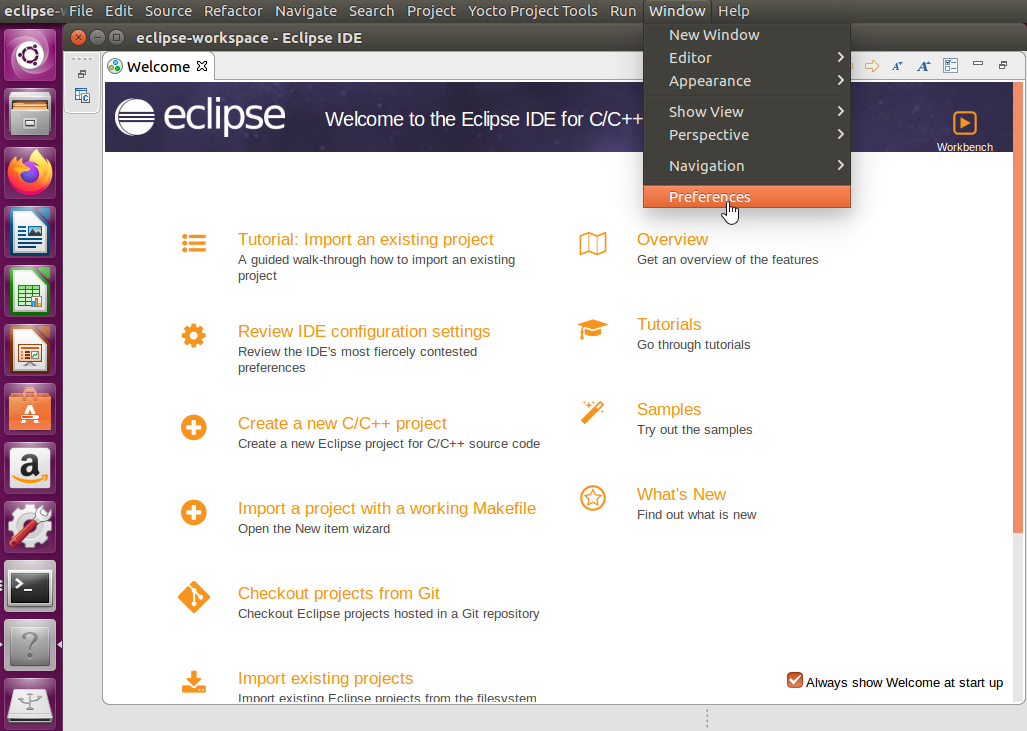
In the Preferences window, in the left side panel, select Yocto Project SDK:
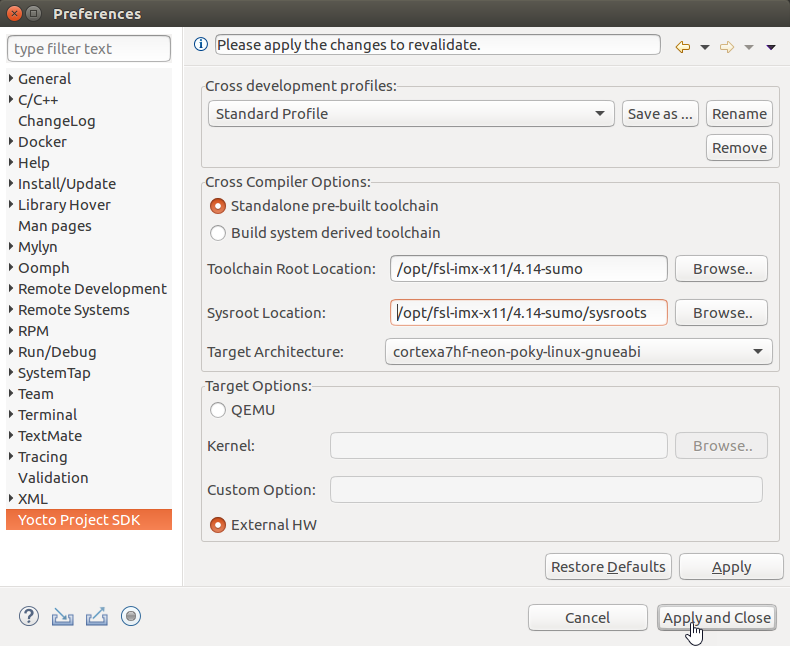
Fill out the fields in the Yocto Project SDK window with the following values (the 3rd column titled “Some Notes” contains relevant information but can otherwise be ignored):
Field |
Value |
Some Notes |
|---|---|---|
Cross Compiler Options |
Standalone pre-built toolchain |
|
Toolchain Root Location |
/opt/fsl-imx-x11/4.14-sumo/ |
If you chose to have the SDK installed in a non-default location make sure you reflect that here |
Sysroots Location |
/opt/fsl-imx-x11/4.14-sumo/sysroots |
If you chose to have the SDK installed in a non-default location make sure you reflect that here |
Target Architecture |
cortexa7hf-neon-poky-linux-gnueabi |
This value should have auto-filled |
Click “Apply and Close” to save the settings.
Creating and Configuring a New C Application
Note
In order to complete the steps outlined in this section you will first need your phyCORE-i.MX7 development kit booted into Linux and connected to the same network as your Host development machine. You will need the IPv4 address of your phyCORE-i.MX7 (See the Ethernet guide for more information).
Now that the workspace is configured to use the toolchain, we need to create a new application and configure it to use the toolchain. We will also configure that application to run on the target hardware. (I know, I know, there are tons of steps). For this article I am just going to setup and build a provided Hello World application, but you can create an empty project to do something else from scratch.
Navigate to File → New → Project:
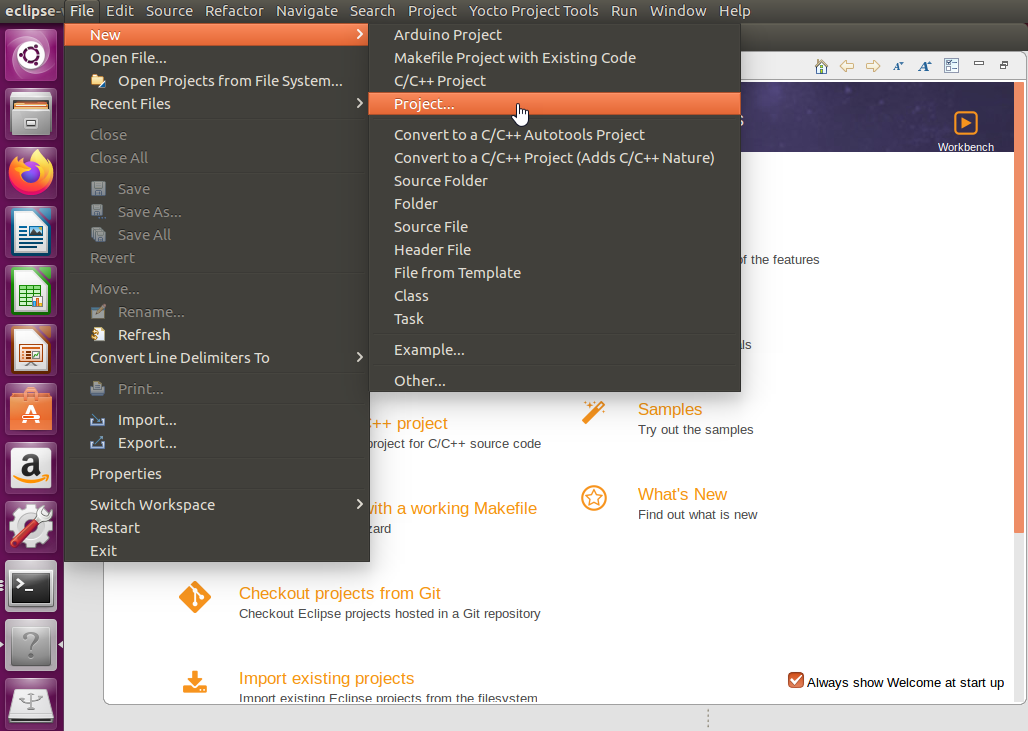
In the New Project window, navigate to C/C++ → C Project:
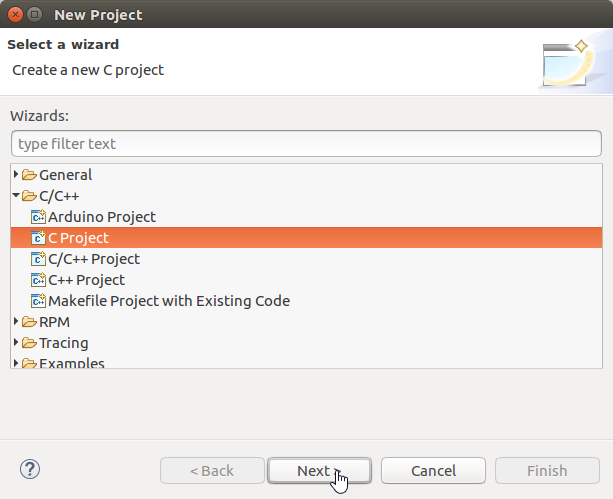
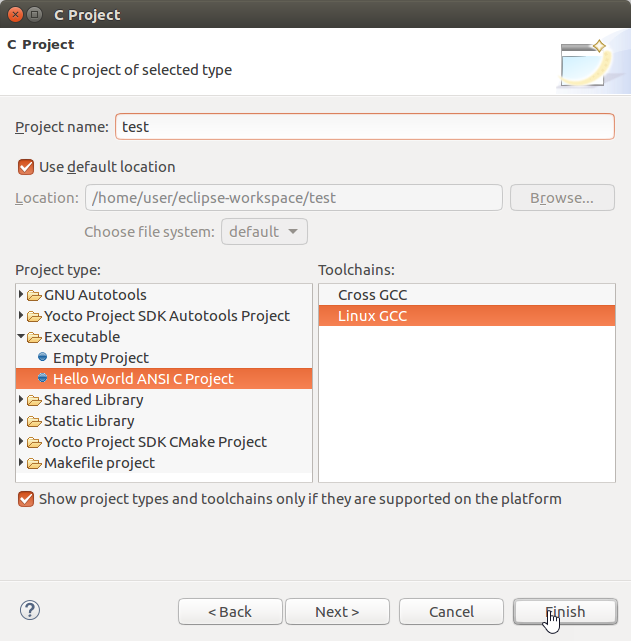
In the C Project window, name the project “test”, select the “Hello World ANSI C Project” under Project Type and select Linux GCC under Toolchains before clicking Finish:
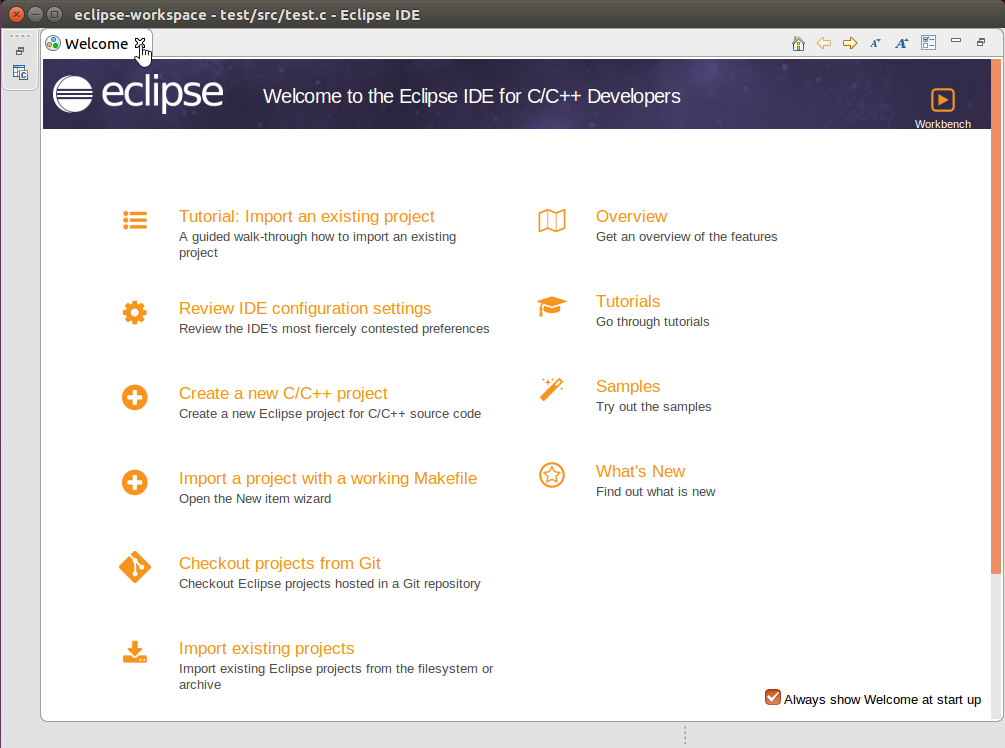
After selecting Finish you might still be on the Welcome page (this definitely confused me). Close that to see the project we just made if it didn’t come up on its own!
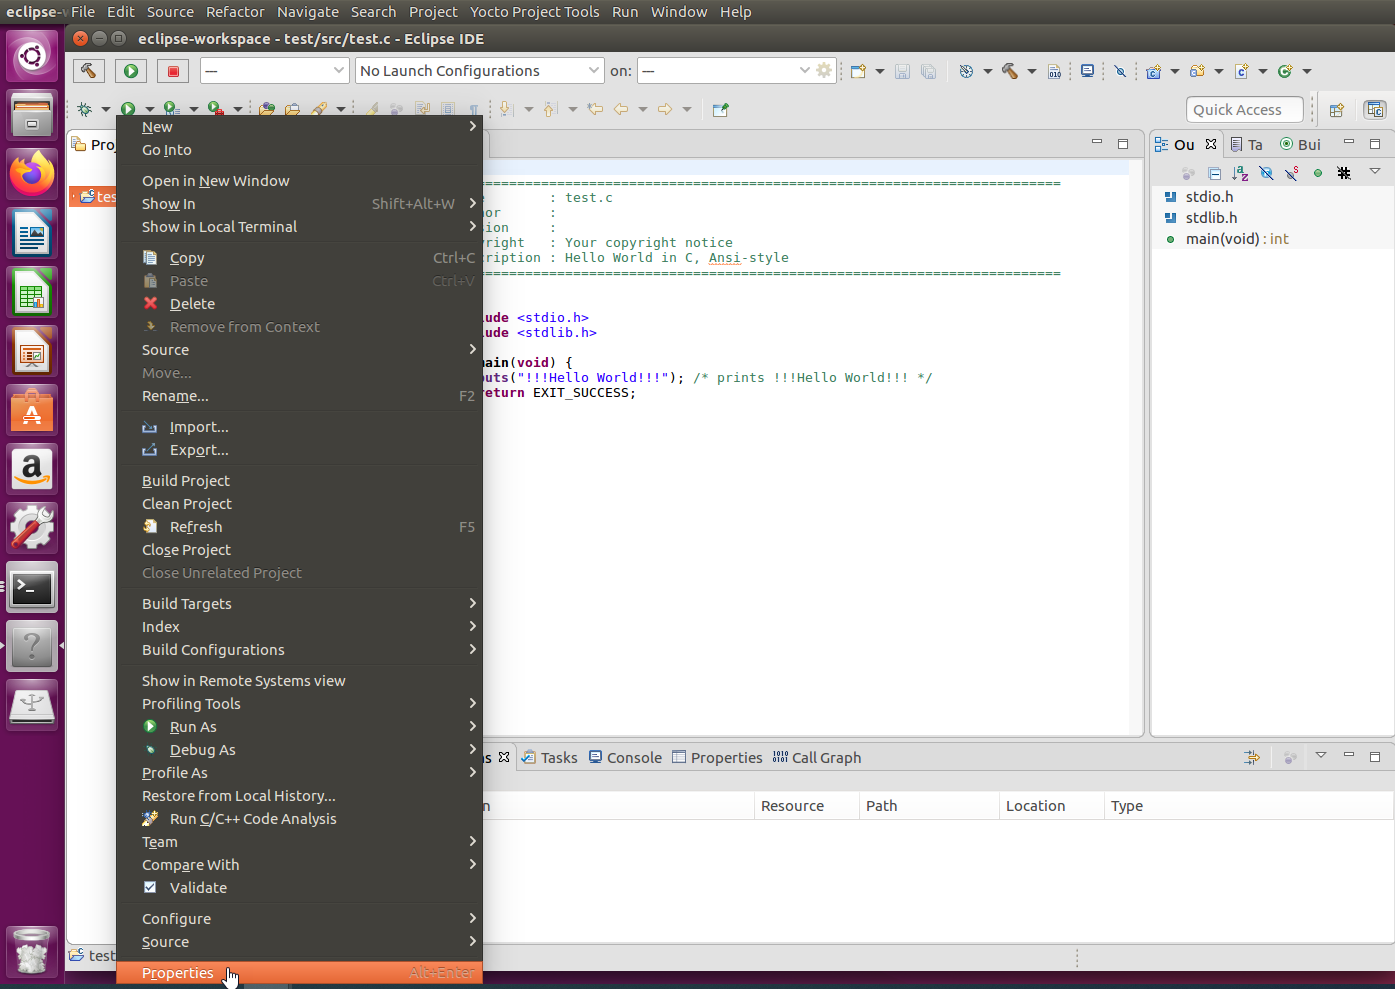
You should see a left side panel called Project Explorer, right click the “test” project folder and navigate to Properties:
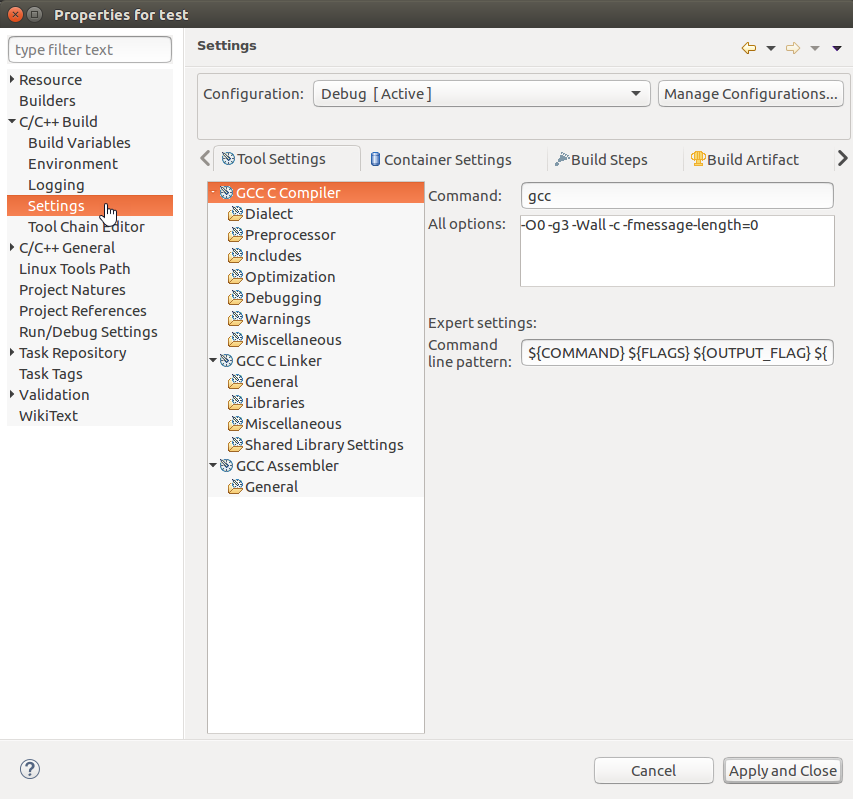
In the Properties for test window, in the left side panel, navigate to C/C++ → Settings:
In the center portion of the window, select GCC C Compiler
Enter the following value into the Command field:
Target (Linux)${CC}
In the center portion of the window, select GCC C Linker:
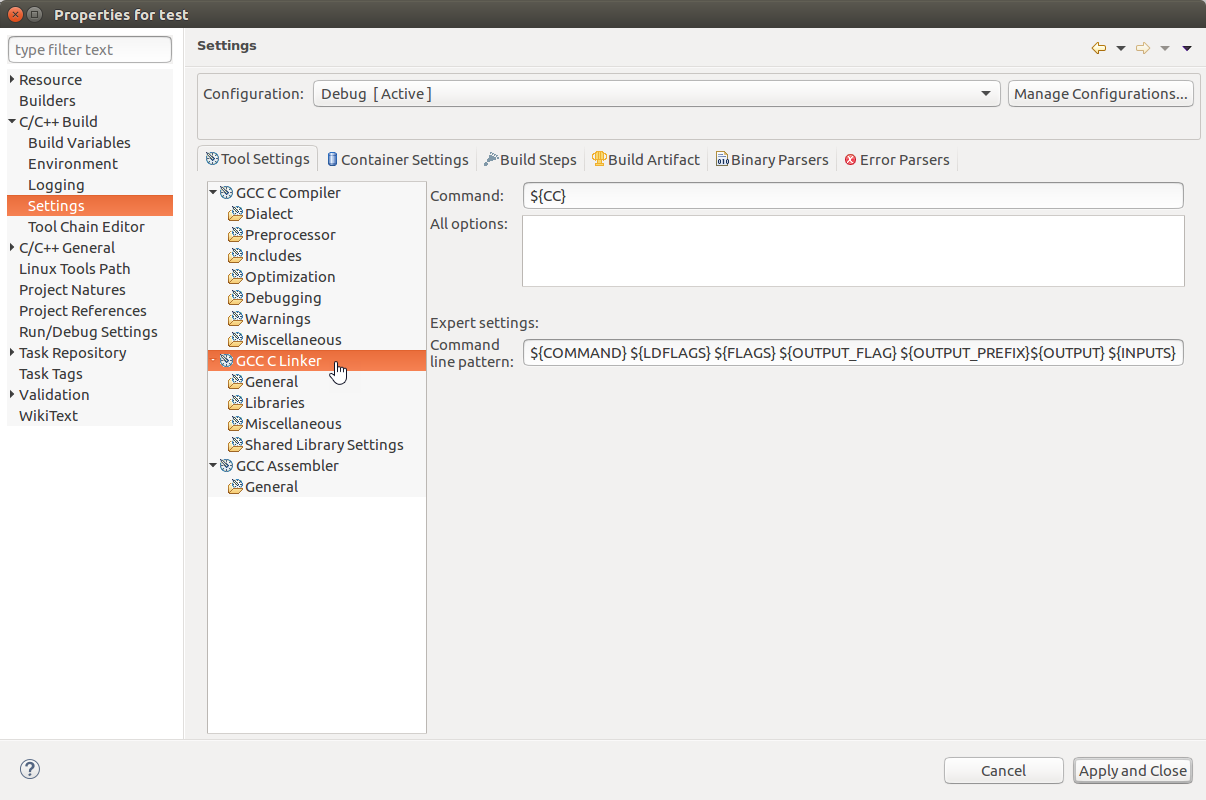
Enter the following value into the Command field:
Host (Ubuntu)${CC}Add in ${LDFLAGS} between ${COMMAND} and ${FLAGS} in the “Command line pattern:” field. This field should now contain the following value:
Host (Ubuntu)${COMMAND} ${LDFLAGS} ${FLAGS} ${OUTPUT_FLAG} ${OUTPUT_PREFIX}${OUTPUT} ${INPUTS}In the center portion of the window, select GCC Assembler:
Enter the following value into the Command field:
Host (Ubuntu)${AS}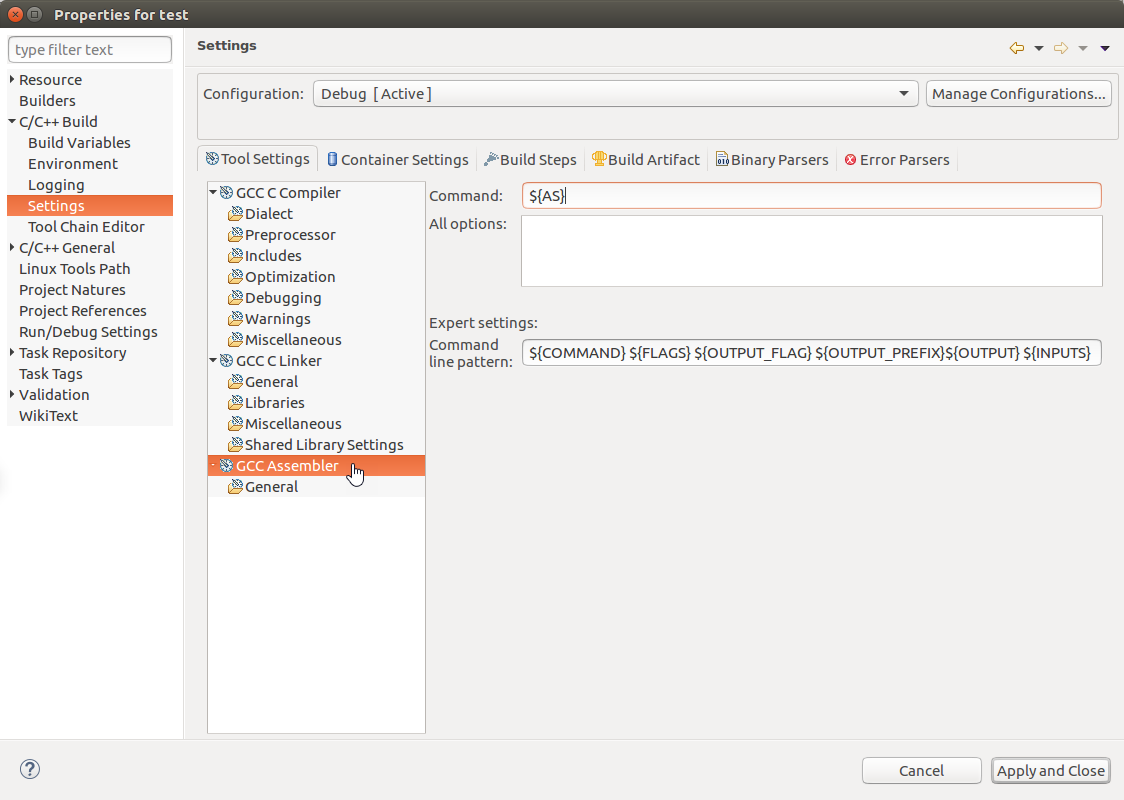
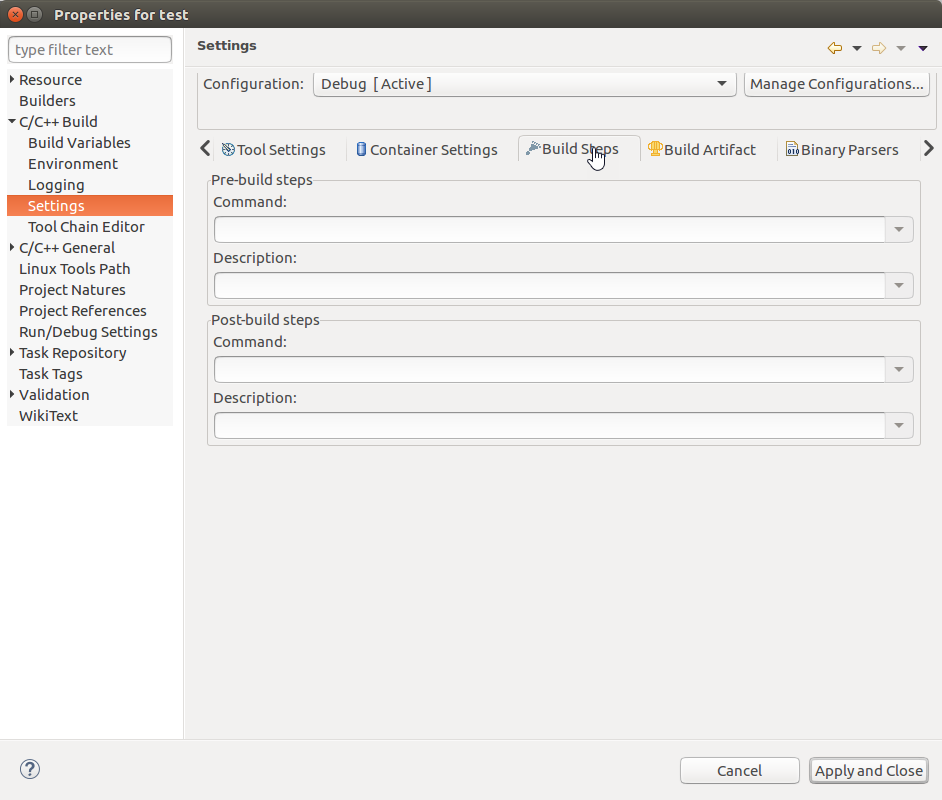
Now select the “Build Steps” tab in the center portion of the window:
In the “Post-build steps” → “Command:” field, fill in the following value (you will need replace the X’s to reflect the IPv4 address of your i.MX7 Development Kit):
Host (Ubuntu)scp ./test root@192.168.xx.xx:/home/root/; ssh root@192.168.xx.xx /home/root/test
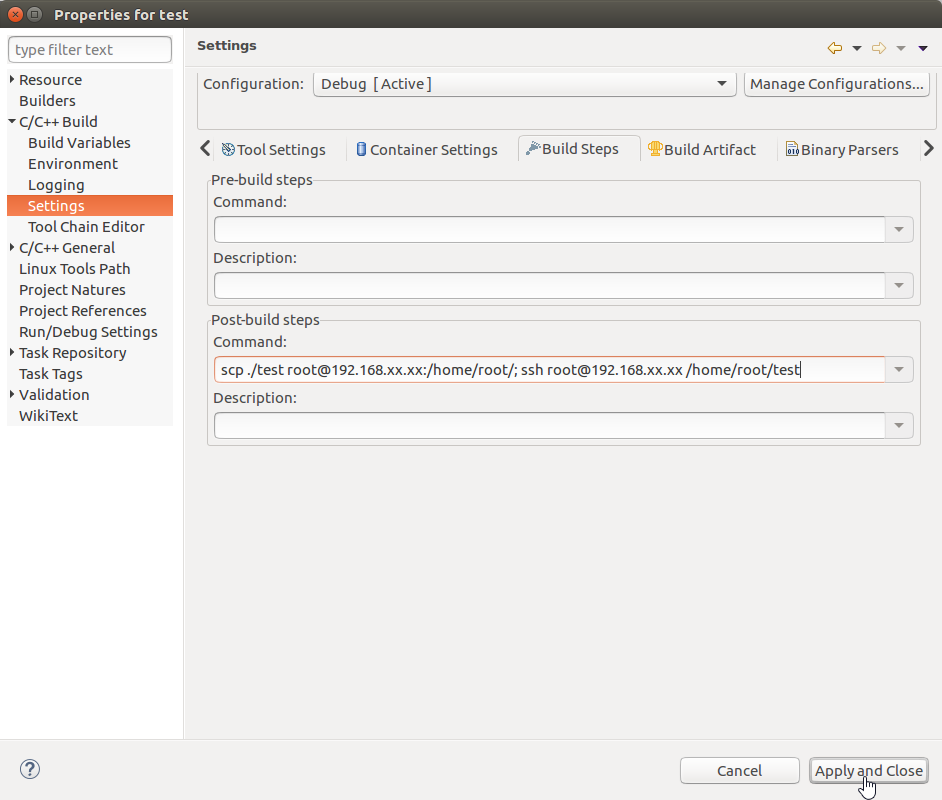
Select Apply and Close.
You made it to the end! Give yourself a big pat on the back!
Now, when you build the project (which can be done by clicking the little hammer icon in the top left or by right clicking the project in the Project Explorer and selecting Build Project) the project will be built using the SDK’s compiler, linker and assembler which allow for the resulting executable to run on our phyCORE-i.MX7 development kit. Since we also specified those post-build steps, Eclipse will automatically copy your executable over to the phyCORE-i.MX7 every time you build the project AND it will ssh into the phyCORE-i.MX7 and run the executable. You can see the resulting “!!!Hello World!!!” message appear right in the IDE’s console!