USB/DFU
Overview
AM62Ax USB peripheral boot (also called device boot) mode receives a second bootloader image from a USB host using the Device Firmware Update (DFU) specification defined by USB-DFU.
This section demonstrates how to use DFU to boot phyCORE-AM62Ax to a U-Boot prompt using a Linux Ubuntu PC.
Setup
Hardware
Ubuntu 22.04 LTS, 64-bit Host Machine
If using a virtual machine, VMWare Workstation, VMWare Player, and VirtualBox are all viable solutions.
USB-C to USB-A cable
Software
Prepare the following U-Boot images for downloading to and booting on the phyCORE-AM62Ax via DFU:
* tiboot3.bin-perif
* tispl.bin
* u-boot.img
tiboot3.bin-perif is built along side tiboot3.bin and is used for periferal boots on the AM62Ax.
Install & Configure Snagboot
Install python3, pip, and swig:
Host (Ubuntu)$ sudo apt update && sudo apt install python3 python3-pip python3-venv swig
Now we can create our python virtual environment in the same folder that we have our U-Boot images
Host (Ubuntu)$ python3 -m venv myenv $ source myenv/bin/activate
Install snagboot in our venv using pip
Host (Ubuntu)$ pip install snagboot
Export our template
Host (Ubuntu)$ snagrecover -t am62x-phyboard-lyra > am62x-phyboard-lyra.yaml
We can cat the template to verify it is exported correctly:
Host (Ubuntu)$ cat am62x-phyboard-lyra.yaml tiboot3: path: tiboot3.bin-perif tispl: path: tispl.bin u-boot: path: u-boot.img
Note
At this point if we run ls our folder should include the following:
$ ls

am62x-phyboard-lyra.yaml
myvenv
tiboot3.bin
tiboot3.bin-perif
tispl.bin
u-boot.img
Booting from USB/DFU
Here are the basic steps for booting from USB/DFU on the phyCORE-AM62Ax development kit. The steps for establishing a serial communication are outlined in the Quickstart.
Note
We should have two terminals open at this point. One for running commands via USB-C and an open Serial connection to see the SoMs boot status.
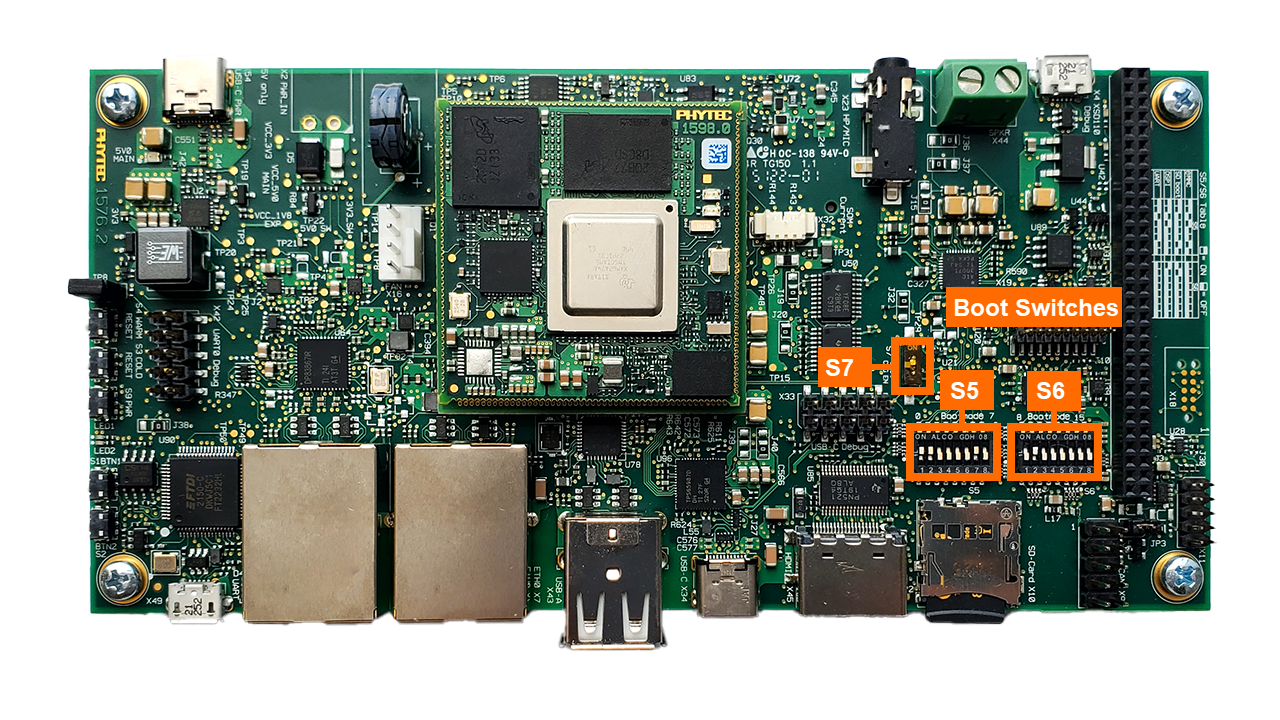
Plug a USB-C cable from the phyCORE-AM62Ax development kit into your Ubuntu machine.
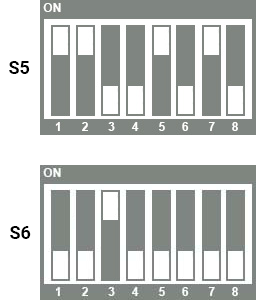
Adjust boot switch settings on the phyCORE-AM62Ax development kit.
Power on the phyCORE-AM62Ax development kit.
At this point you should see the kit appear on your Ubuntu machine via the USB-C. To verify this, run the following:
Host (Ubuntu USB-C)$ lsusb | grep 0451:6165 Bus 005 Device 060: ID 0451:6165 Texas Instruments, Inc. AM62x DFU
We can now begin our recovery by running snagrecover on our Ubuntu machine.
Host (Ubuntu USB-C)$ snagrecover -s am625 -f am62x-phyboard-lyra.yaml --rom-usb 0451:6165 Starting recovery of am625 board Installing firmware tiboot3 Searching for partition id... Downloading file... Could not read status after end of manifest phase Done Done installing firmware tiboot3 Installing firmware u-boot Searching for partition id... Downloading file... Done Done installing firmware u-boot Installing firmware tispl Searching for partition id... Downloading file... Done Sending detach command... Done installing firmware tispl Done recovering am625 board
We should see the following response letting us know the tispl has been loaded:
Host (Ubuntu Serial)NOTICE: BL31: Built : 09:34:15, Aug 24 2023 U-Boot SPL 2023.04-gcef86e5f6f (Nov 01 2023 - 19:03:02 +0000) SYSFW ABI: 3.1 (firmware rev 0x0009 '9.0.5--v09.00.05 (Kool Koala)') SPL initial stack usage: 1856 bytes Trying to boot from DFU
We can then run the next command to load U-Boot:
Host (Ubuntu USB-C)$ snagflash -P dfu -p 0451:6165 -D 1:u-boot.img Downloading u-boot.img to altsetting 1... progress:100% Done Sending DFU detach command... Done
At this point we should see U-Boot start up and attempt to boot from the SD-Card on our Serial terminal. We can stop in U-Boot by pressing any key at this point.
Boot Switch Settings
S7 should be ON to overide default boot settings.