SD Card
Create a Bootable SD card
To create a bootable SD card, you’ll need to flash a BSP image onto it. “Flashing” refers to the process of burning software images onto a flash memory storage device. This guide section outlines three methods for flashing the complete .wic.xz image format to an SD Card. One method involves using USBImager, while the other two methods utilize Linux terminal commands: dd and bmaptool.
The .wic.xz image format is a compressed binary containing all the necessary binaries, as well as information about the required disk partitions needed for booting the phyCORE-i.MX7 into Linux. This includes the bootloader, kernel, and root filesystem.
In order to boot the phyCORE-i.MX7 development kit into Linux, it must load valid software from a memory storage device. It is typical for production systems to boot software from an onboard (non-removable) memory storage device such as eMMC memory but booting from an SD Card is more convenient during development. The phyCORE-i.MX7 development kit is configured to boot from an SD Card by default.
A pre-configured SD Card should have been included in the box with your development kit but this guide will walk through the creation of a bootable SD Card using Pre-Built Binaries or images you have generated on your own by following the Build the BSP guide.
Warning
The machine number for the BSP image can be impacted based on the processor you are developing with. Please refer to the table Part Number Summary in the Release notes to assist in selecting the correct machine.
Using USBImager (Windows)
What you’ll need
SD Card Reader
4GB micro-SD Card or larger (Included in development kit)
Step-by-Step
Download the SD card flasher app USBImager
Extract it to
C:\Program Files.Download the prebuilt SD card image Pre-Built Binaries.
Once your system is set up, use USBImager to create a bootable SD card.
Open USBImager.
Click
...at the top right and select thephytec-qt6demo-image-phyboard-zeta-imx7d-1.rootfs.wic.xzSD card image file from your Downloads folder.Insert the microSD card into the SD card reader.
Select the SD card.
Click
Writeto begin flashing the SD card.Once USBImager has finished flashing, eject the SD card from the host PC and insert into the development kit.
See the section “Booting from SD Card” for more information.
Using bmaptool (Linux)
What you’ll need
Ubuntu 22.04 LTS, 64-bit Host Machine
If using a virtual machine, VMWare Workstation, VMWare Player, and VirtualBox are all viable solutions.
SD Card Reader
4GB micro-SD Card or larger (Included in development kit)
Step-by-Step
Download the prebuilt SD card image (wic.xz) and bmap (.wic.bmap) from the Pre-Built Binaries.
Install bmaptool
host:~$ sudo apt install bmap-tools
Run the following command without the SD card connected to the host machine.
host:~$ ls /dev/sd*
Connect the SD card to the Ubuntu host machine.
Run the following command again with the SD card connected to the host machine.
host:~$ ls /dev/sd*
Unmount the SD card from the host machine. Do not remove the card from the machine.
host:~$ umount /dev/sdX*
Navigate to the directory containing the ‘.wic.xz’ file you wish to flash. This might be wherever you downloaded the pre-built image or it could be the deployment directory of your local BSP build at
$BUILDDIR/deploy/images/phyboard-zeta-imx7d-1/host:~$ cd <image location>
Flash the .wic.xz image to the SD Card using bmaptool:
host:~$ sudo bmaptool copy phytec-headless-image-phyboard-zeta-imx7d-1.wic.xz /dev/sdX
Note
Note that you have to flash the SD Card image to the entirety of the SD Card. This is done by specify the output location of the flashing command without a numbered partition specified. For example, if you try to flash the SD Card image to /dev/sda1 this will result in a improperly formatted SD Card.
Unmount the SD card from your Linux machine.
host:~$ umount /media/<user>/boot /media/<user>/root
Insert the micro-SD card into the development kit. For more information on how to boot from SD card, see the section “Booting from SD Card”.
Using dd (Linux)
What you’ll need
Ubuntu 22.04 LTS, 64-bit Host Machine
If using a virtual machine, VMWare Workstation, VMWare Player, and VirtualBox are all viable solutions.
SD Card Reader
4GB micro-SD Card or larger (Included in development kit)
Step-by-Step
Download the prebuilt SD card image (wic.xz) from the Pre-Built Binaries.
Run the following command without the SD card connected to the host machine.
host:~$ ls /dev/sd*
Connect the SD card to the Ubuntu host machine.
Run the following command again with the SD card connected to the host machine.
host:~$ ls /dev/sd*
Unmount the SD card from the host machine. Do not remove the card from the machine.
host:~$ umount /dev/sdX*
Navigate to the directory containing the ‘.wic.xz’ file you wish to flash. This might be wherever you downloaded the pre-built image or it could be the deployment directory of your local BSP build at $BUILDDIR/deploy/images/phyboard-zeta-imx7d-1/
host:~$ cd <image location>
Flash the .wic.xz image to the SD Card:
host:~$ sudo xz -dc phytec-headless-image-phyboard-zeta-imx7d-1.wic.xz | sudo dd of=/dev/sdX bs=8192 conv=fsync
Note
Note that you have to flash the SD Card image to the entirety of the SD Card. This is done by specify the output location of the flashing command without a numbered partition specified. For example, if you try to flash the SD Card image to /dev/sda1 this will result in a improperly formatted SD Card.
Unmount the SD card from your Linux machine.
host:~$ umount /media/<user>/boot /media/<user>/root
Insert the micro-SD card into the development kit. For more information on how to boot from SD card, see the section “Booting from SD Card”.
Updating Individual Parts of an Image:
Once the SD card has been formatted, you can update the kernel, root filesystem, and u-boot individually as well:
Kernel
If modifying the kernel, remove the existing zImage and device tree binary files (replace ‘<user>’ in the file path accordingly):
Host (Ubuntu)rm /media/<user>/Boot\ imx7d-/zImage && rm /media/<user>/Boot\ imx7d-/oftree
Load the new Linux kernel and device tree binary to the SD Card. By default u-boot loads the file named “oftree” as the DTB, so make sure to rename the device tree that you intend to use:
Host (Ubuntu)cp zImage /media/<user>/Boot\ imx7d-/; sync cp zImage-<YOCTO_MACHINE>.dtb /media/<user>/Boot\ imx7d-/oftree; sync
Tip
If you wish to change the dtb name that is loaded from “oftree” to a specific dtb name, follow these steps to modify the U-Boot environment:
Power on the board and press any key to stop autoboot within 3 seconds to enter U-Boot:
Type the following commands:
Target (U-boot)setenv fdt_file <dtb name> saveenv reset
Root Filesystem
If modifying the root filesystem, remove the existing (replace ‘<user>’ in the file path accordingly):
Host (Ubuntu)sudo rm -rf /media/<user>/<rootfs partition>/*
Load the new filesystem to the SD Card:
Host (Ubuntu)sudo tar -jxf <YOCTO_IMAGE>-<YOCTO_MACHINE>.tar.bz2 -C /media/<user>/<rootfs partition>/; sync
Bootloader
Flash u-boot to the SD card (replace X with the correct letter):
Host (Ubuntu)sudo dd if=u-boot.imx of=/dev/sdX bs=512 seek=2 conv=fsync
Booting from SD Card
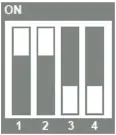
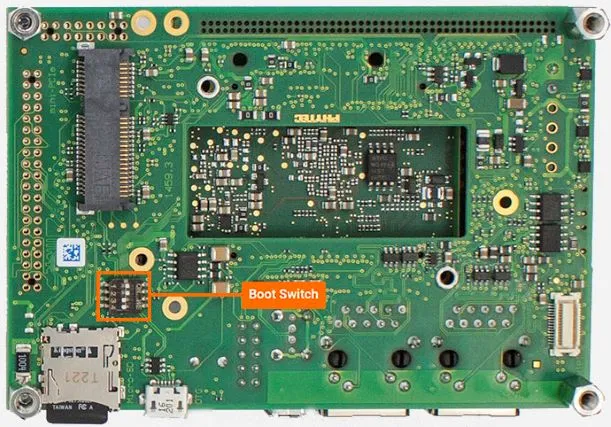
The phyCORE-i.MX7 development kit is configured to boot from an SD Card slot by default and basic steps for performing this and establishing serial communication are outlined in the Quickstart. Boot switch (aka DIP switches) settings determine the location and method the boot ROM loads the first stage bootloader into memory before executing it.
Boot Switch Settings